When not using the builtin Design + Base Template you can also merge Templates manually in code. This allows for a little bit more flexibility when building individual merge strategies.
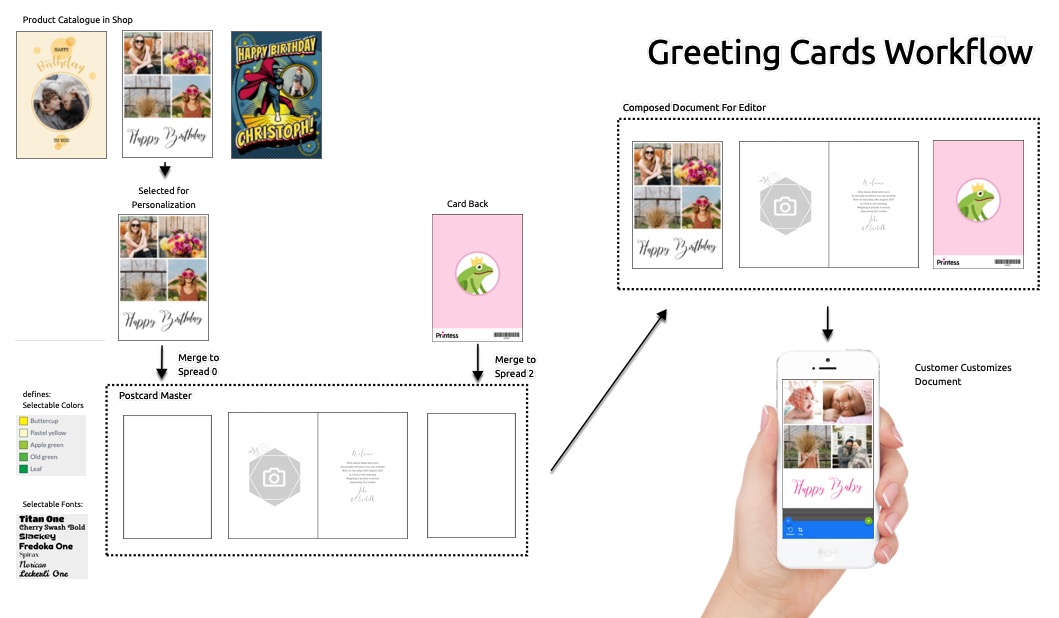
As an example for this have a look at a proposed greeting cards workflow.
In this example the final document to edit for the buyer is created by taking the Greeting Cards Master Document and merging the buyer selected artwork template on Spread 0 and the cards back template to Spread 2.
The Greeting Cards Master Template will not only define the inside pages (which could have been merged as well) but also defines the available buyer colors, buyer fonts, form fields, styles, the final bleed, the pasteboard, usable Snippets, and the basic Buyer Side behaviors like Multi Line text edit mode. This helps to keep your products maintainable. If e.g. an additional font should get added to all products one would only need to edit the master document and not all product artworks.
templateName: "card",
mergeTemplates: [{
  "templateName": "motive1",
  "documentName": "Document", // optional, source-document used for merging. If not supplied Primary or first Document is used. !!! This is the source, not the target document, you can set the target-document in the designer by enabling "Is Merge Target" in the document menu. !!!
  "templateVersion": "published" // Can be draft or published (default) depending on which version of the document should get used
  // spreadIndex: 0; // optional
  // mergeMode: "merge" // other options: "layout-snippet-no-repeat" | "layout-snippet-repeat-all" | "layout-snippet-repeat-inside"
}];
A commonly used approach is to have a Master Template with the final dimensions, general Buyer Side settings, and all available colors and fonts. And then having multiple Artwork Templates which the customer can select directly from the shop catalog.
Example: Let’s say the Master Template is named “Card” and the selected motive is named “Motive1”. When you show the Printess Editor you can now load “Card” via the
templateNameproperty and merge in the document Document from the “Motive1” Artwork Template via themergeTemplatesproperty. WithspreadIndexyou can define the spread number (zero-based) that the merged Template is placed on.
mergeMode By default merge mode for mergeTemplates is set to “merge” what simply merges the content of the merged doc(s) into the Master template. If set to one of the layout snippet modes the content merge will happen as if the pages of the doc had been used as Layout Snippets. This allows for merges which later on will disappear when the buyer selects a different layout.
Merging can also merge multiple documents from one template. Please note that this requires to enable the Is Merge Target property for additional documents and to not! set documentName while merging.
Additional Note: Keep in mind that on a facing-page document each pair of pages counts only as a single spread.
Note: Templates, Resource Libraries and Layout Snippets which include a database can not be merged.
Printess also has a convenient way to test your merge workflows via the Generate Test Link Menu. It always starts with the Printess Template you would like to merge to your Master Template. And it takes the following steps:
Open the Printess Template you would like to merge to your Master Template. Never use the Master Template to start with.
Click on the Template Type Button  in the center of the Top Menu Bar to open the Template Type dialog.

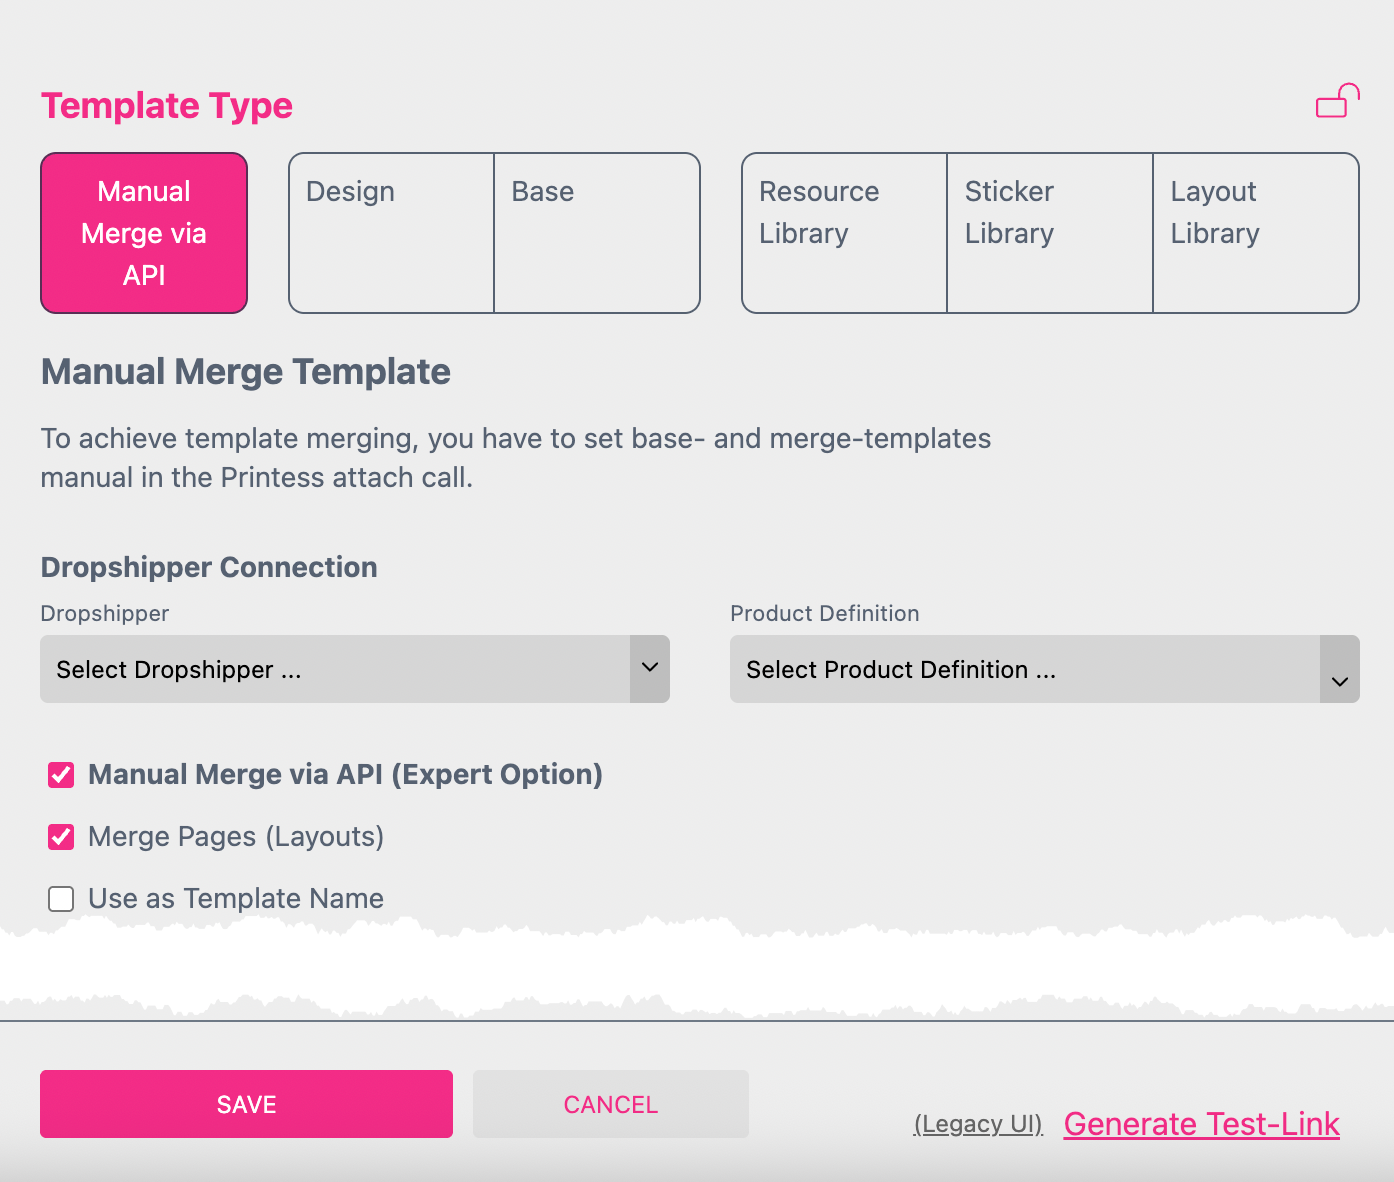
If you press the SAVE button your Printess Template is changed to the Type MANUAL MERGE.
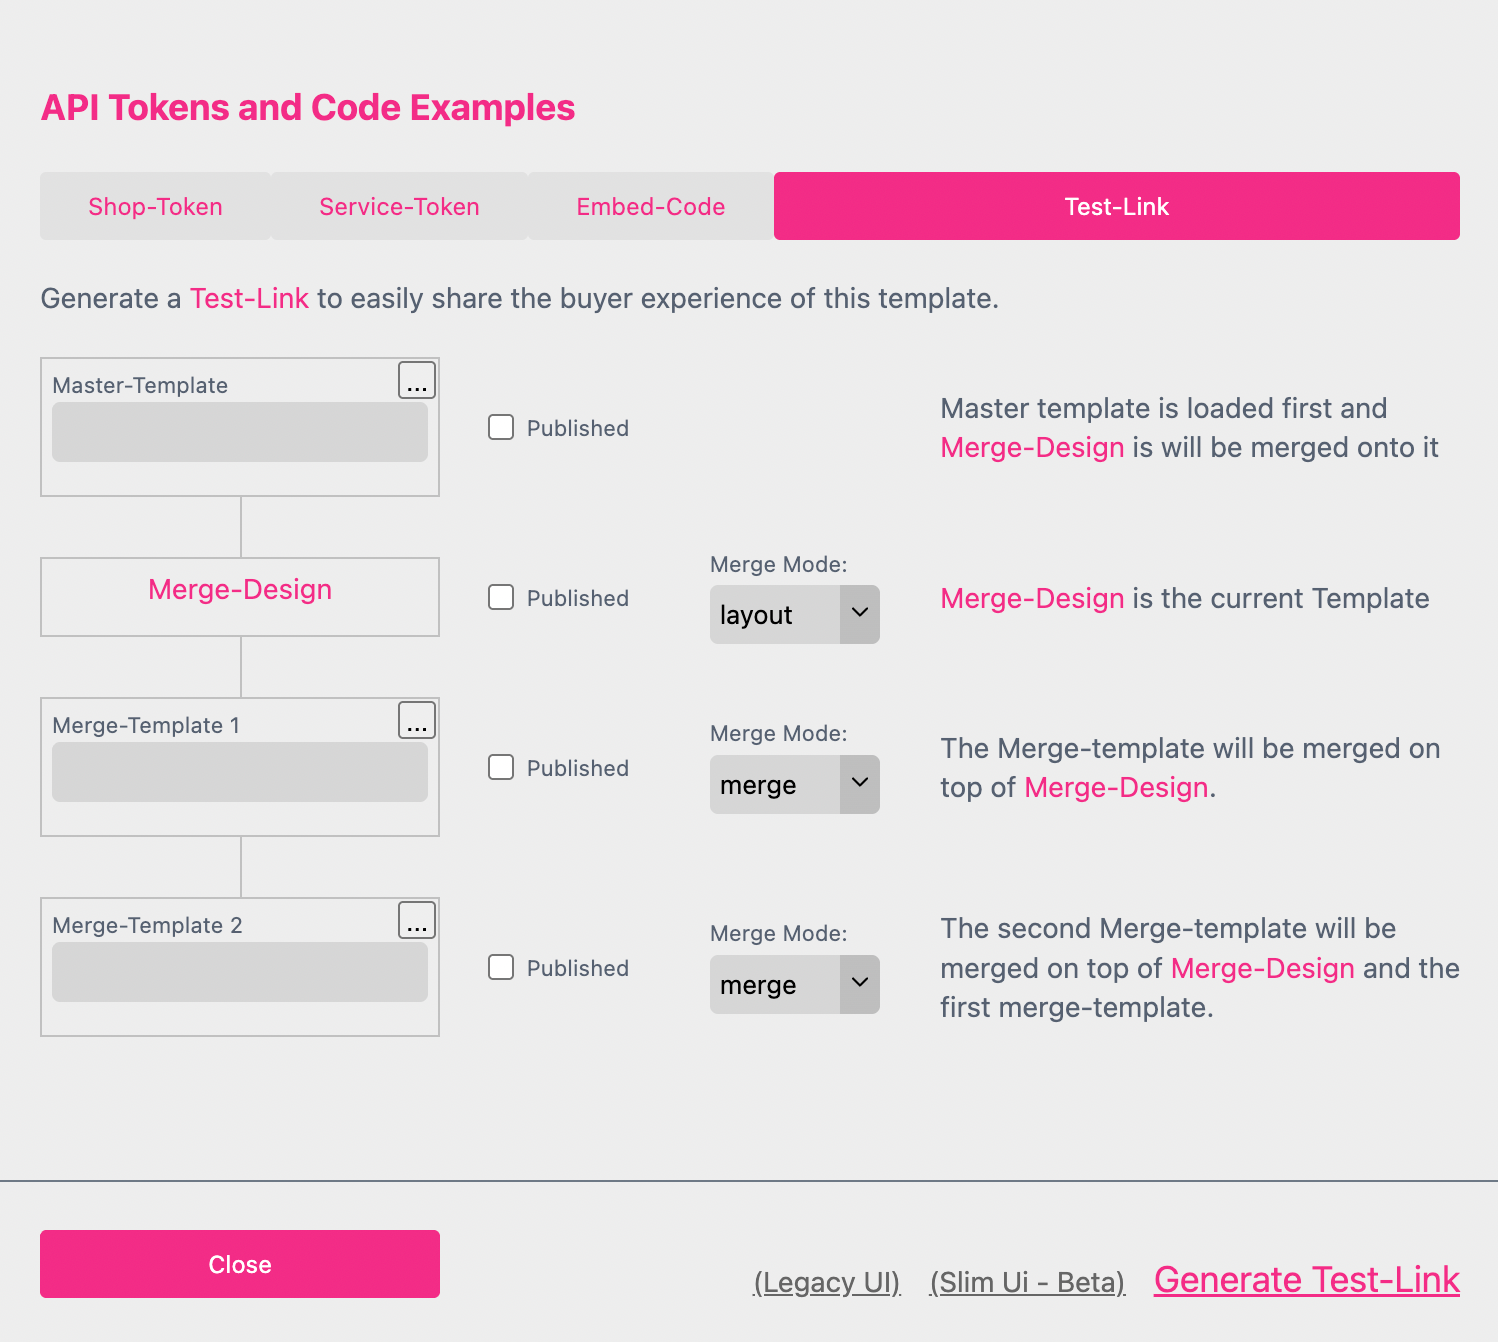
The name of your current Printess Template is displayed in pink - in this case “Merge-Design”.
Select at least a Master Template which you would like to merge. In addition you can add two more Templates for the manual test merge. For each of the Templates you can decide if you would like to merge the saved version or a published version. For the published ones you have to activate the check box Published.
If you press the test link the Printess Buyer Side will load the merged Templates to show you the result.
And if the result doesn’t look as expected, click on the Shopping Basket to open the Save Token in the Designer.
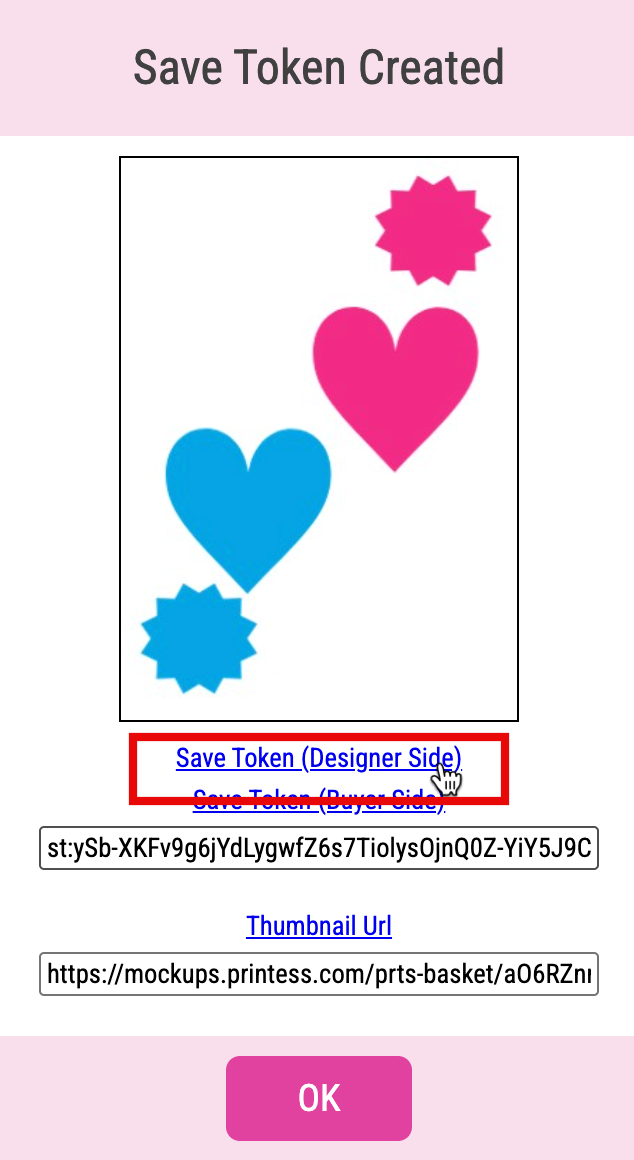
There you can review the individual layers where the Origins of the Frames are displayed — this is the only way to fully understand the result of the merge.

An important detail of the Manual Merge are the different Merge Modes.
For the Master Template you can not define any Merge Mode because it will be loaded first and so any other Template will be merged to the Master Template. So you only define how the other Templates will be merged to the Master Template.
The different Merge Modes lead to different merge results. For any Frame of any Printess Template you can define a so called Origin to define the Frame’s behavior during a merge. This is especially important when placing Layout Snippets on a Template.
In a Manual Merge, however, the Merge Mode is not defined per Frame but at the Template level — meaning it applies to all frames within the Printess Template. That means that the selected Merge Mode overwrites the individual Origins of the Frames of the Template!
Will set the Origin of any Frame in this Template to “none”. This way, no frame will be removed — neither from this Template nor from the one it is merged into.
A Template which is set to layout will behave like a Layout Snippet. It will remove any Frame with the Origin “layout” of the Template it is being merged into. And all of its’s own Frames will be set to the Origin “layout” too. So they will be removed if you merge another Template with the Merge Mode “layout” into it.
It won’t change the Origin of any Frame of this Template to keep the Origins you defined for each single Frame.
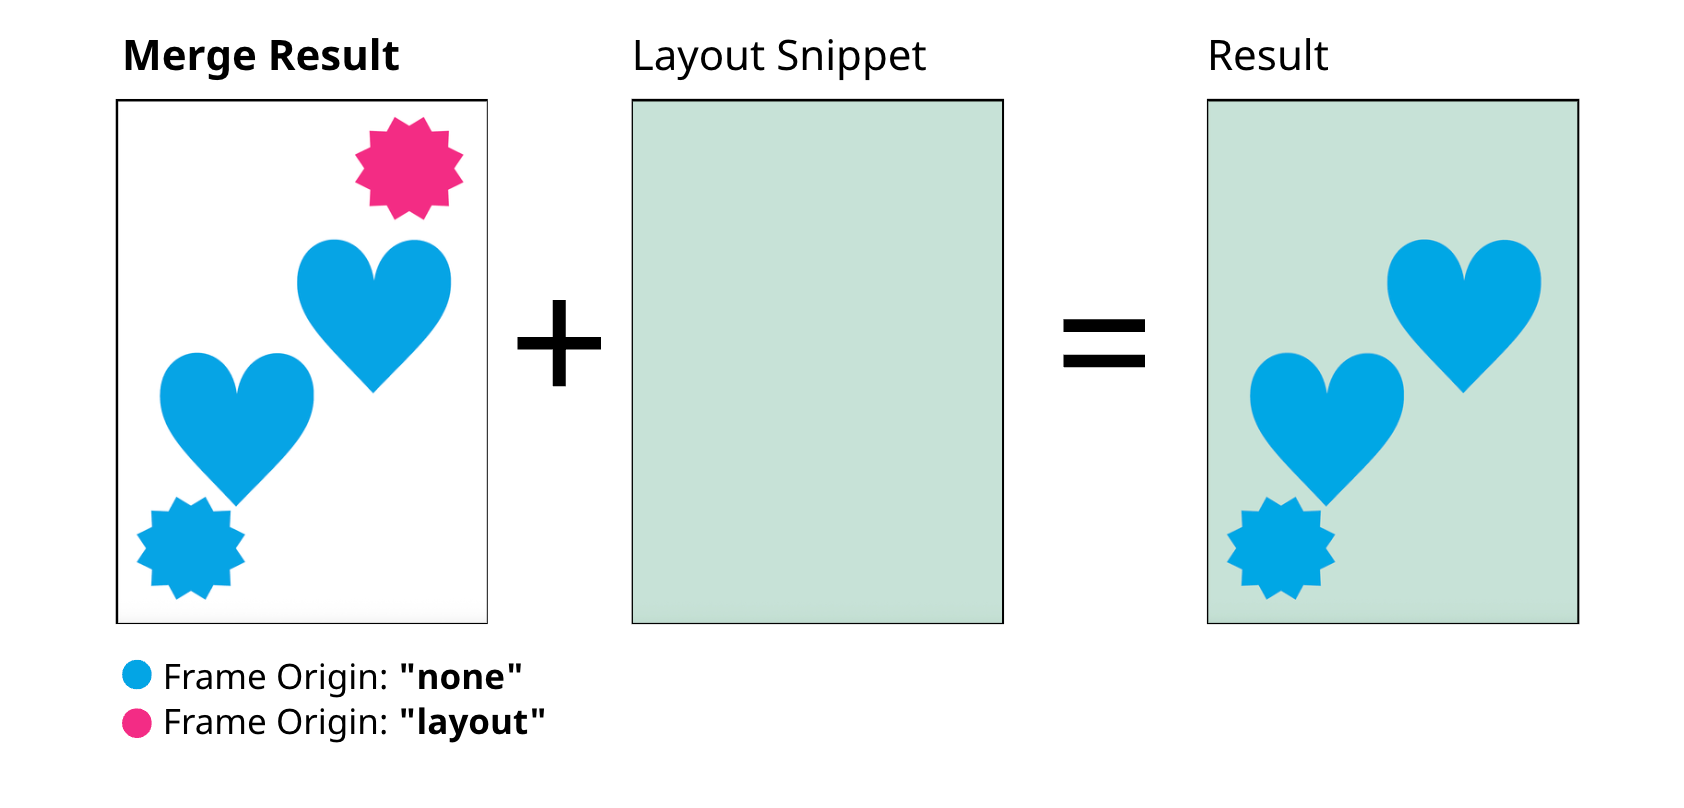
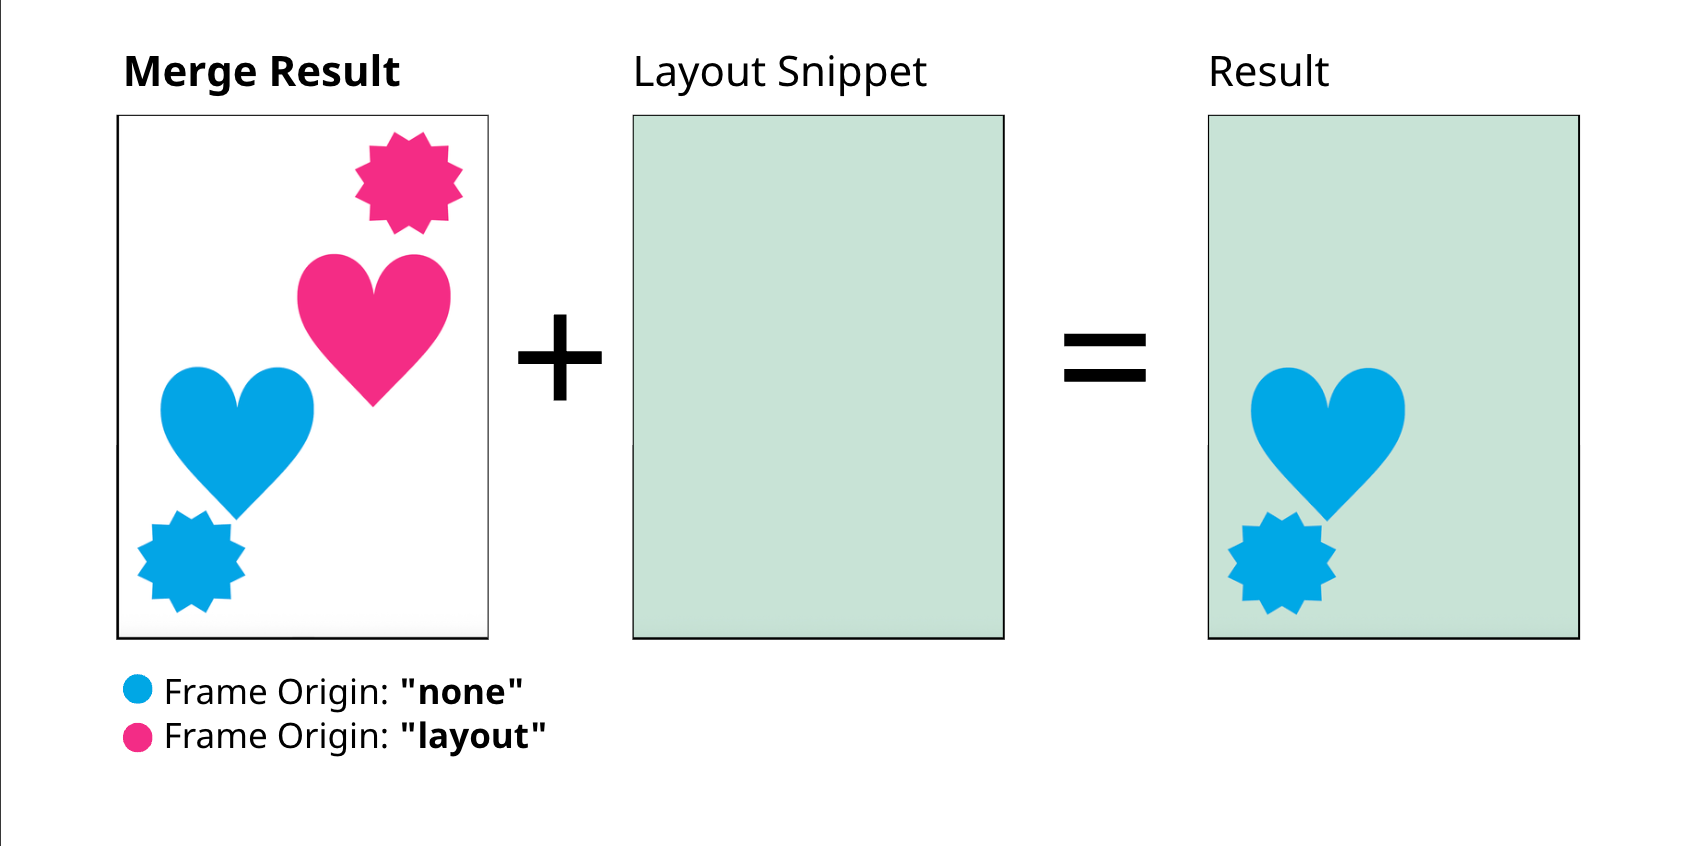
The first graphic shows the result of the Manual Merge. And the second what happens if later the Buyer adds a Layout Snippet onto it. All Frames of a Layout Snippet got automatically the Origin “layout”.
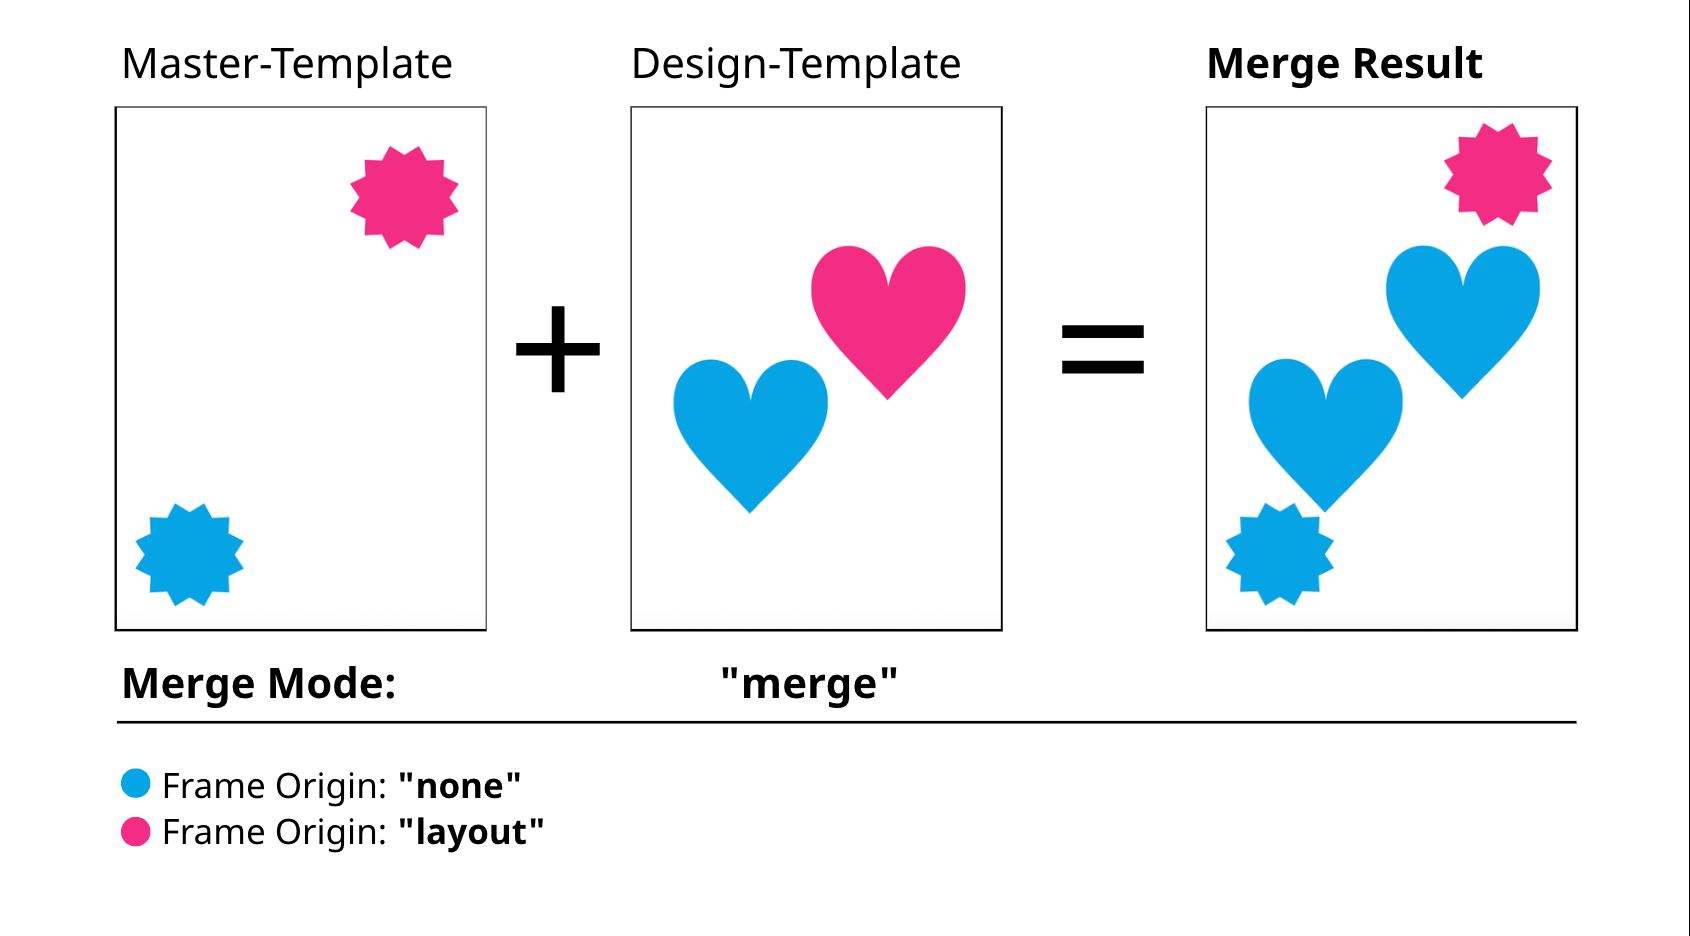
The Merge Mode merge sets all Frames of the Design-Template to the Origin “none”. So they will be added and the pink star from the Master-Template keeps the Origin “layout”.
If the Buyer now adds a Layout Snippet to this result the pink star will be replaced by the Layout Snippet. Any other Frame will be kept.
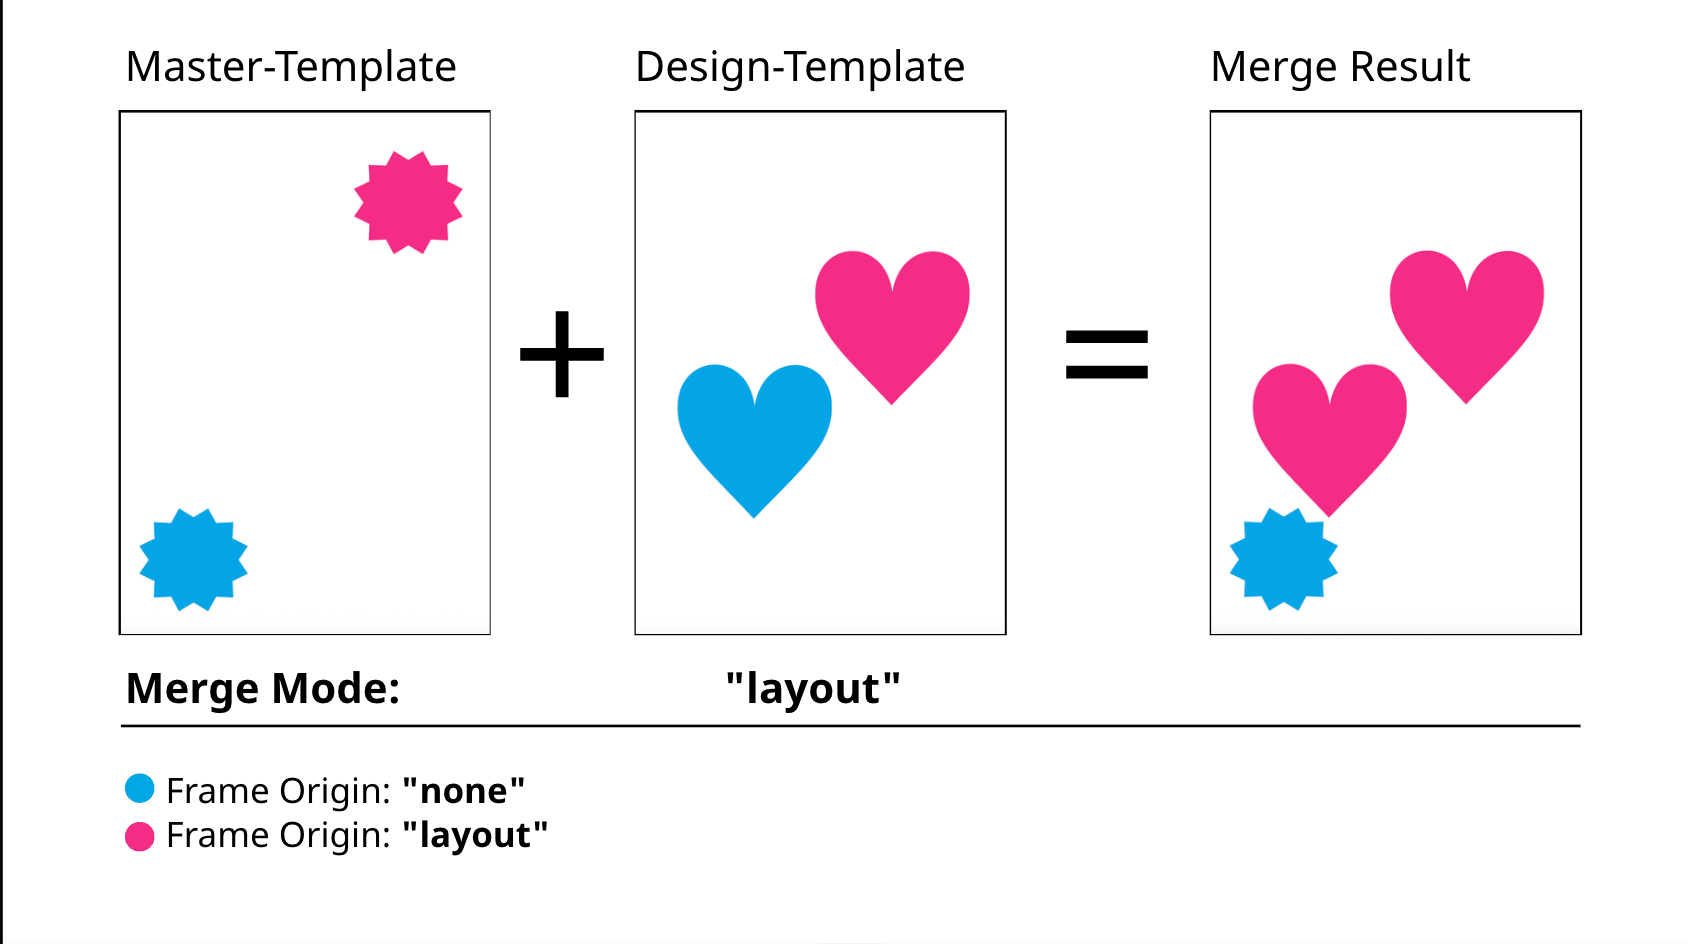
The Merge Mode layout sets all Frames of the Design-Template to the Origin “layout”. So they will replace the pink star from the Master-Template with the Origin “layout”. The blue star will be kept.
If the Buyer now adds a Layout Snippet to this result both pink hearts will be replaced by the Layout Snippet. The blue star will be kept.

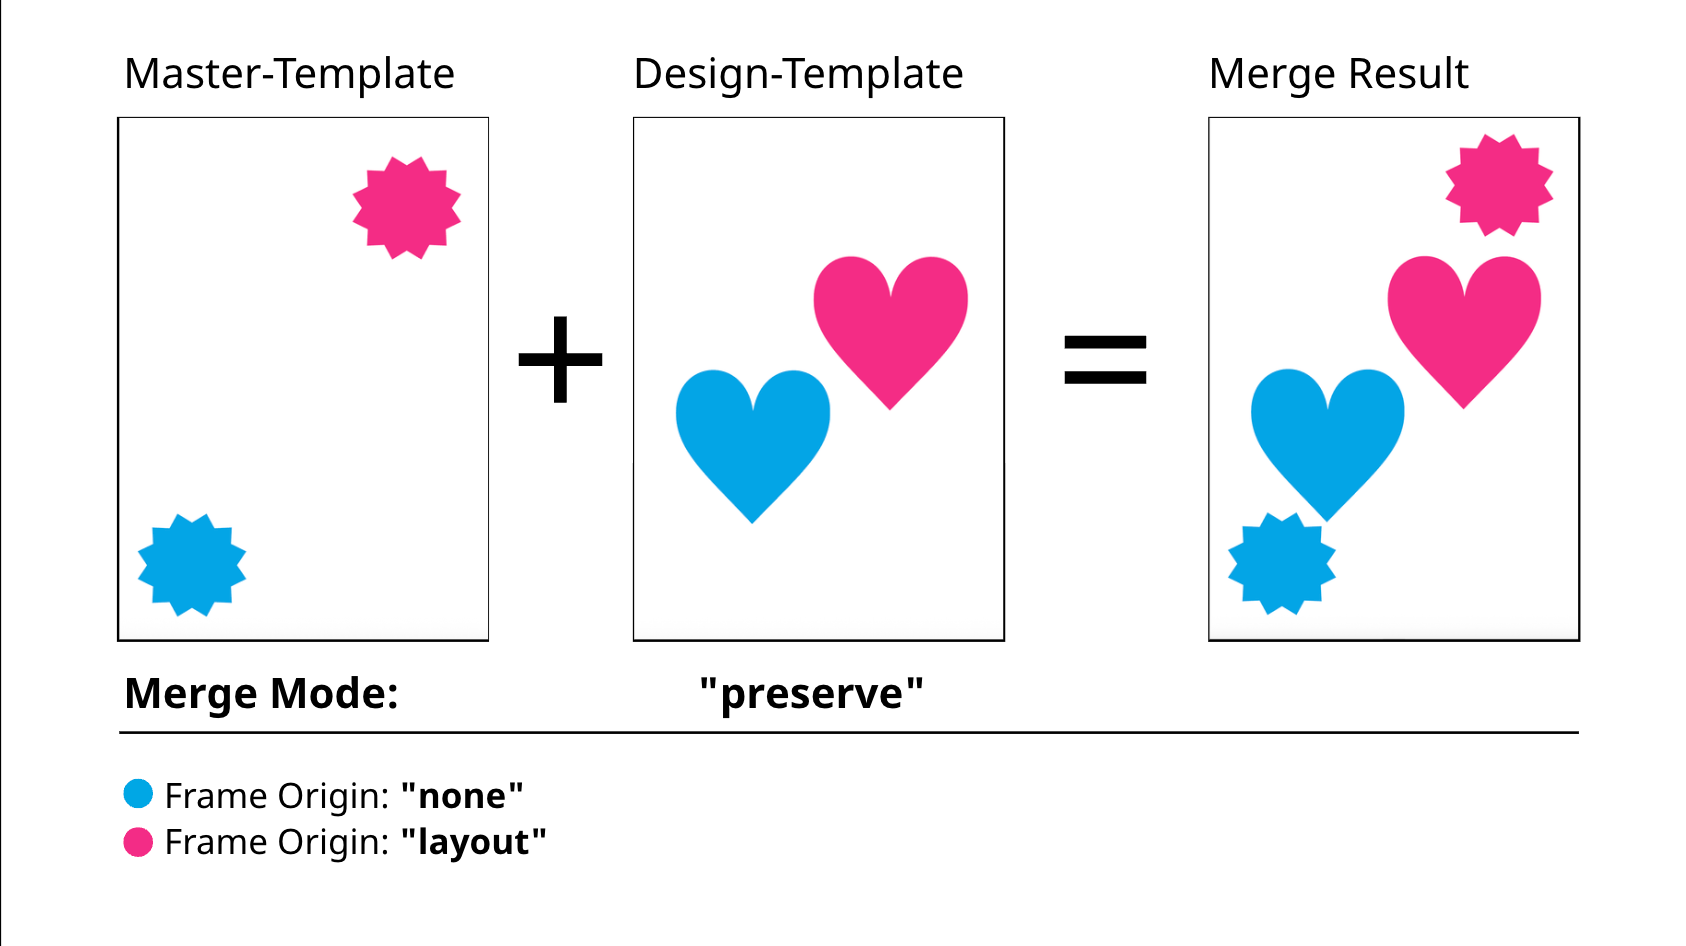
The Merge Mode preserve keeps the Origin Settings for all Frames of the Design-Template. So the pink heart keeps the Origin “layout” - the blue heart the Origin “none”. And the pink star from the Master-template will not be replaced keeping it’s Origin “layout” as well.
If the Buyer now adds a Layout Snippet to this result the pink frames will be replaced by the Layout Snippet. Any other Frame will be kept.
Merging of templates can also be tested for up to three merge templates directly in the editor by supplying the parameters in a URL (the API does not limit the amount of merge templates). To let this work the browser needs to be logged into the editor and the account the templates to be merged are in.
An example merged URL looks like this: https://editor.printess.com//bcui.html?name=card_Master&merge1=card_RoundPhoto&version=draft
These are the Parameters:
The Editor will open the master template and merge the additional merge templates creating a new merge document which can be tested.
Notice this URL method is for testing purpose only (during design phase) - in the real shop workflow this is done by the merge Templates parameter when starting the buyer side editor.
Merge Documents also allows for merging image, color and font lists into your buyer side documents right before editing. Making it super easy to control the available resources centrally without touching thousands of templates. Read more on how to control what resources get merged from a source document here.
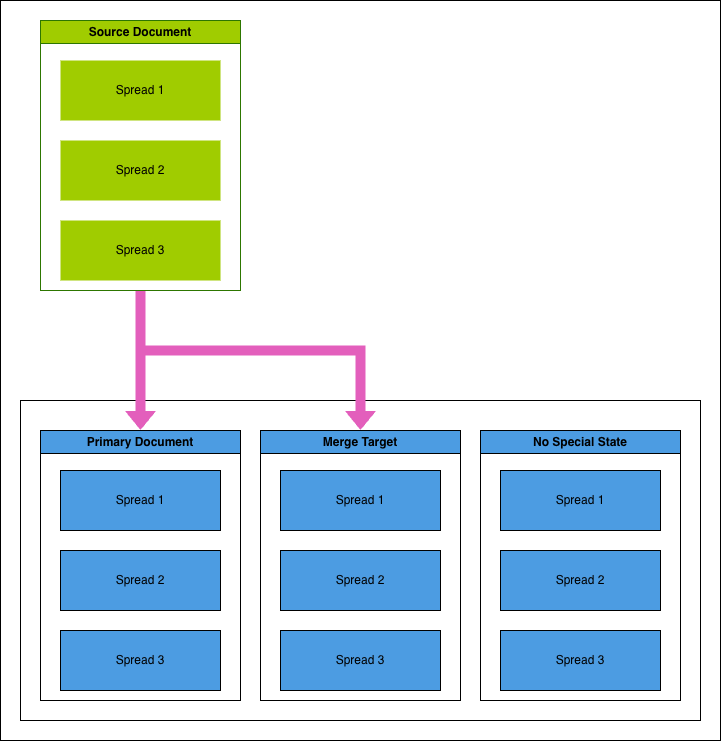
In your Master/Target template, you can specify which documents any merge should apply to. The first document in order is the Primary document and will always be a merge target.
Additionally to the Primary document, any document that you give the “Is Merge Target” flag will receive your merge. You may have any number of documents flagged as merge targets.
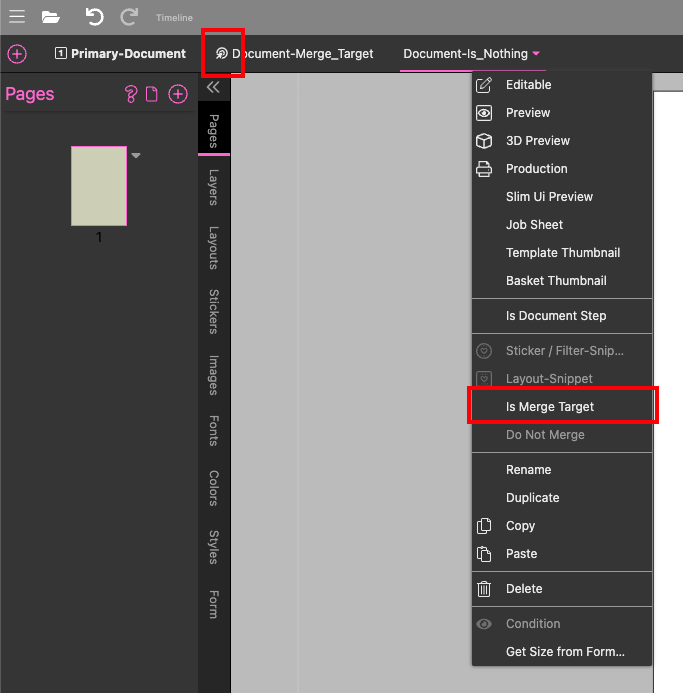
Any Documents that are neither Primary nor flagged as “Is Merge Target” will not receive changes from the merge.