By default, the editor will show the Buyer Side interface in the language the browser is set to - if the language fits one of our currently implemented languages.
Printess comes with 30 languages available at your Printess Account. But please contact us if a needed language is missing - we can add it. Additionally, you can explicitly set the language the browser should display when integrating the editor in your shop.
Printess also allows you to provide your own translations, change existing translations, and even include translations for example values in Templates! It does not matter if you would like to change and existing translation or if you would like to add your. You always use the Translation Table at your Printess Account to define that content.
Login at the Printess Account Portal to access the Translation Table at the Tab Translations.
How to manage the Translations is explained here.
You can also directly provide a fixed translation object when attaching the editor. Please learn more in our API section
For this please look up the translation.json inside our ‘Getting Started’ GitHub repository which contains all translatable UI text as well as all prompts and error messages.
Check out the repository here!
In this file, you will already see two reserved object namespaces - Used UI and Error - we recommend to only use these namespaces to overwrite existing translations you would like to change and add your own custom namespaces for translations of user values and is resolved by the internal function gl(). Simply write ${gl(translatableObject)} anywhere in Text Fields or Multi Line texts and the content will be looked up from the global translation tables before being displayed to the Buyer.
This can be used to translate example text used throughout the Template. As an example, we can translate the typical sample names and addresses into their local variants.
${gl(“example.first”)} in a Single Line text will look up the object example. First for a translatable example ‘first’ name. The Buyer will then see “John” in their input box. The translation object table for this could look like this:
{
  "example": {
    "first": "John",
    "last": "Doe",
    "street": "123 Main St",
    "city": "Anytown, PA 12345"
  }
}
The custom translation table can also be used as a reference guide to change Buyer Side UI icons and text. All text and labels can be changed. This enables you to totally customize your Buyer’s user interface.
For example, below is the standard Buyer Side UI text for the Custom Photo Product tab on the Buyer Side:
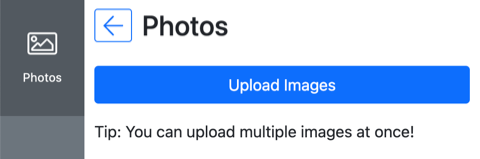
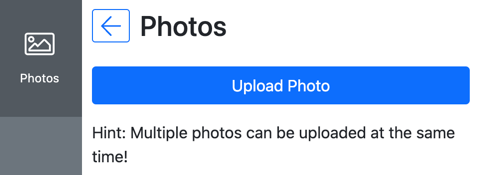
We easily change this in the Custom Translation table using the ui.imageTab and ui.uploadMultipleImagesInfo tags and writing the desired text:
{
  "ui": {
    "imageTab": "Upload Photo",
    "uploadMultipleImagesInfo": "Hint: Multiple photos can be uploaded at the same time!"
  }
}
This changes the Buyer Side “Upload Images” button text to “Upload Photo” and the text underneath the image upload button from “Tip: You can upload multiple images at once!” to “Hint: Multiple photos can be uploaded at the same time!”
You can use the Printess translation tables to find all labels and easily change them to best suit your product.
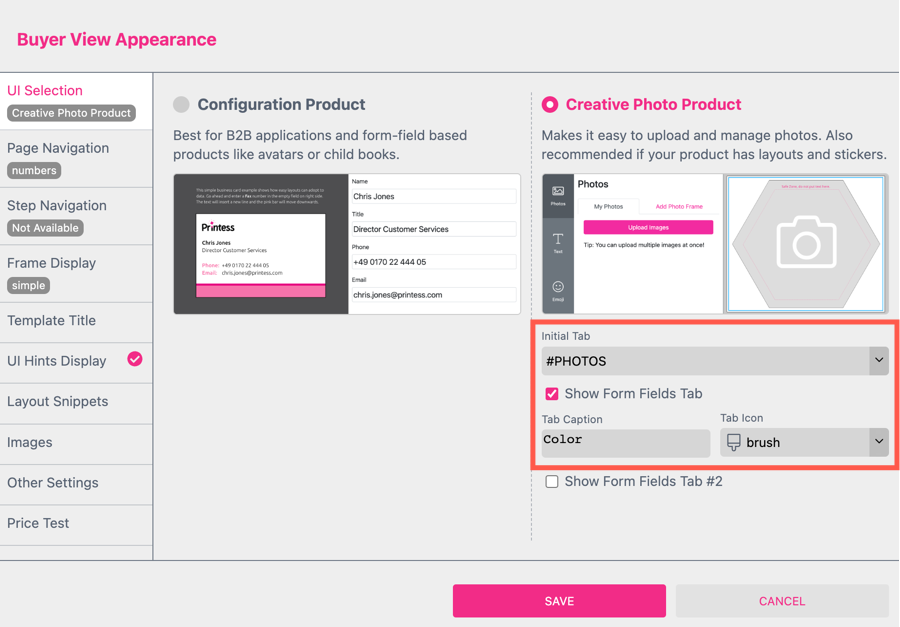
Info: Buyer Side Creative Photo Tab icons and text are changed through the Tab Caption and Tab Icon settings.