This document describes how to integrate the Printess Editor into your shopify theme. This is done by uploading a set of javascript files to the themes assets, modifying some of the themes liquid files and adding new product meta data properties. To integrate the editor, you will need some basic skill in web development technologies (Html / Javascript). This documentation is written using the shopify standard theme “Dawn”. In case another theme is used, it is required to find out where the “Add to basket” button is located (Dawn theme: main-product.liquid [old versions], buy-buttons.liquid [never versions]) and the render code for each cart item (Dawn: main-cart-items.liquid) and modify these to integrate our changes. The theme modifications need to be done every time you want to update or switch your theme. To prevent unnecessary reintegrations, make sure that the theme is the final decission and it should be checked that the theme has the most recent version.
Shopify product meta fields are used to store Printess specific settings to each product. The Printess Template Name field, is the most important field that is required. This field is used to distinguish between “normal Shopify products” that have the “Add to basket button” and Printess products that will have the “Design now” button. Products that have no value provided for this field will be treated as standard Shopify products. Other settings that can be specified via these meta fields are for example the Printess Dropshipping Product Definition Id which is used to configure the Printess dropship integration as well as the “Printess DPI” and “Printess Output Format” which are used to configure the production output resolution and the final image file format (pdf, jpg, png).
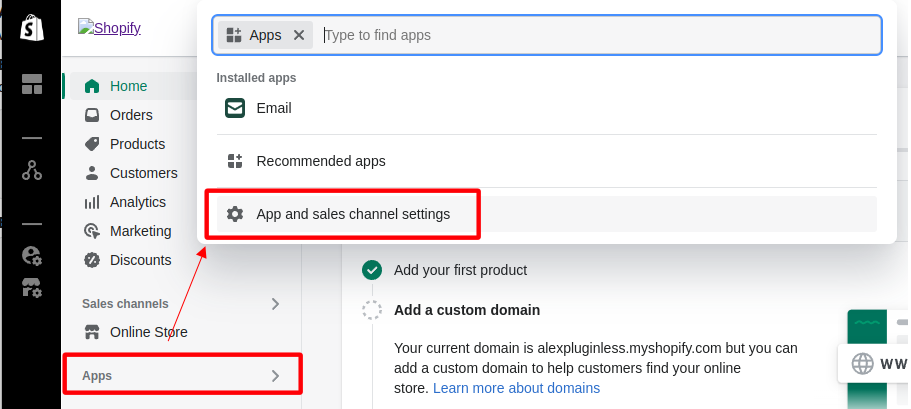
Go into the administration interface of your shop and open the meta field configuration:
Scroll down and find the „Metafields“ option. Select Products.
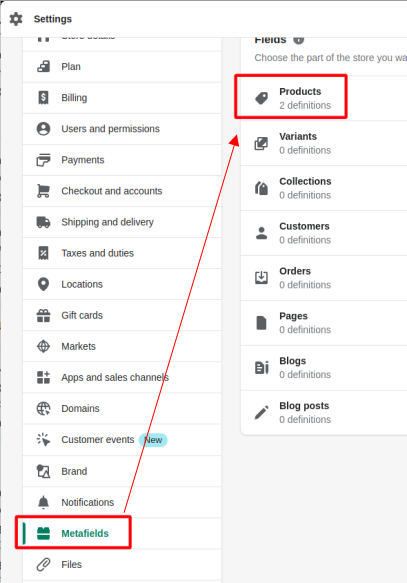
Click on „Add definition“ to create a new form field definition.

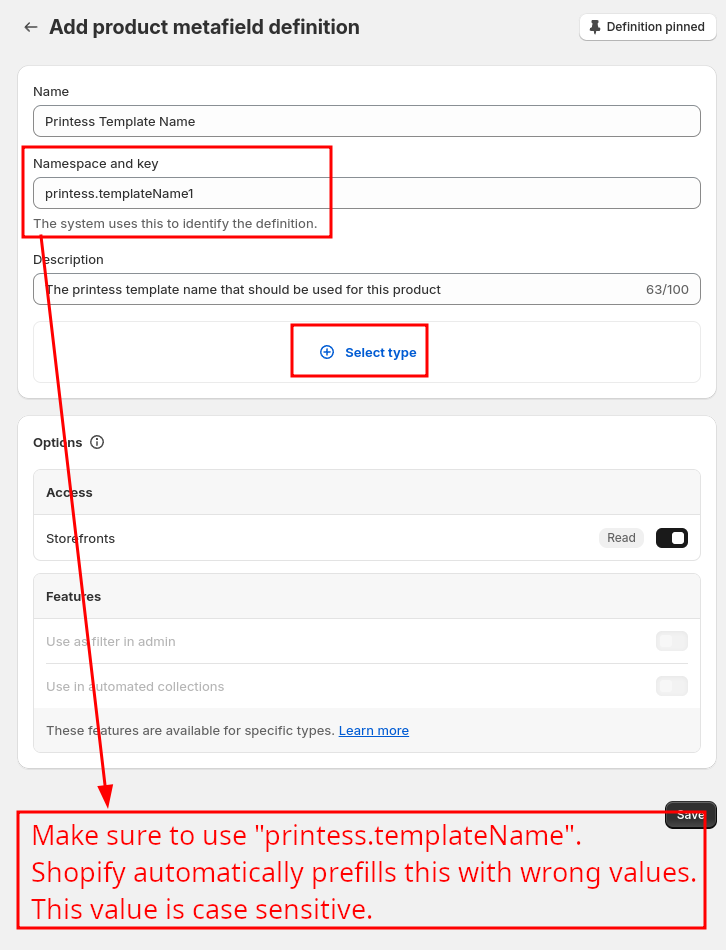
You have to create one field for the Printess template name. The name property is the display name that is shown within the product configuration. Use Printess Template Name as Value. “namespace and key” is the value that is IMPORTANT for the integration. This is the key that will be used to access the value from within the frontend. Use “printess” as namespace and “templateName” as key. The final value that needs to be written to “namespace and key” is “printess.templateName”. Its is important to use exactly this value. “Description” is the description that will be displayed inside the product configuration.
Values to enter:
Name: Printess Template Name
Namespace and key: printess.templateName
Description: The printess template name that should be used for this product
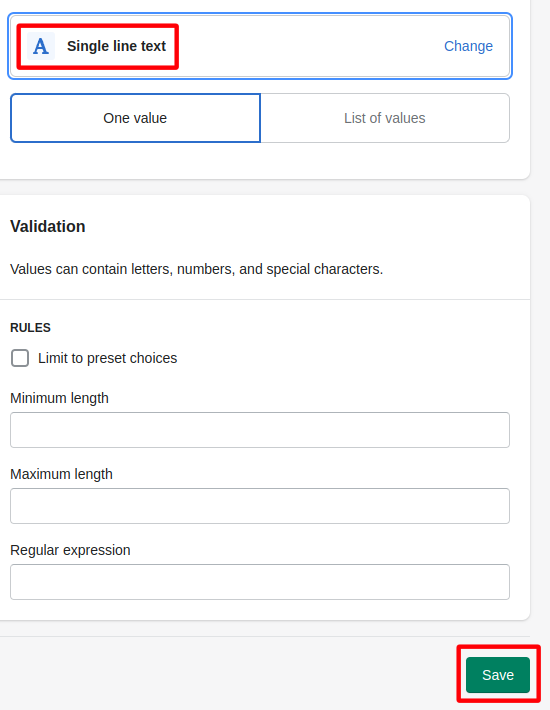
Make sure that Storefronts is activated under “Options” -> “Access”. Select “Expose this metafield to Storefront API requests” and click on “Select type”.
Use “Single line text” as type and click on “Save”.
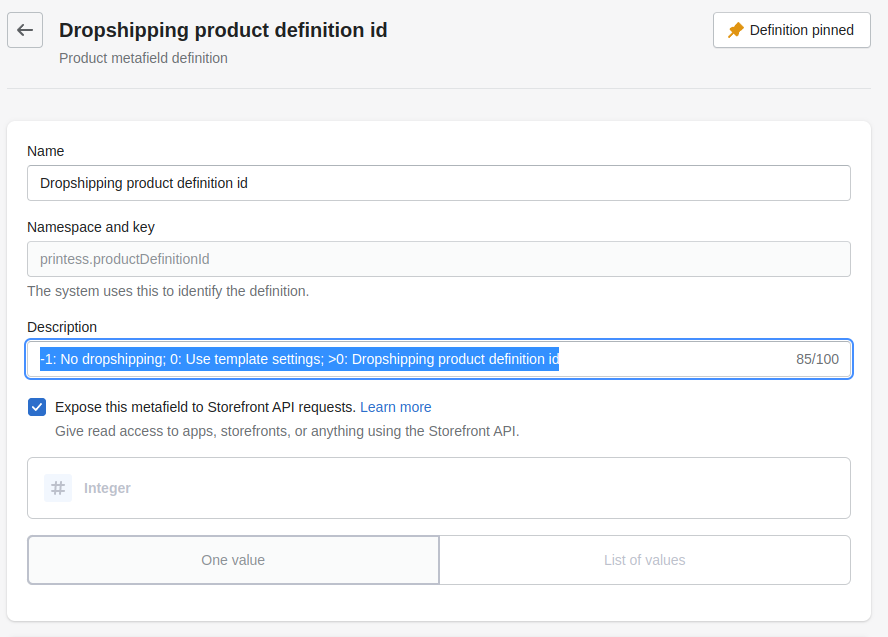
Now, create a second meta data definition for the drop shipping configuration. This field contains the “Printess dropshipping product definition id”. The available ids (Product definitions) can be found inside your printess account portal under “Dropshippers”. Use “Dropshipping product definition id” for name and “printess.productDefinitionId” under “Namespace and key”. As description, add “(Integer value) -1: No dropshipping; 0: Use template settings; >0: Dropshipping product definition id”. Make sure that the value in “Namespace and key” is correct. Shopify prefills this value with wrong values. Casing is important!
The field value type has to be set to Integer.
By creating additional definitions for “printess.dpi” (integer) or “printess.outputFormat” (single line text, supported values pdf, png, jpg) you can add additional options for controlling the output dpi and the file format of the produced files after an order.
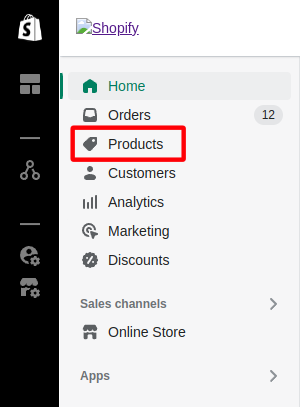
Inside the shop configuration go to “Products” and open an existing one (or create a new one).
Inside the product configuration of the created ( / selected product), scroll down to where the meta fields section is located and enter a name of an existing, published printess template to the “Printess Template Name” field.
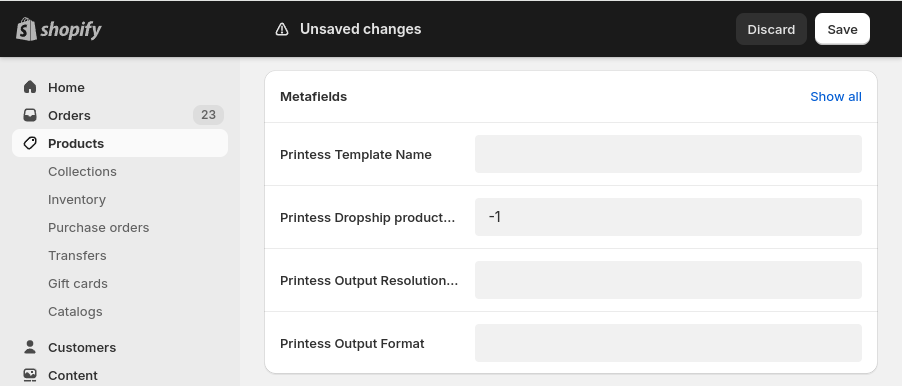
Use “-1” for “dropshipping product definition id” (Disable dropshipping) and click on “Save”
The integration is based on a few javascript and css files that need to be uploaded to the theme assets. Additionally, a few liquid files that needs to be created inside the snippets folder and finally on a few modifications that need to be done on the themes source liquid files.
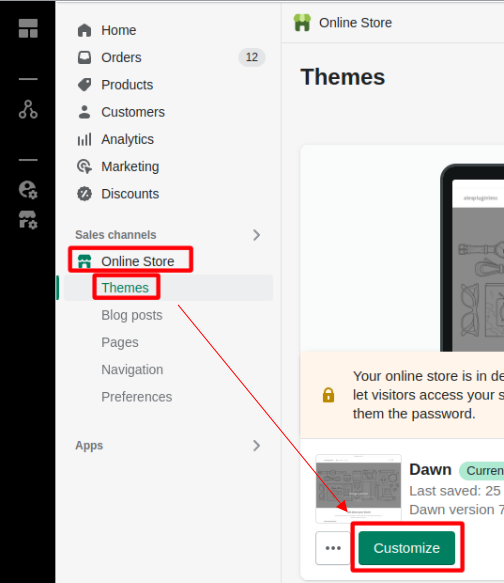
Go to the Administration interface of your shop and open the the theme editor (Online Store → Themes → Customize)
Open the code editor.

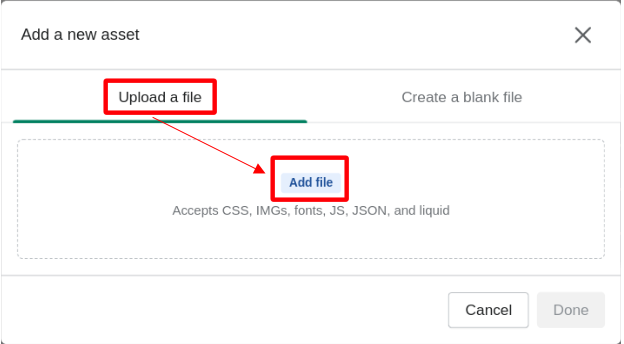
Go to the Printess Shopify Plugin git repository and download the following files printessShopify.js, printessEditor.js and printesseditor.css and upload all 3 to the shoppify theme assets:
Inside the “Add new asset” dialog, click on “Add file” and upload the 3 files after each other.
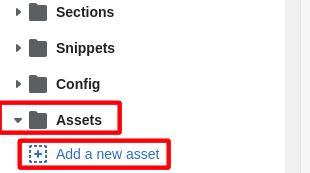
Then go to the snippets folder and create 3 new snippets with the names printess-add-to-basket.liquid, printess-cart-edit-button.liquid and printess-thumbnail.liquid.

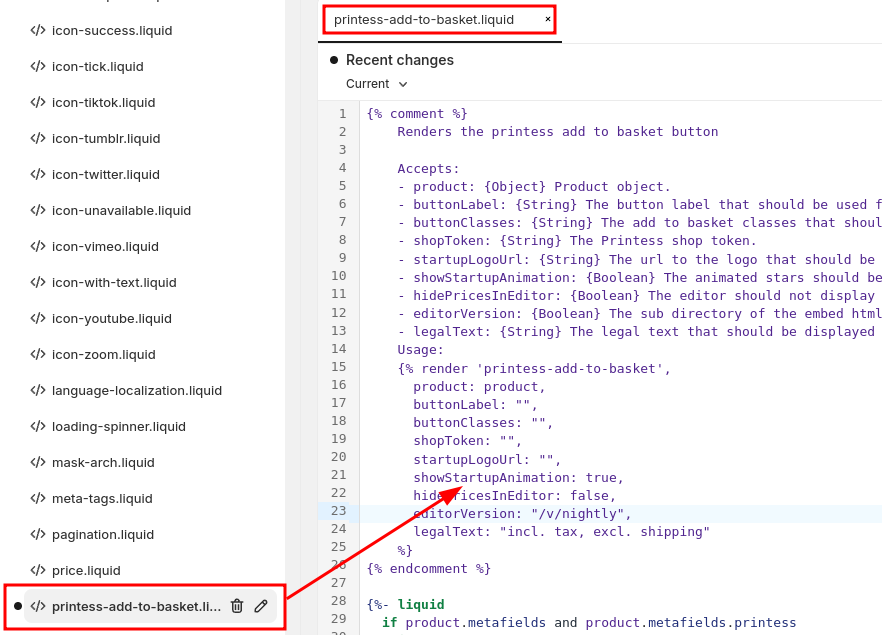
Click on the printess-add-to-basket.liquid file that you just created and paste in the sourcode from the printess-add-to-basket.liquid file from the plugin git repository
Now do the same for the printess-cart-edit-button.liquid and the printess-thumbnail.liquid files.
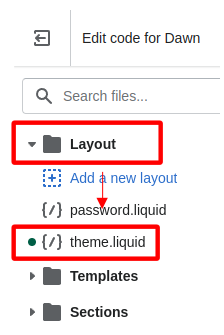
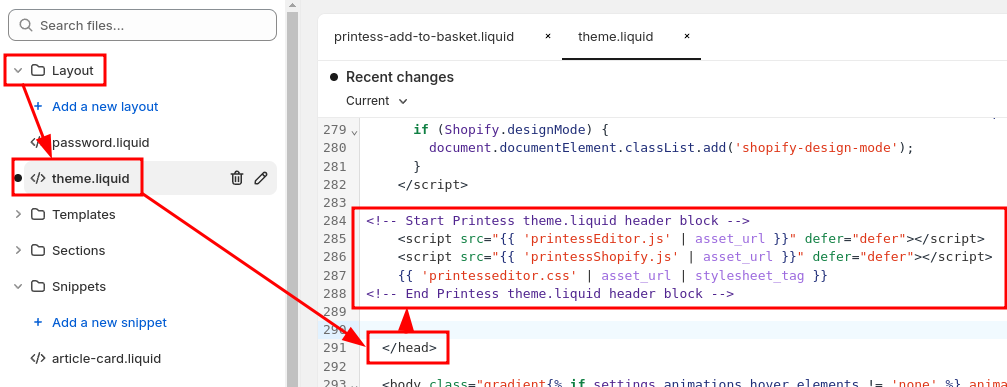
The Layout folder can be found on top of the file view. Expand it and click on the theme.liquid file to edit it. This file is loaded and displayed every time a visitor is visiting any page on your shop. We will use this file to ensure that the 2 js files that have been uploaded previously and the css file are loaded automatically on page load.
Search for the html head end tag </head>.
copy the contents of the theme.liquid file that can be found on the plugin git repository right above the head end block:
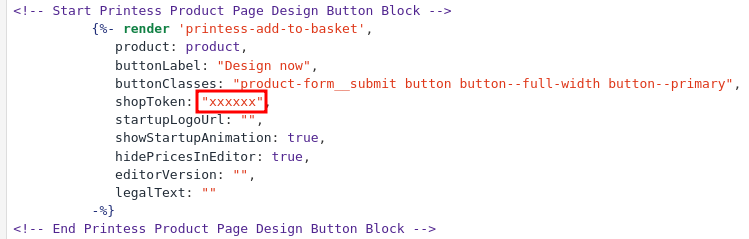
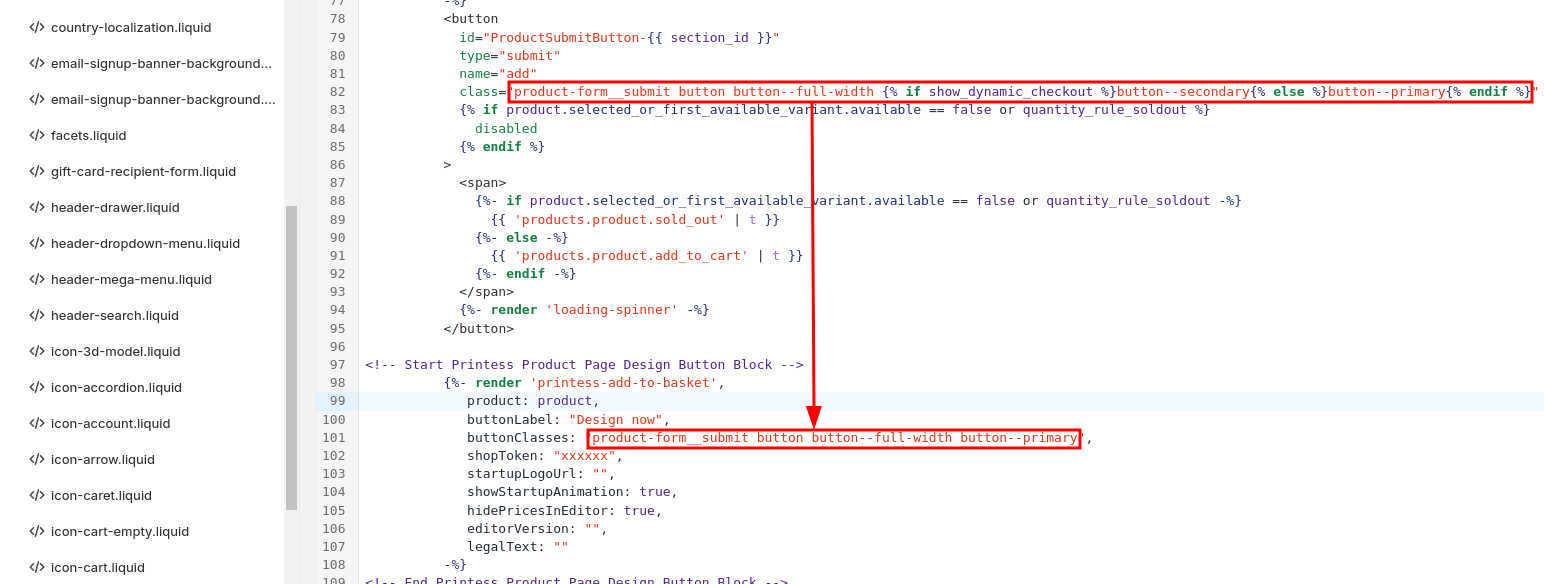
To integrate the Design now button it is important to find the file that includes the source code for the Add to basket button. Typically it is a button that has the ID “name” and is located inside the product form.
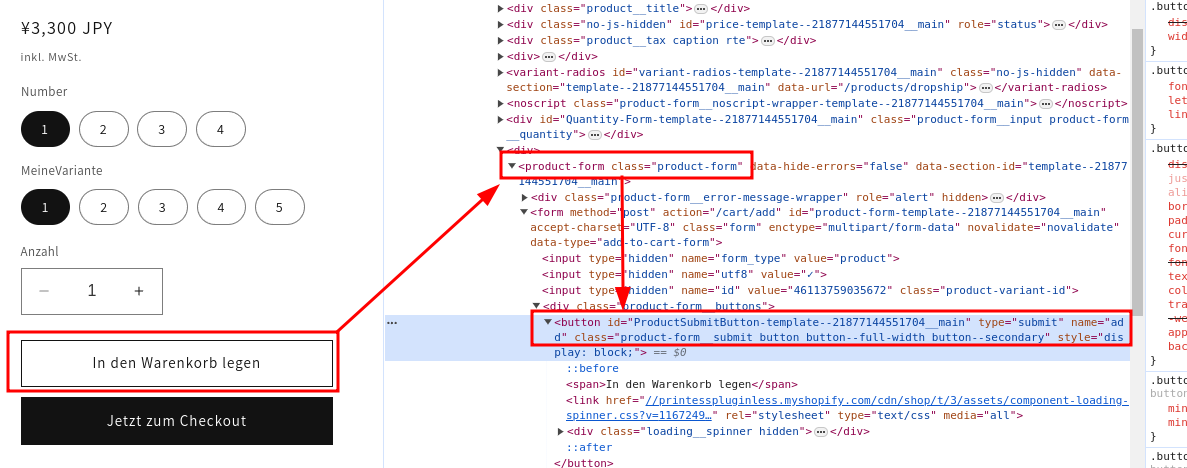
On old versions of the Dawn theme, this button can be found inside a file called “main-product.liquid” inside the sections folder. On newer versions of that theme, the button can be found in a file called buy-buttons.liquid inside the snippets folder. On other themes we have seen the button for example in files with a file name similar to product-form.liquid. Open the file that contains the add to basket button and search for the </button> end tag of the add to basket button. Paste the contents of the render-design-now button.liquid code block of the plugin git repository right below the add to basket button end block.
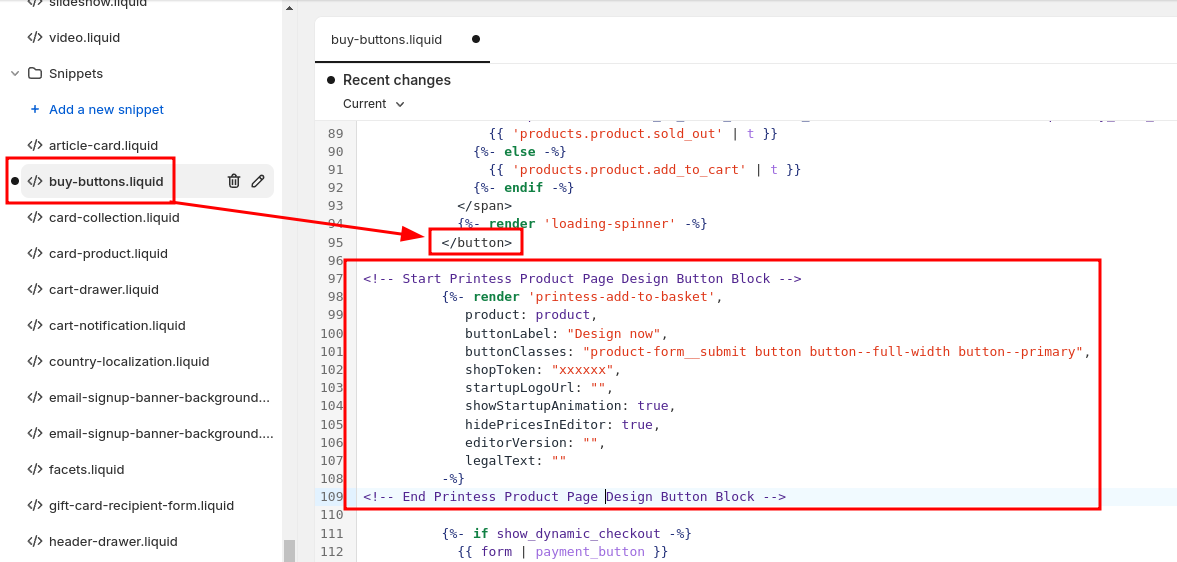
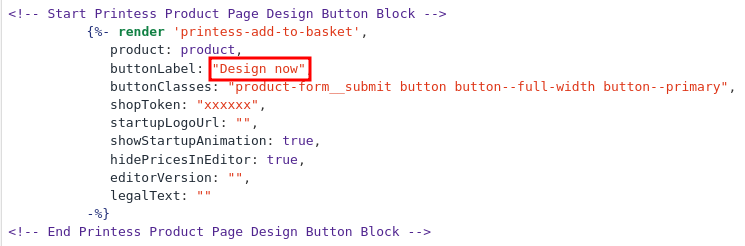
This code block contains the configuration of the printess design now button and is responsible that it is rendered at that location. To provide a custom label, change the “Design now” text to the desired one.
Then replace the shop token provided (xxxxxx) with your own shop token:
 .
.
To style the button in the exact same way as the add to basket button, copy over the class definitions from the “Add to basket” button and copy them over to the buttonClasses configuration.
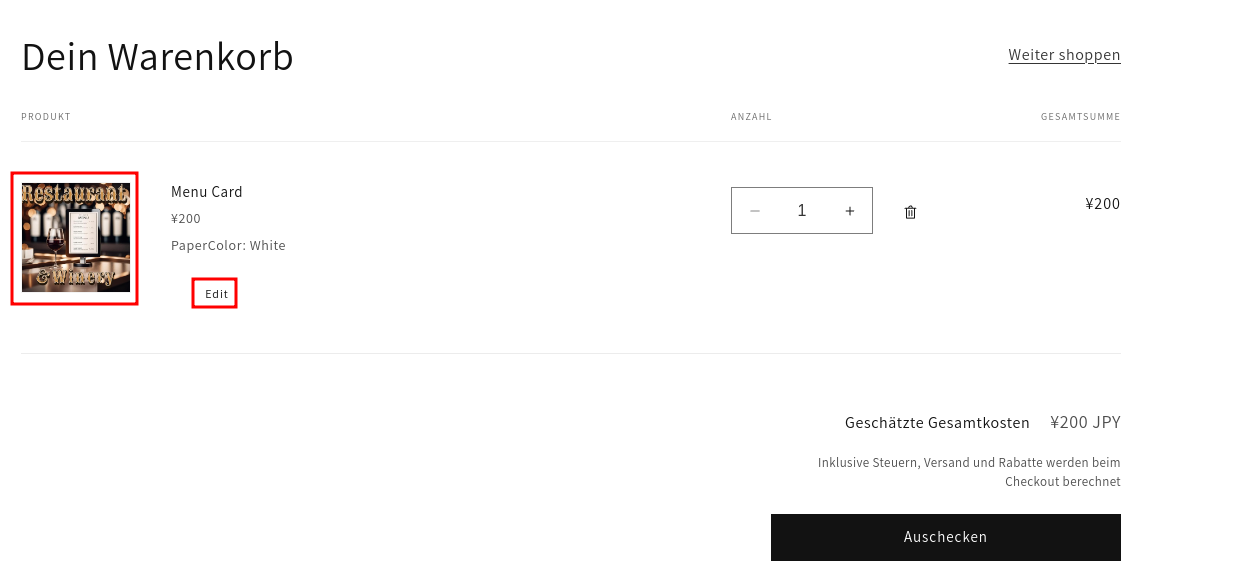
On the shopping cart page, the integeration exchanges the product image with a thumbnail of the already personalized product. Typically there is one dedicated document inside the printess template that is used for the product thumbnails (it has the thumbnail flag set inside its properties). In case the designer of the template did not create a specific thumbnail page, the system will automatically use the first document inside the template for thumbnails as well. In most cases where the items in the shopping cart do not display the correct personalisation, the thumbnail document is a static image which does not contain any dynamic personalization. In these cases, make sure that the thumbnail document (the one marked as thumbnail or the first document inside the template) really include the personalisation. Additionally, the integration will blend in an Edit button right behind the list of product properties which allows to change the personalisation after the item has been added to the shopping cart.
The first task for the shopping cart integration is to find the corresponding liquid file that contains the liquid (html) source code for one basket item. Inside the Dawn theme, the complete sourcecode for the whole cart item list is located inside the file “main-cart-items.liquid”. However, we have seen themes where the cart item itself is in its own file so that it can be reused for mini baskets etc.
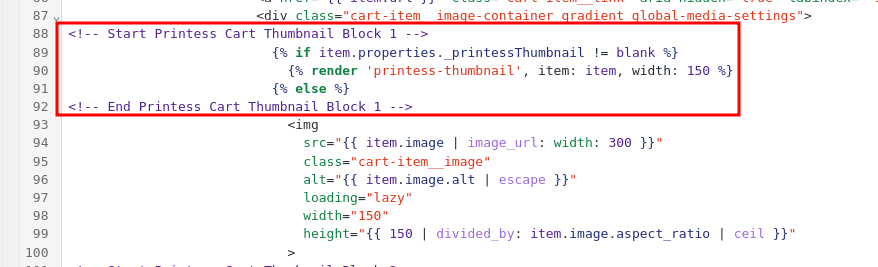
For the Dawn theme (and many others) there is no special image component (.liquid file) used that contains the actual code to display the cart thumbnails. This makes it easy to find the image by just searching for the html image tag <img. The easiest way is to search for the for loop {%- for item in cart.items -%} inside the .liquid file that iterates through all the cart items.
In most themes (Dawn included) that we have seen, the code for the thumbnail is located near this for loop.

Shopify themes (and many others) are using the class name cart-item__image for this image object. This might make it easier to find the correct image element. our integration is split in 2 parts (blocks) for this. One block that checks if the cart items is a printess product. If this is the case, it will render out a new image block that references the printess thumbnail. Otherwise the original theme source code (<img tag) is rendered. Paste the following code:
<!-- Start Printess Cart Thumbnail Block 1 -->
                          {% if item.properties._printessThumbnail != blank %}
                            {% render 'printess-thumbnail', item: item, width: 150 %}
                          {% else %}
<!-- End Printess Cart Thumbnail Block 1 -->
right above the already existing image element.
The shopify editor might now display some errors about invalid liquid code. The reason is that the code above opened an if condition without closing it. To close it correctly, place the following code:
<!-- Start Printess Cart Thumbnail Block 2 -->
                          {% endif %}
<!-- End Printess Cart Thumbnail Block 2 -->
right below the end of the <img tag that is responsible for the standard cart item image:
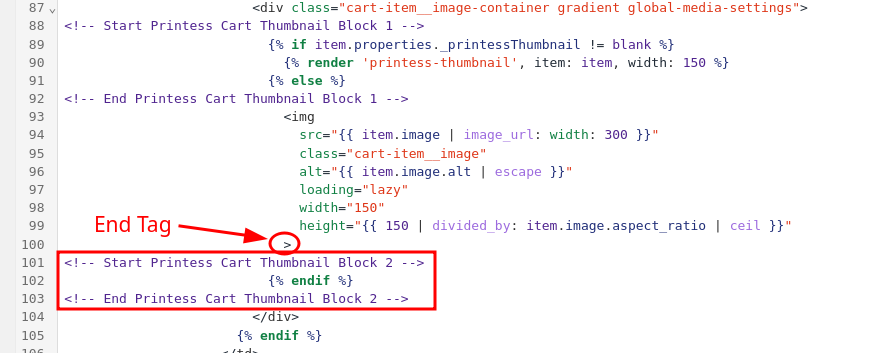
The second block ensures that the if condition is closed correctly.
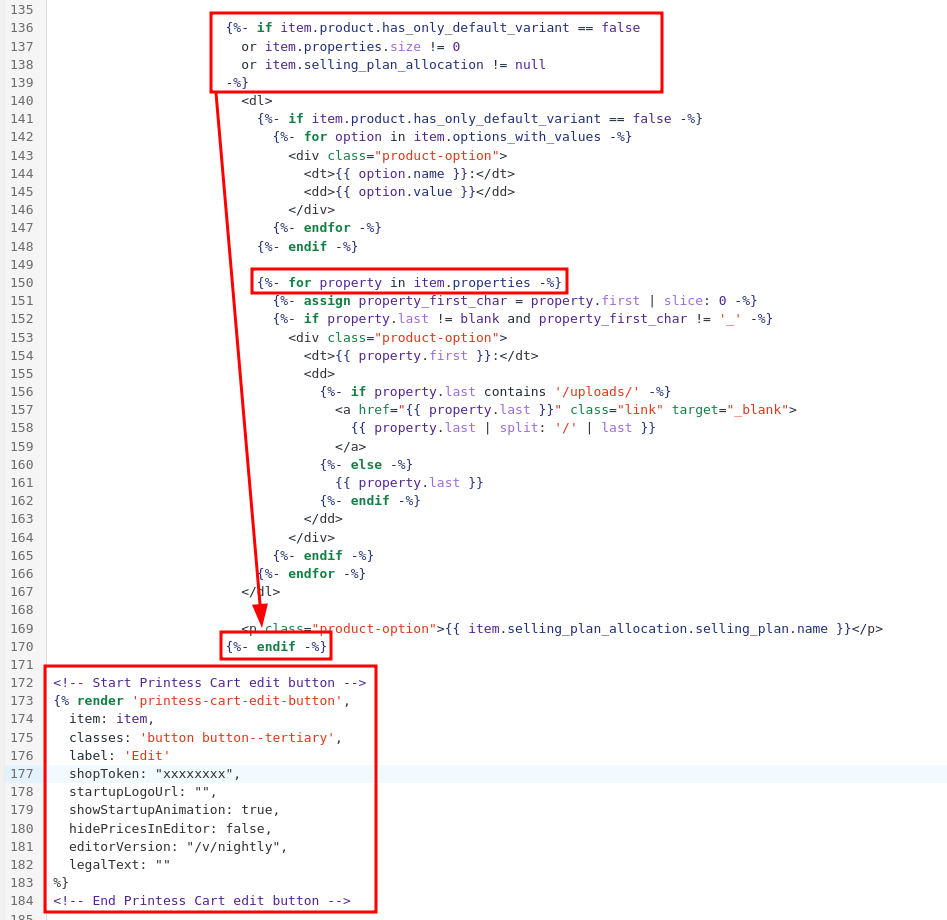
To integrate the edit button, search for the code that is responsible for rendering the product options. In most themes this is a for loop that iterates through all product properties. It might be found by searching for item.properties:
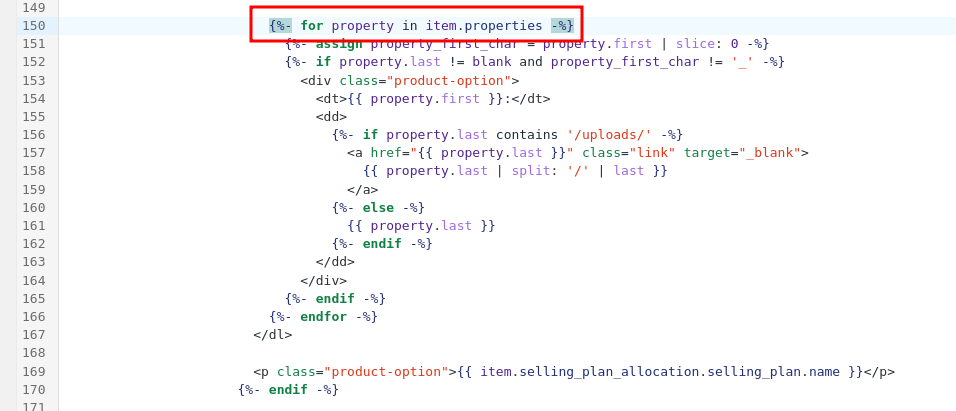
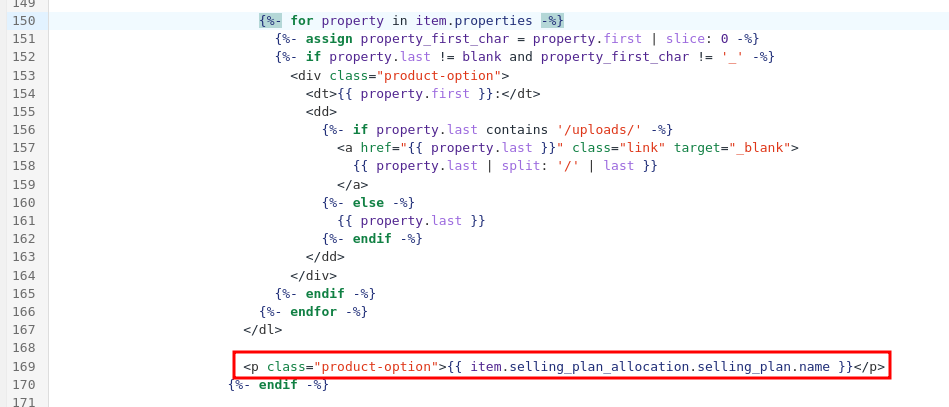
The code for the edit button could be placed right under the property loop. However, in case of the Dawn theme, there is a selling plan name rendered to the list of item properties .
Addittionaly, the Dawn theme is skipping rendering of item properties in case there are none, or in case the product has variants or in case there are no additional properties. The Edit button should be displayed always. So the Edit- Button needs to be placed outside of the if condition.
Code for the printess edit button:
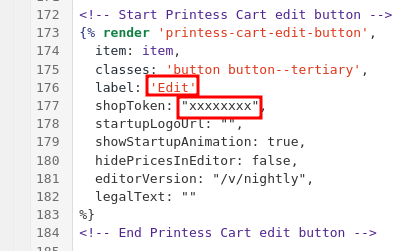
<!-- Start Printess Cart edit button -->
{% render 'printess-cart-edit-button',
  item: item,
  classes: 'button button--tertiary',
  label: 'Edit'
  shopToken: "xxxxxxxx",
  startupLogoUrl: "",
  showStartupAnimation: true,
  hidePricesInEditor: false,
  editorVersion: "",
  legalText: ""
%}
<!-- End Printess Cart edit button -->
After placing the render code for the Edit Button, the xxxxxxxx needs to be replaced with your shop token. The button label of the Edit Button can be changed as well.
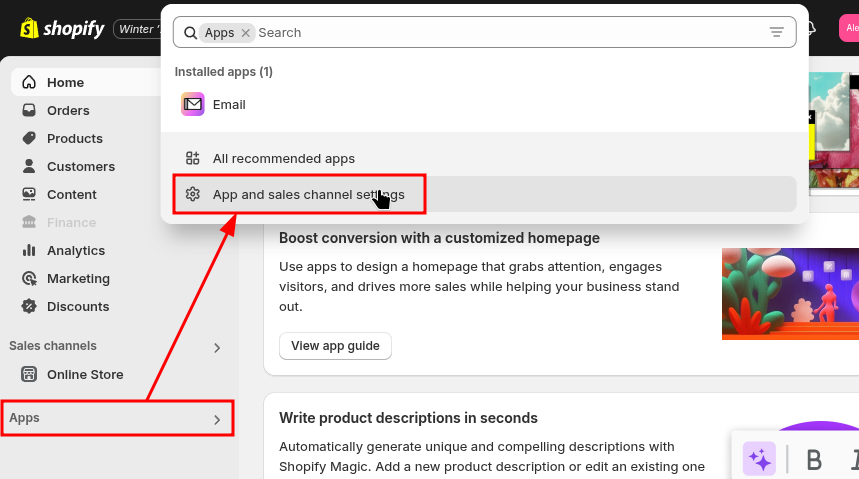
In February 2024, Shopify retires / retired the frontend web api’s for reading products and variants in favour of their GraphQl API’s. Most themes do not provide any product or variant information which is the main reason why our integration needs these API’s to handle variants and price displays. The web api usage has been automatically authenticated by the store frontend without the need for the integration to take care of authentication. With GraphQl, an additional authentication is required. For that, an additional app needs to be created inside the shopify administration that will provide us with the required authentication token.
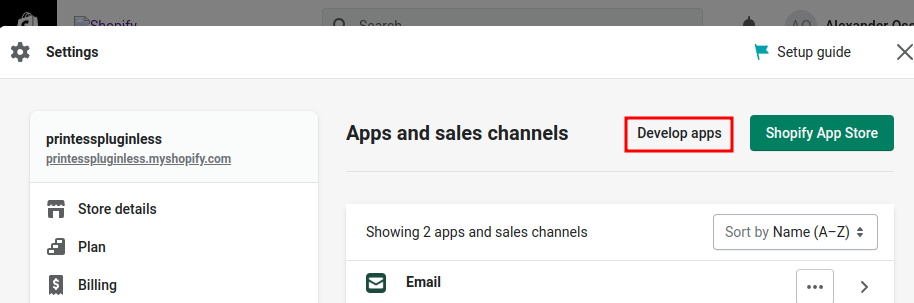
Go to the shopify administration and go to the App and saleschannel settings
Inside the App and sales channel settings click on Develop apps
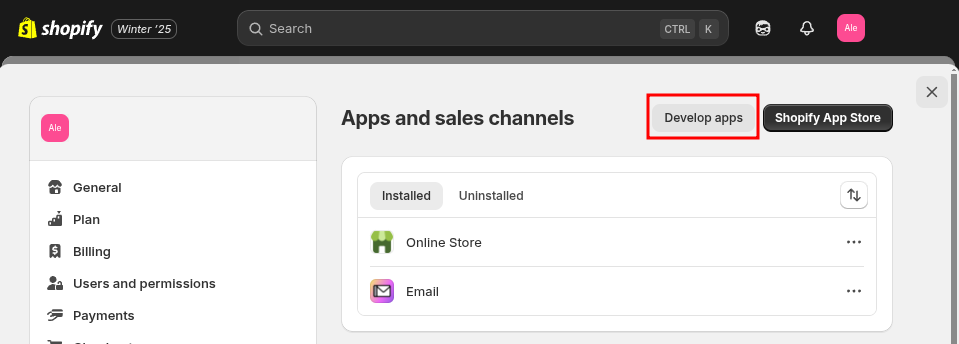
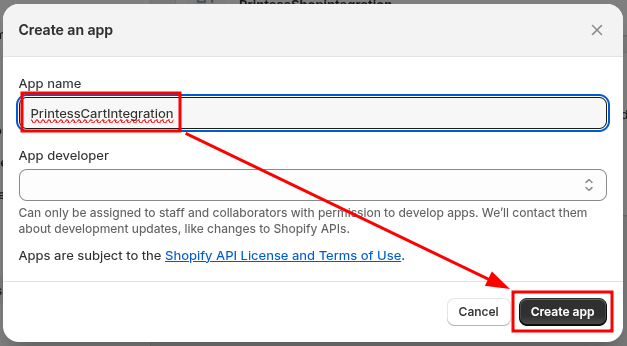
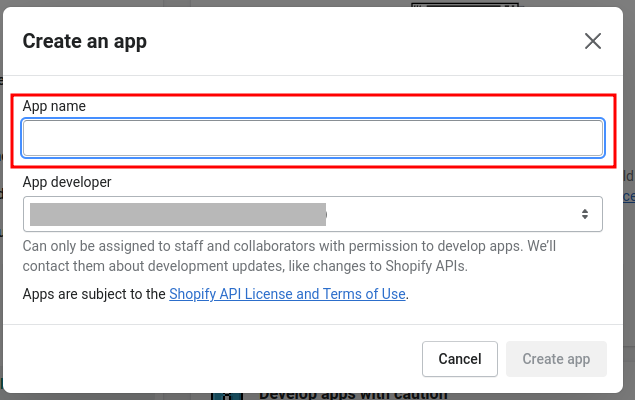
There you will find a list of already created applications on this shop. Click on Create an App to create a new application.
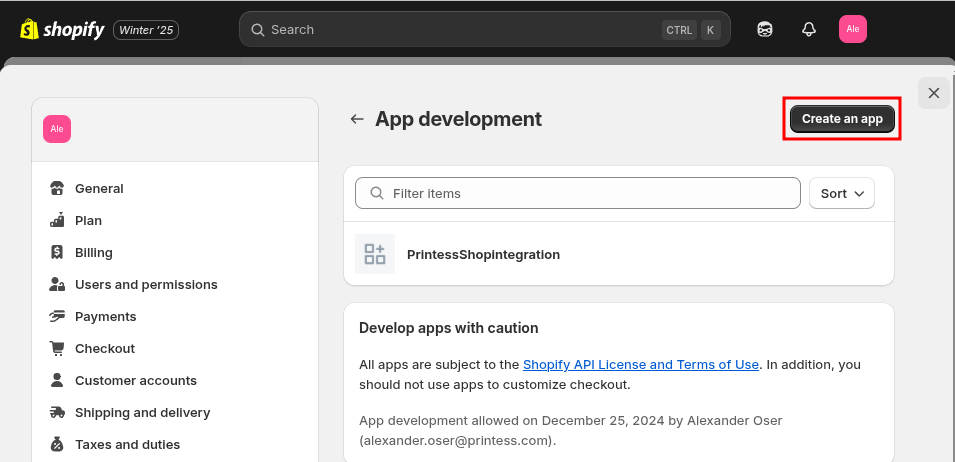
Provide an app name that reminds you of the Printess integration like PrintessCartIntegration and click on Create app.
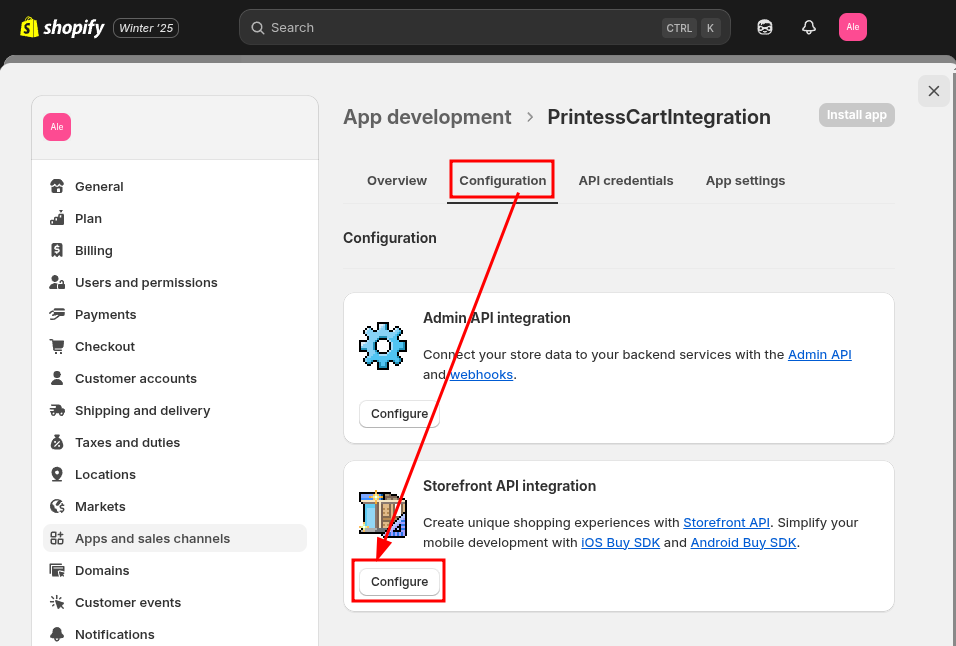
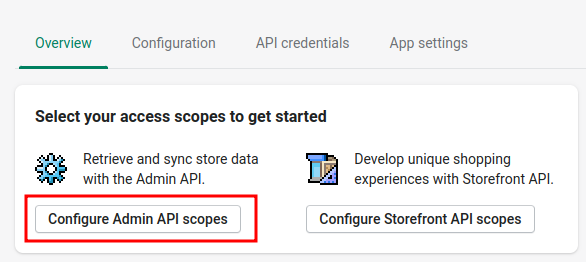
To configure the required access scopes, got to the Configuration tab and click on configure under Storefront API integration
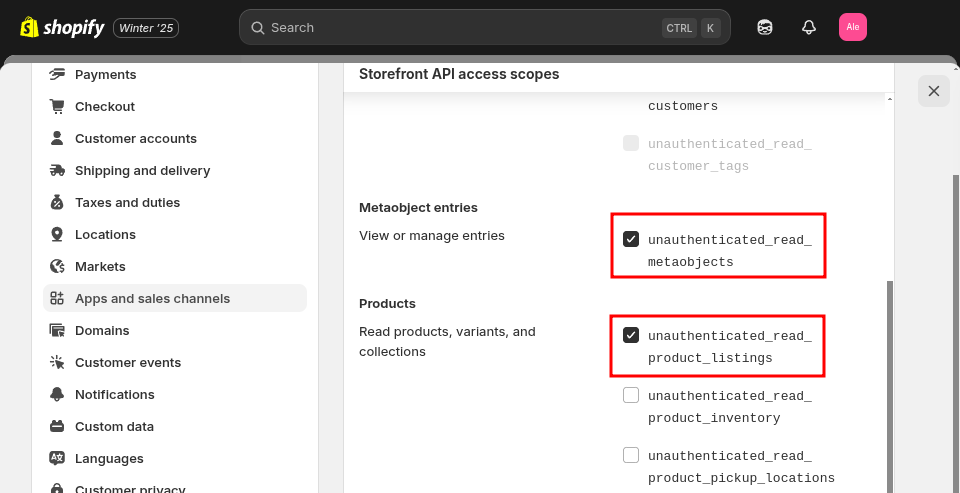
Make sure that unauthenticated_read_metaobjects and unauthenticated_read_product_listings are checked so that the integration can read product info and the associated printess meta data.
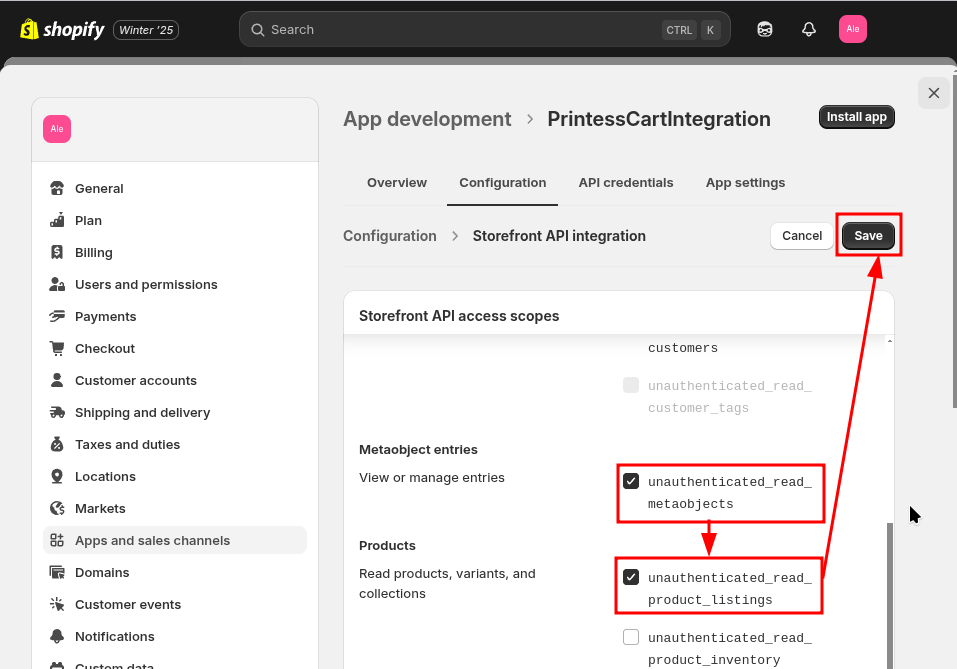
Click on Save to save the changes.
In order to get the required api access token, the app needs to be installed. Go to the API credentials tab and click on Install app.
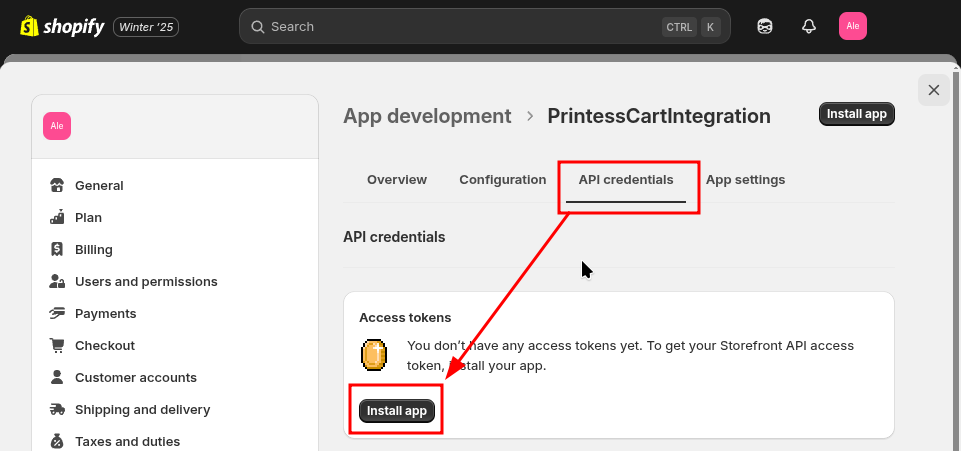
A dialog appears that reminds you to only select access scopes that are really required. Click on Install.

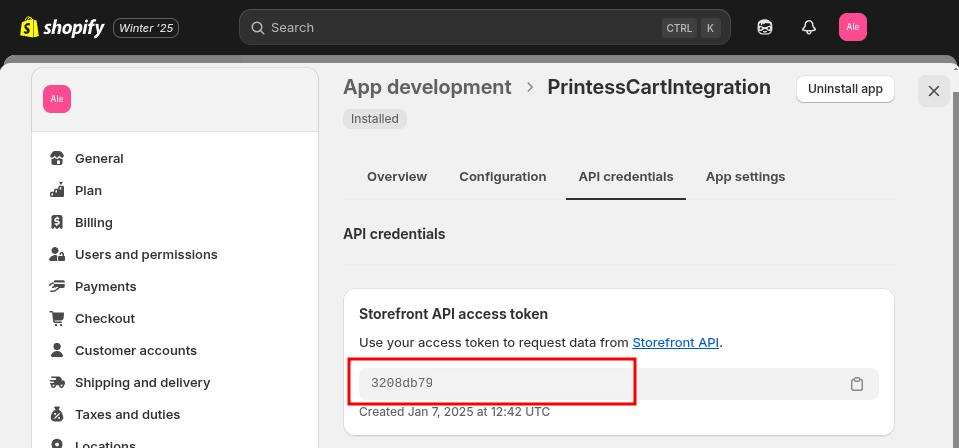
The created access token will be displayed. Copy & or write it down so that we can provide it to the storefront configuration of the Printess integration.
Go back to the theme code editing and open the liquid file(s) that are responsible for displaying the single cart items. Add the following property to the printess-cart-edit-button render block(s):
,
  graphQlToken: "3208db79xxxxxxx"
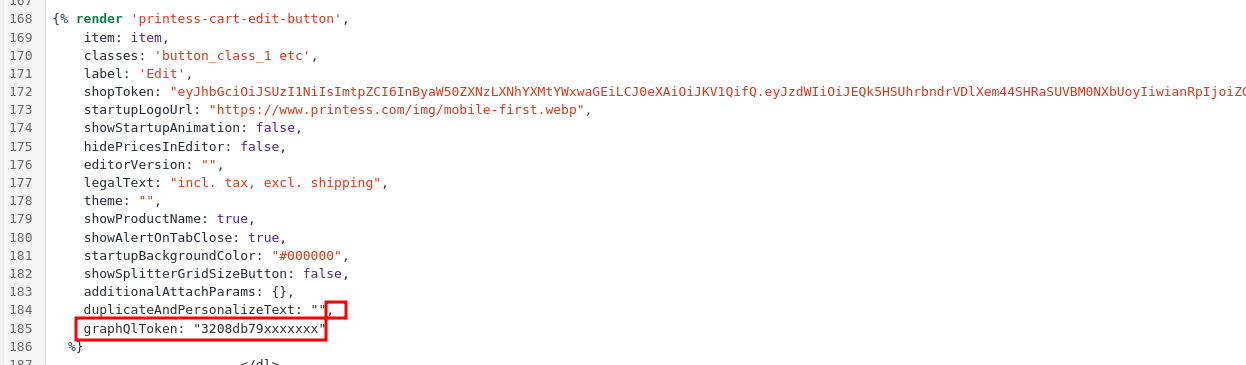 .
.
IMPORTANT: Replace 3208db79xxxxxxx with your own key.
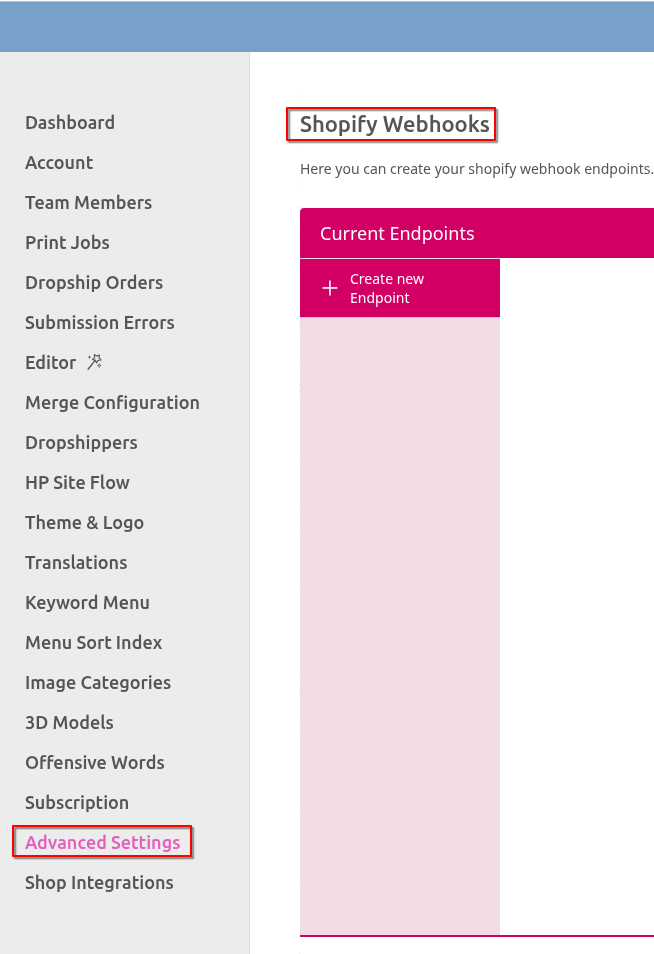
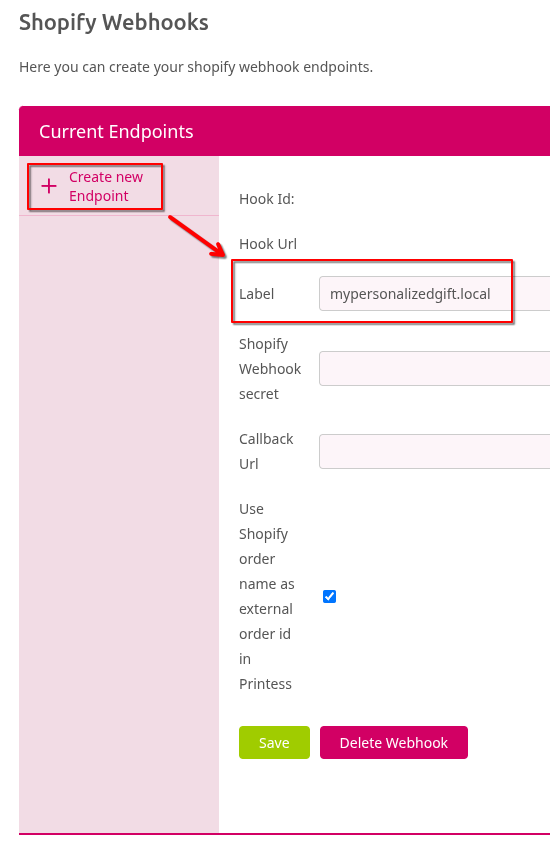
In order to notify the printess system about new orders so that it can start producing the PDF’s of your personalized products you need to register a webhook at the shopify webhook configuration. At first you will have to create a new webhook url at the Printess account portal at the Advanced Settings page. The Advanced Settings menu entry is only visible to account owners. On the Advanced Settings page, scroll down to the shopify webhook settings:
Click on Create new Endpoint and provide a label for the new Endpoint. Each endpoint would be one of your shopify shops. To distinguish between your different entries, you have to provide labels. Type in for example the domain of your shop ( or the shops name etc):
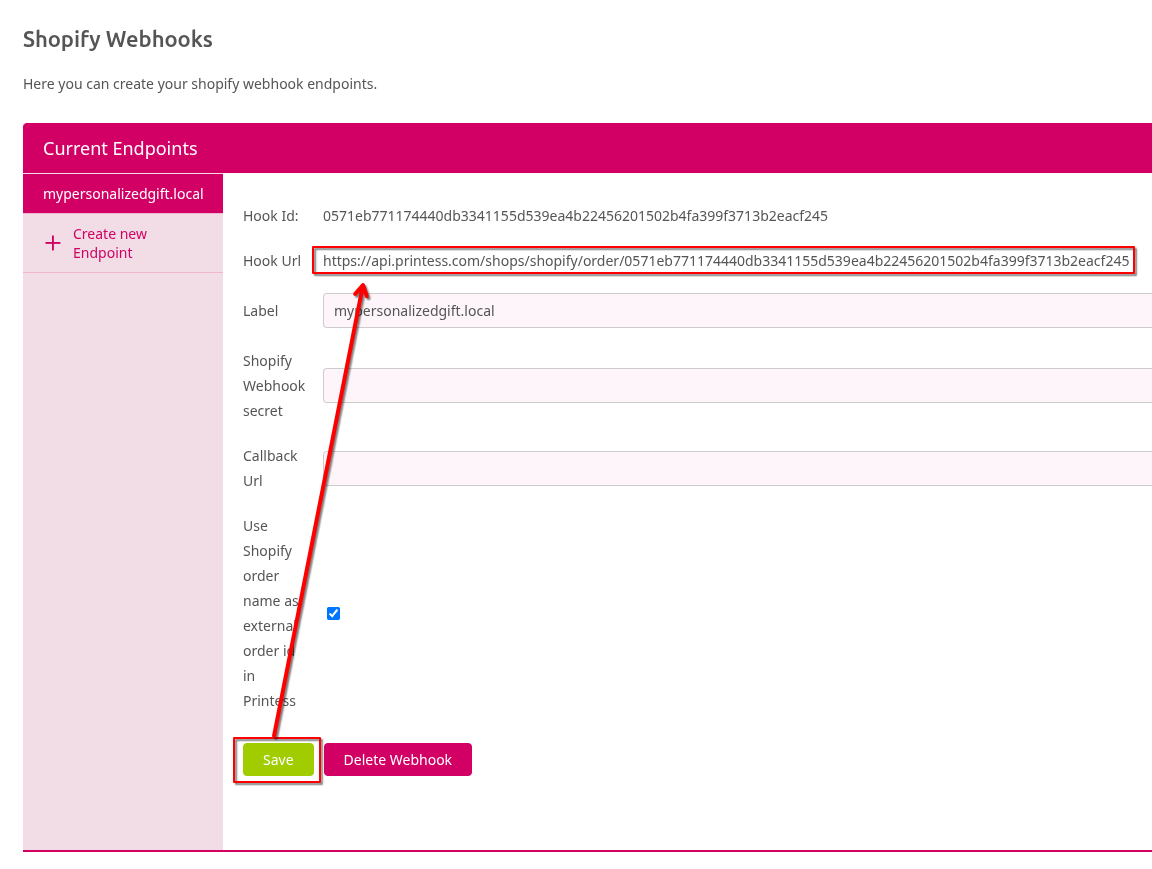
After clicking on Save, your new end point will display the shopify webhook url that you will have to enter at the shopify webhook admin page.
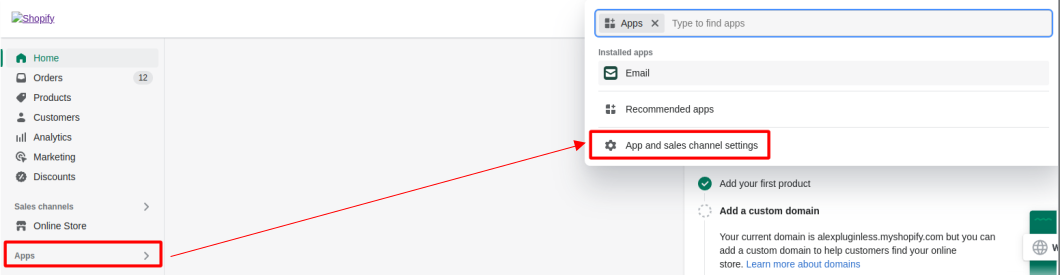
After you created the webhook url, you need to go to the “App and saleschannel settings” of your shop administration.
There, open the notification settings.
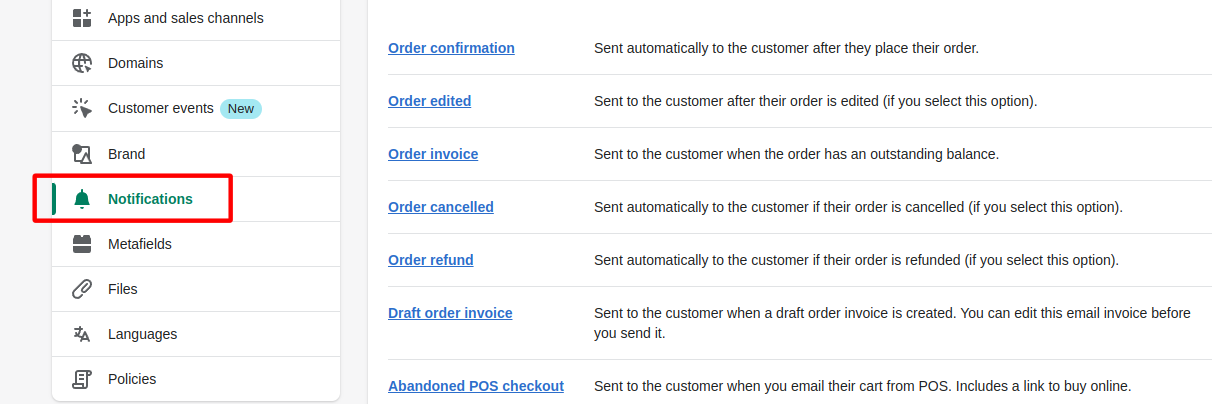
And scroll to the bottom where you will find the web hooks configuration.
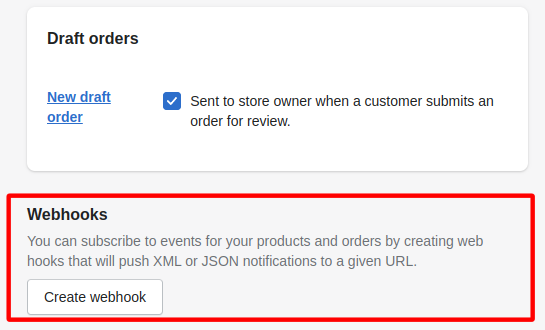
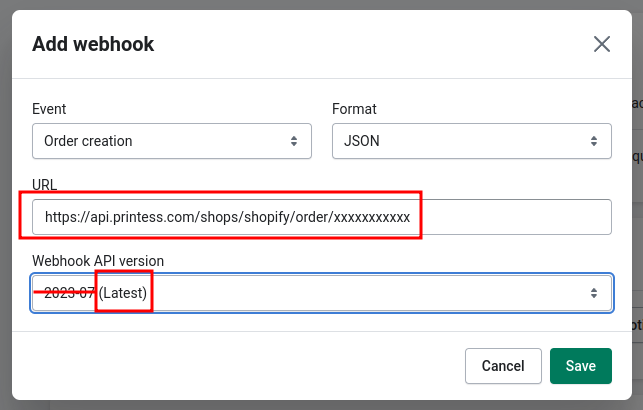
Click on “Create webhook” and select “Order creation” from the events and configure the format to be “JSON”:

Inside the url setting, use the url provided by the printess account portal. For Shopify Webhook API version select the current release or the unstable version.
Click on save. Now, shopify will display a “secret key” that is being used to sign shopify requests and that is being used to verify that the webhook call is really done by the shopify system.

Go back to the printess account portal to the Shopify Webhook settings and enter the signing key that you copied from the shopify webhook configuration and enter it into the textbox Shopify Webhook secret of your created end point.
Click on Save to save your changes.
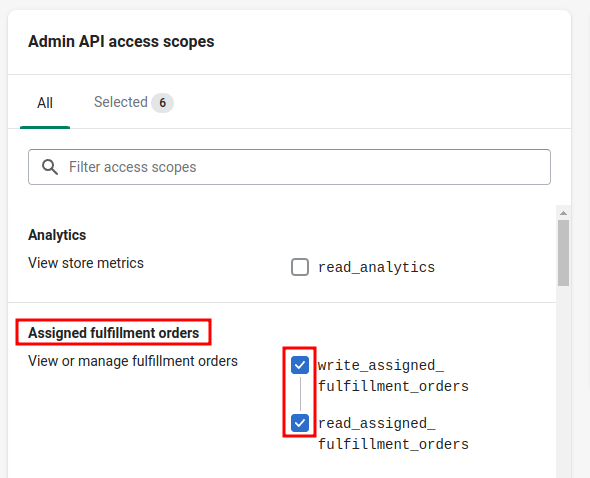
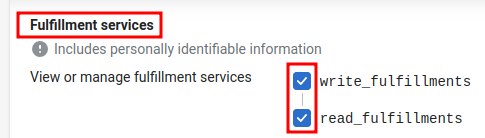
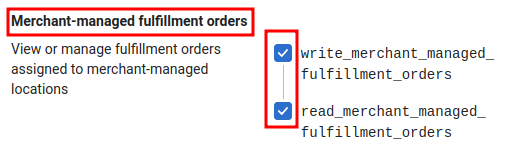
In case your Printess account has fulfillments activated, we (Printess) need a shopify app token that is allowed to access and modify fulfillment information on your orders. You will need to create a private app inside your shop that has the following access scopes activated: ‘read_fulfillments’, ‘write_fulfillments’, ‘read_assigned_fulfillment_orders’, ‘write_assigned_fulfillment_orders’, ‘read_merchant_managed_fulfillment_orders’, ‘write_merchant_managed_fulfillment_orders’
To create such a private app, head over to the apps “App and sales channel settings” inside the admin area of your shop.
Click on Develop apps on the top right side.
Click on Create an app
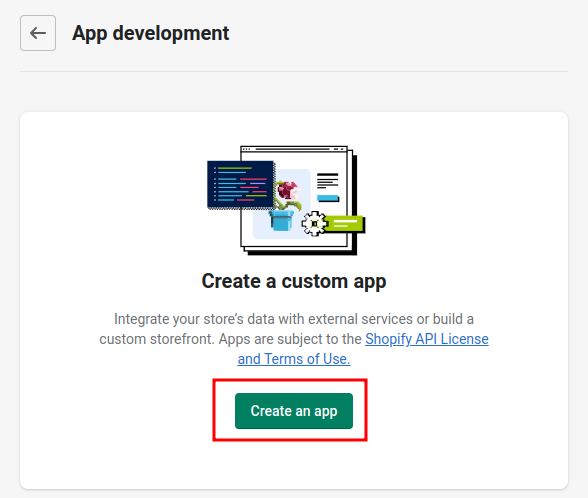
Provide a name for the app.
Now click on “Configure Admin API scopes”
Select the following api scopes: ‘read_fulfillments’, ‘write_fulfillments’, ‘read_assigned_fulfillment_orders’, ‘write_assigned_fulfillment_orders’, ‘read_merchant_managed_fulfillment_orders’, ‘write_merchant_managed_fulfillment_orders’
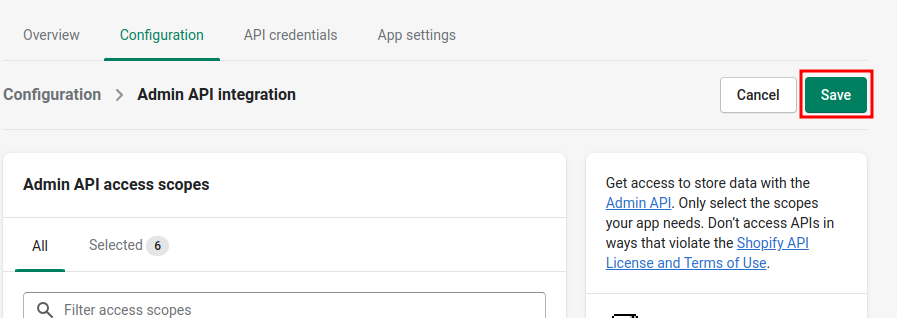
Click on Save on the top right (bottom right) corner of the page.
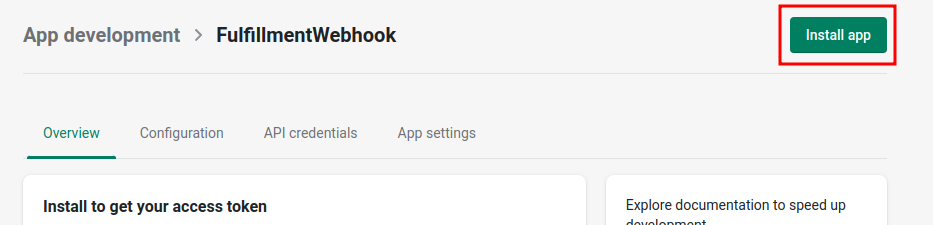
To receive an access token, the app needs to be installed on the current shop. Click on Install app on the top right corner.
Click on Install
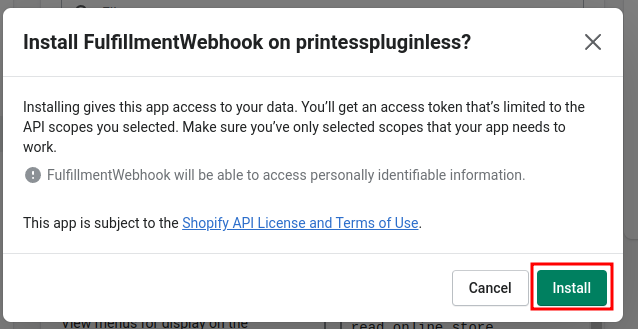
Shopify will now display the Admin API access token as well as the API key and secret key. In the Admin API access token section, click on reveal token once and copy it to your clipboard or write it down.
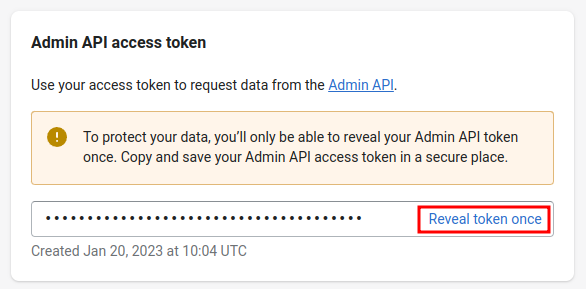
The token should start with shpat_. Now provide the printess support with this token and the domain name of your shop.
The shopify integration is writing additional information about the order and its contents to the template at the time of production. Order properties like the order id, the order name (the display name of the order) or the order recipient name are written into form fields named orderId, orderName, itemQuantity, itemSku etc. In case you want to use one of these values inside your documents, you have to make sure that the template has form fields with specific names. These values will then be set at the time of the PDF creation. The predefined form field names are:
itemQuantity
itemSku
orderId
orderName
lineItemId

CustomerFirstName
CustomerLastName
CustomerName
CustomerAddress1
CustomerAddress2
CustomerCity
CustomerCompany
CustomerCountry
CustomerCountryCode
CustomerPhone
CustomerProvince
CustomerProvinceCode
CustomerZip

ShippingFirstName
ShippingLastName
ShippingName
ShippingAddress1
ShippingAddress2
ShippingCity
ShippingCompany
ShippingCountry
ShippingCountryCode
ShippingPhone
ShippingProvince
ShippingProvinceCode
ShippingZip

BillingFirstName
BillingLastName
BillingName
BillingAddress1
BillingAddress2
BillingCity
BillingCompany
BillingCountry
BillingCountryCode
BillingPhone
BillingProvince
BillingProvinceCode
BillingZip
The Customer- prefixed values representing available information of the shop customer that ordered the product. The Shipping- prefixed values represent the shipping destination (Address) that was provided by the customer. The Billing- prefixed values represent the personal information of the invoice recipient. In case your printer requires an additional page in your document that contains the recipients name / address and the item sku, quantity for content validation at the time of packaging, you could create these 5 form fields
itemQuantity
itemSku
ShippingName
ShippingAddress1
ShippingAddress2
ShippingZip
ShippingCity
that can then be used for example as variables inside text items on your template’s documents.
CustomerName, ShippingName, BillingName are values automatically created by the Printess backend and consist of a combination of the first and the last name (${Firstname} ${LastName}).
Allowed characters for form field names are pretty limited. For example, Spaces, periods, hyphen etc are not allowed. Therefore, in some rare cases (Using of data table, custom integrations) it is not possible to create a form field that has the exact same name that would be required to pull in a specific value into your template. In these cases, you will need to provide a form field mapping that mapps the names used by the shopify integration to the corresponding form field name. The Form field mapping is a simple dictionary lookup with key and value pairs where the keys are the extern names (like CustomerName or ShippingCountry) and the values are the names of the corresponding Printess template form field names. To make this configuration readable by our system, it must be JSON formated.
Example:
{
  "ShippingName": "Recipient",
  "ShippingAddress1": "Street",
  "ShippingAddress2": "Apartment",
  "ShippingZip": "PostalCode",
  "ShippingCity": "City"
}
The above example maps the recipient address that is provided by the Printess backend to a printess tempalte that contains the following form fields: “Recipient”, “Street”, “Apartment”, “PostalCode”, “City”. In this example, mappings would be obsolote by using the same form field names as the names provided by the printess backend. However in some customer specific integrations like Etsy or Amazon the mappings become mandatory in case the incoming variales contain space or other non numeric characters (Rule of thumb a-Z and 0-9 are allowed as long as the first character is alphanumeric and not a number). If your integration for example writes the following variables:
Customer First Name
Customer Last Name
Customer Address1
Customer Address2
Customer Zip
Customer City
These variable names can not be represented as form field names and therefore must be mapped. One example mapping could be:
{
  "Customer First Name": "Firstname",
  "Customer Last Name": "Lastname",
  "Customer Address1": "Address1",
  "Customer Address2": "Address2",
  "Customer Zip": "Zip",
  "Customer City": "City"
}
Your custom integration might have specific variables. For Amazon integrations for example, all personalization values are prefixed with properties. Like propertiesSurname and propertiesName. In these cases, no mapping is required. However, in case the amazon personalization value contains spaces like “Nick name” or the resulting “propertiesNick name” the mapping gets mandatory.
Another scenario where mappings becomes mandatory is using a data table form field. Lets assume a form field table is ised with the following columns: Firstname, Lastname, Address1, Address2, Zip and City a mapping is required that tells the printess backend to write into these table columns. This is done by prefixing all values with form.data.. So instead of Firstname we have to provide the value form.data.Firstname:
{
  "CustomerFirstName": "form.data.Firstname",
  "CustomerLastName": "form.data.Lastname",
  "CustomerAddress1": "form.data.Address1",
  "CustomerAddress2": "form.data.Address2",
  "CustomerZip": "form.data.Zip",
  "CustomerCity": "form.data.City"
}
or in case of above mentioned properties prefixed values:
{
  "propertiesName": "form.data.Name",
  "propertiesSurname": "form.data.Surname",
}
or with spaces in the keys like “propertiesFirst Name”:
{
  "propertiesFirst Name": "form.data.Firstname",
  "propertiesLast Name": "form.data.Lastname",
}
To provide these mappings to the printess backend, a new shopify product metafield is required. (See Creation of required product meta fields). Use Formfield Mappings as display name (or any other) and printess.formFieldMappings as namespace and key. The description could be Json object containing template mappings for printess. Choose Single line text as data type. Now, every product in your shopify configuration has a new field Formfield Mappings where the mapping can be provided. In order to provide the mapping to this field, the json object needs to be reformatted into one line. Instead of
{
  "CustomerFirstName": "form.data.Firstname",
  "CustomerLastName": "form.data.Lastname",
  "CustomerAddress1": "form.data.Address1",
  "CustomerAddress2": "form.data.Address2",
  "CustomerZip": "form.data.Zip",
  "CustomerCity": "form.data.City"
}
all new line needs to be removed and everything brought into one line:
{"CustomerFirstName": "form.data.Firstname", "CustomerLastName": "form.data.Lastname", "CustomerAddress1": "form.data.Address1", "CustomerAddress2": "form.data.Address2", "CustomerZip": "form.data.Zip","CustomerCity": "form.data.City"}
This can then be provided to your product configuration.
The Printess shopify integration automatically forwards Shopify product variant options to the editor. Imagine, the product has a Color variant option with the values red, green, blue.
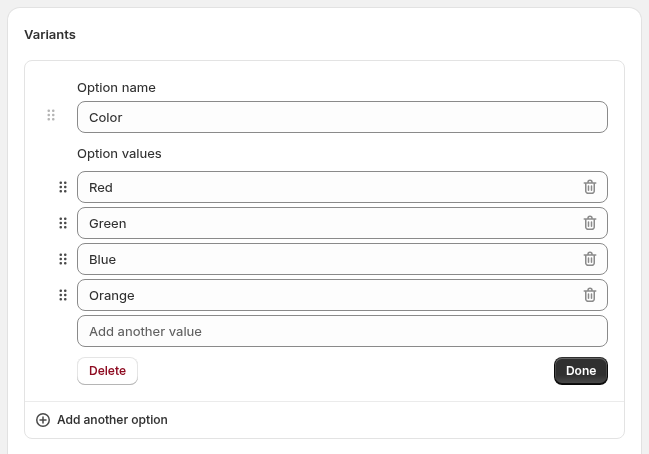
The Printess template needs to have a form field called Color that has the exact same option values as the Shopify option.

Casing is important for the automatic form field mapping. Make sure that the form field name and option values exactly match the Shopify option name and values.
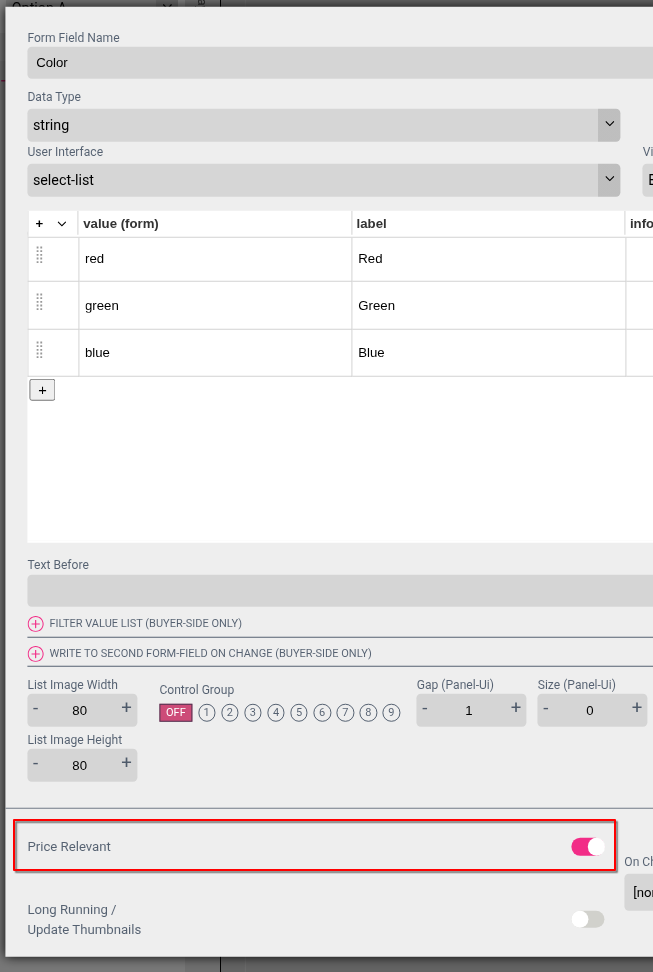
In case the end customer is allowed to change these values during the design editing inside the editor, make sure that value changes done inside the editor are fed back to the shopify shop, ensure that the price relevant option is activated inside the form field configuration.
Printess form field names are restricted to certain characters and do not support white spaces. Sometimes, form field names are already predifined (the DOCUMENT_SIZE form field for eaxample) by the printess editor. In many cases you need to have the ability to freely name your shopify variant options and you definitley do not want to name them DOCUMENT_SIZE. To account for this, instead of mapping your shopify options to Printess form field names, it is also possible to map against the labels of the form field. So instead of Color create a Shopify product variant option called “Cover Color” and rename the variant option values to uppercase characters: Red, Green, Blue. On the Printess template form field modify the labels accordingly:
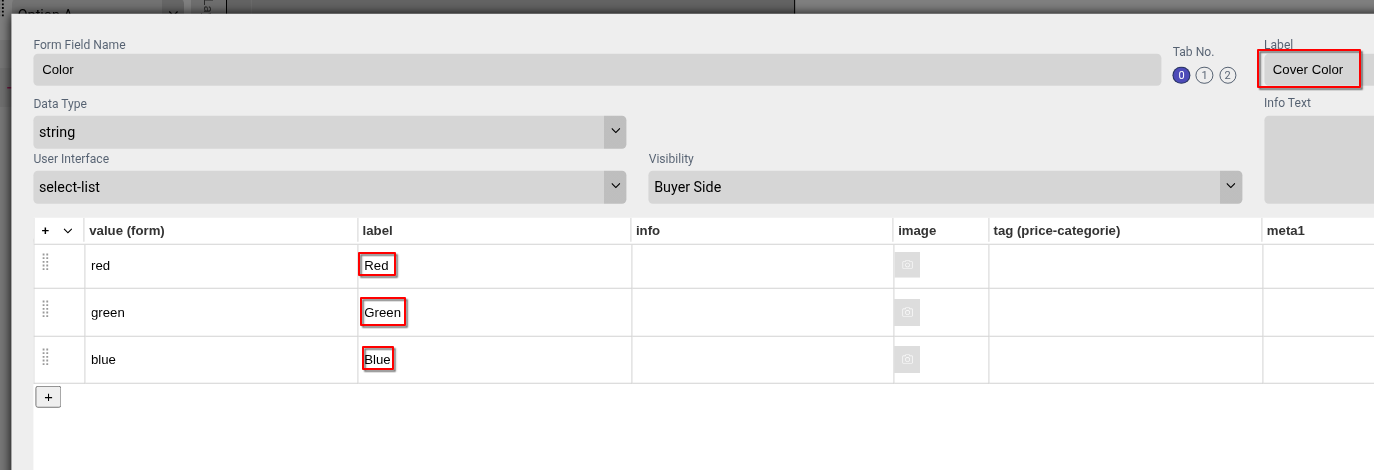
To prevent issues during the automated mapping, you need to ensure on the Printess formf field configuration, that the labels do not match the form field name / values, A shopify option name / value that can not be mapped uniquely to either the name OR the label will cause unforseen issues when trying to write values back to Shopify.