Note:
With Printess’ Magic Photobook the Buyers can effortlessly create their own personalized Photobook with just a few clicks. By integrating powerful features like Layout Snippets and Splitter Grids with AI technology, we offer a completely new user experience that transforms how your customers engage with your product!
A Magic Photobook Template needs two Documents. One for the Cover - including a Cover with a dynamic Spine - which automatically scales based on the number of pages. And a second one for the Inner Pages. You always have to start with the set up of the Inner Pages Document!
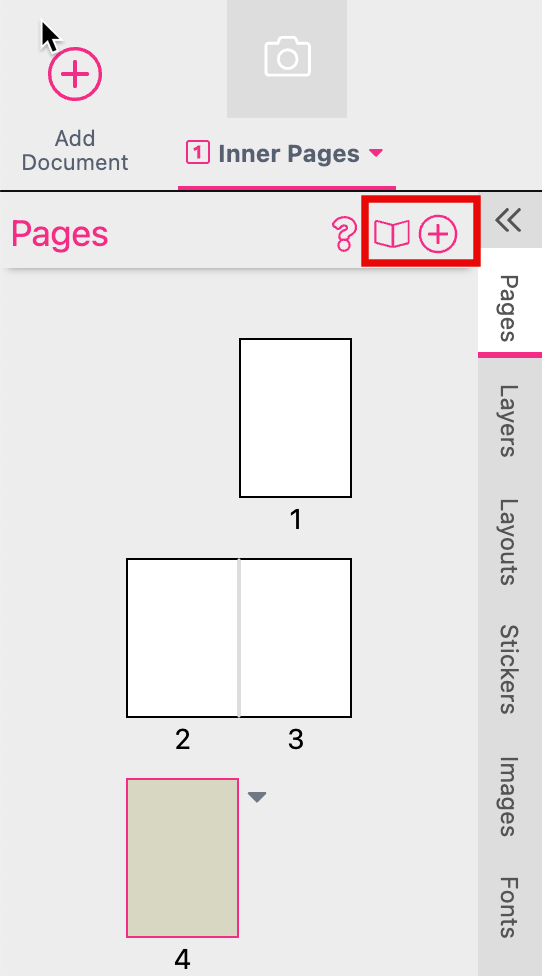
As a result your Document should look like that:
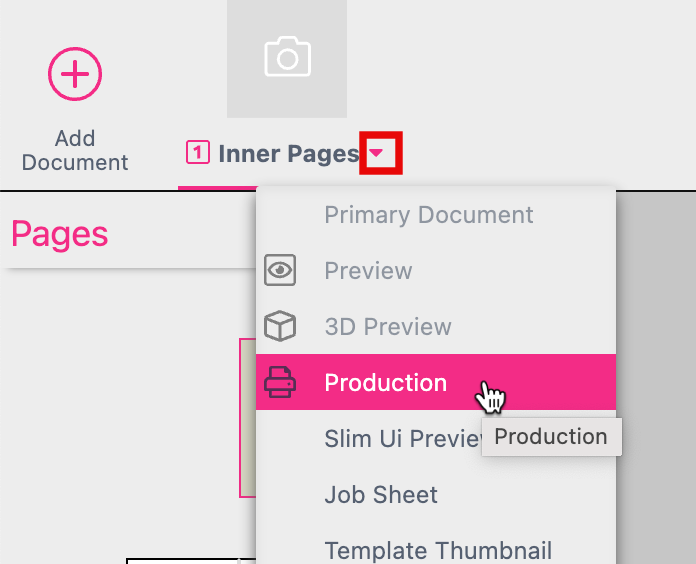
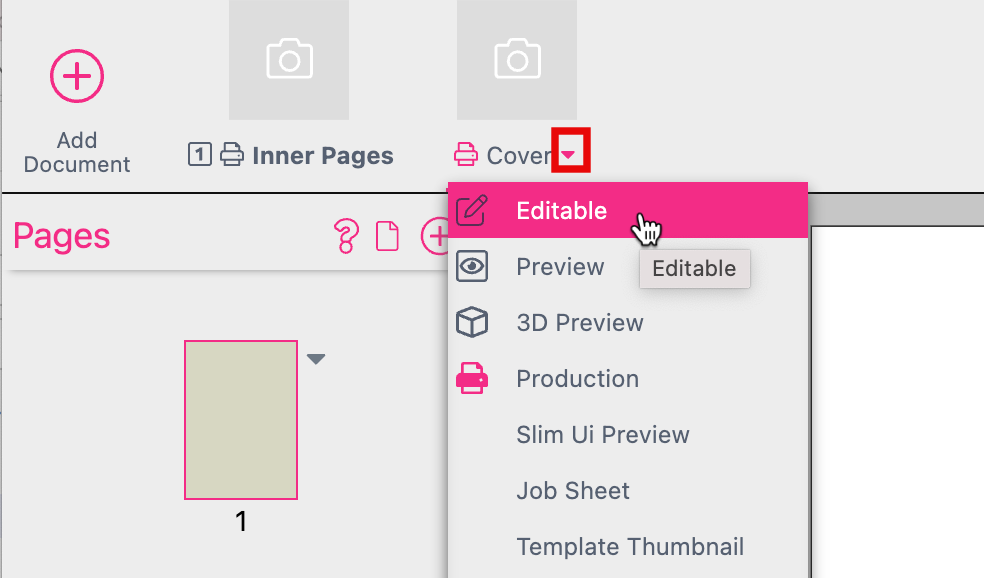
Open the Document Context Menu by clicking the small pink triangle to select the option Production.
You now have to set up the following Book features at the Buyer Side Tab of the Inner Pages Document at the Features Panel:
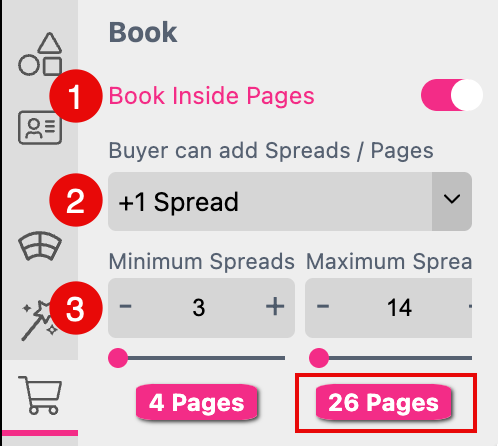
Book Inside Pages: Enables the option to define the inner pages and the cover page in two different Documents and to add spreads at the Buyer Side
Buyer can add Spreads/ Pages You have to activate the option that the Buyer can add Spreads to the Document. And you have to define the number of Spreads which could be added.
Define a Minimum and Maximum number of Spreads the Buyer can add. The maximum number of Spreads which could be added influences the maximum number of pages of your photo book. In this example the maximum number of pages for the photo book is limited to 26. So if you would like to allow more pages you would have to increase the maximum number of Spreads which could be added.
Learn more about Cover Page & Spine
 >
>
The settings of this feature will be explained later.
Now add a second Document to your Printess Template to name it Cover. Open the Document Context Menu by clicking the small pink triangle to select the option Production.

Open the Document Context Menu again to select the option Editable.
Go to the Document Settings of the Cover Document to press the Books icon.
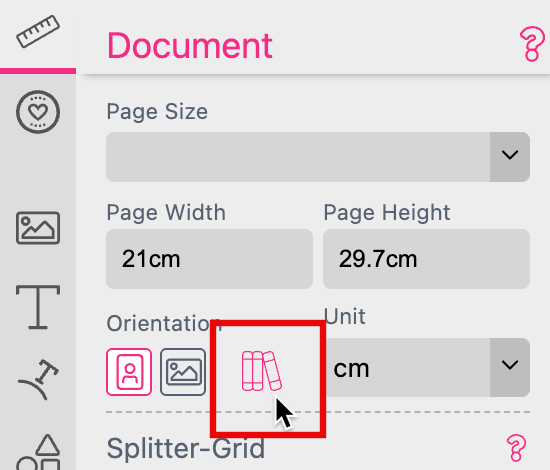
Now this Document automatically becomes a Cover with Spine.
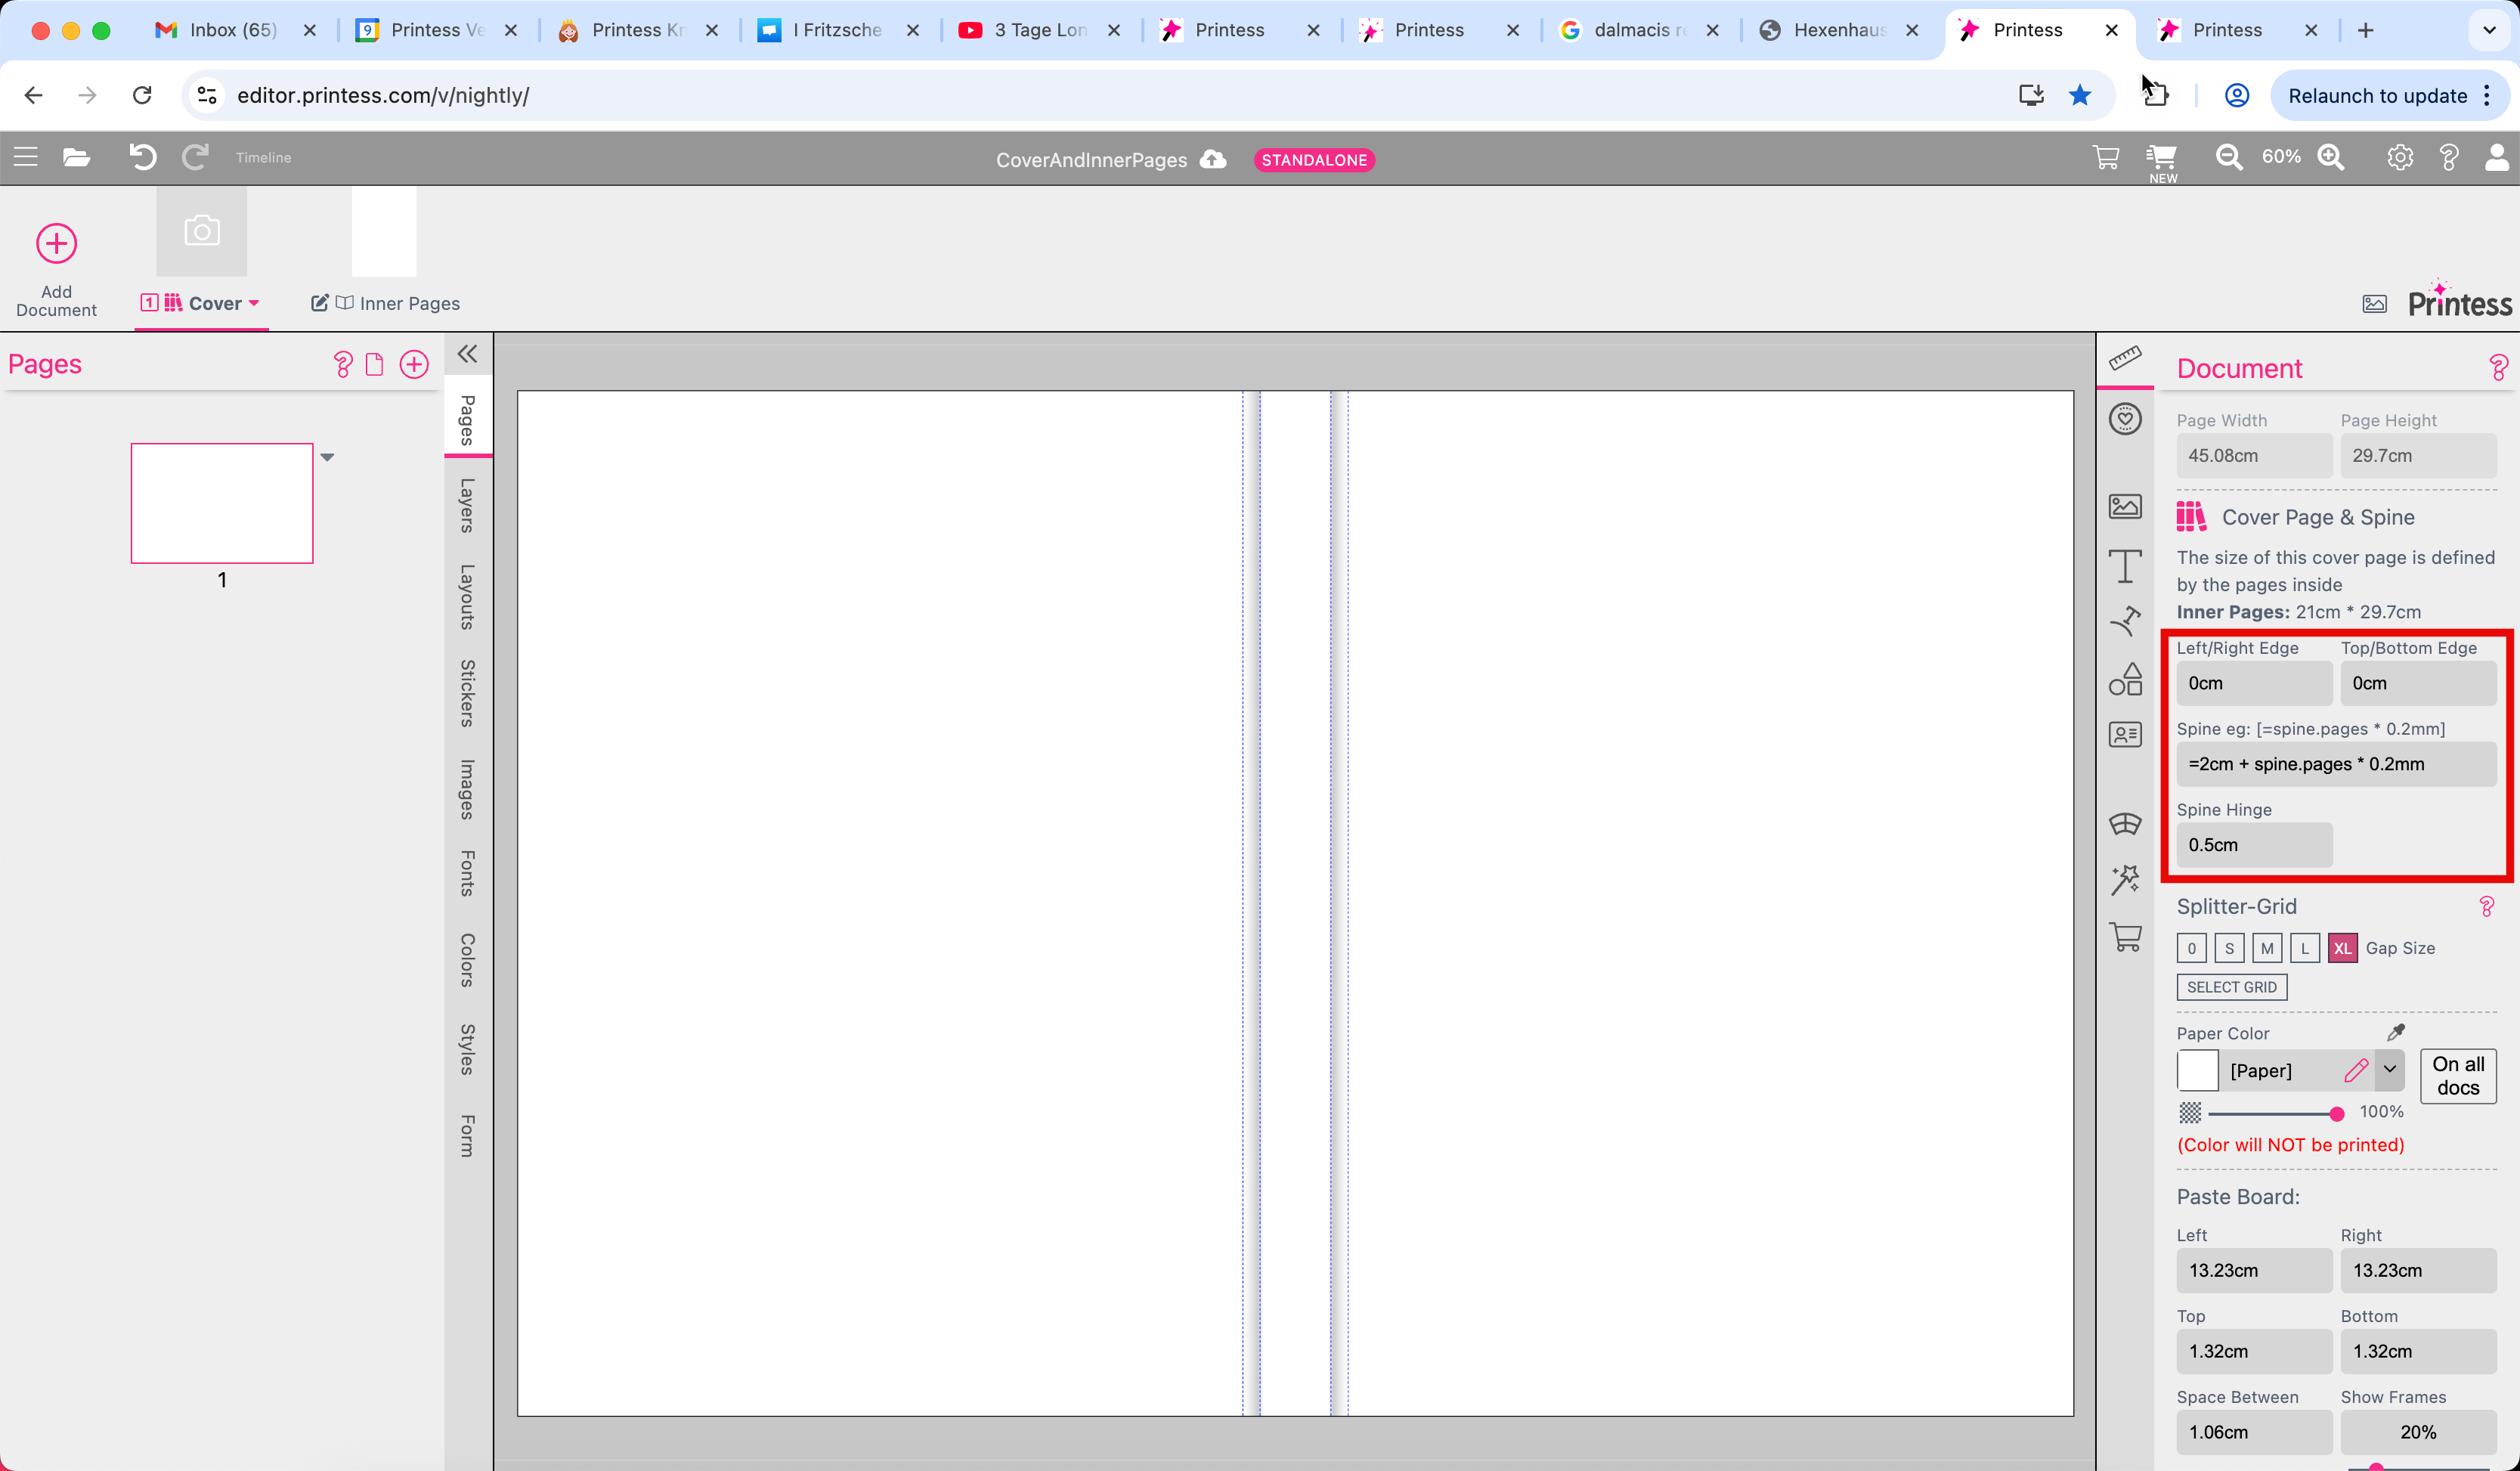
It’s page size is controlled by the Inner Pages Document. PageSizeCover = 2 x “PageSizeInnerSinglePage” + “Spine”. You can now change:
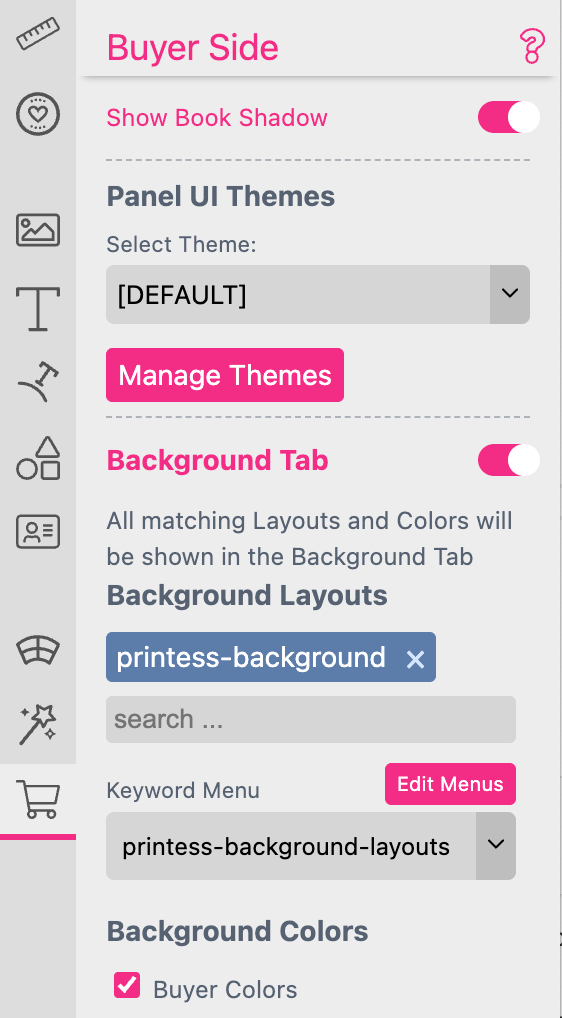
Turn on the Background Tab. This will allow the Buyer to choose different backgrounds.
>
The settings of this feature will be explained later.
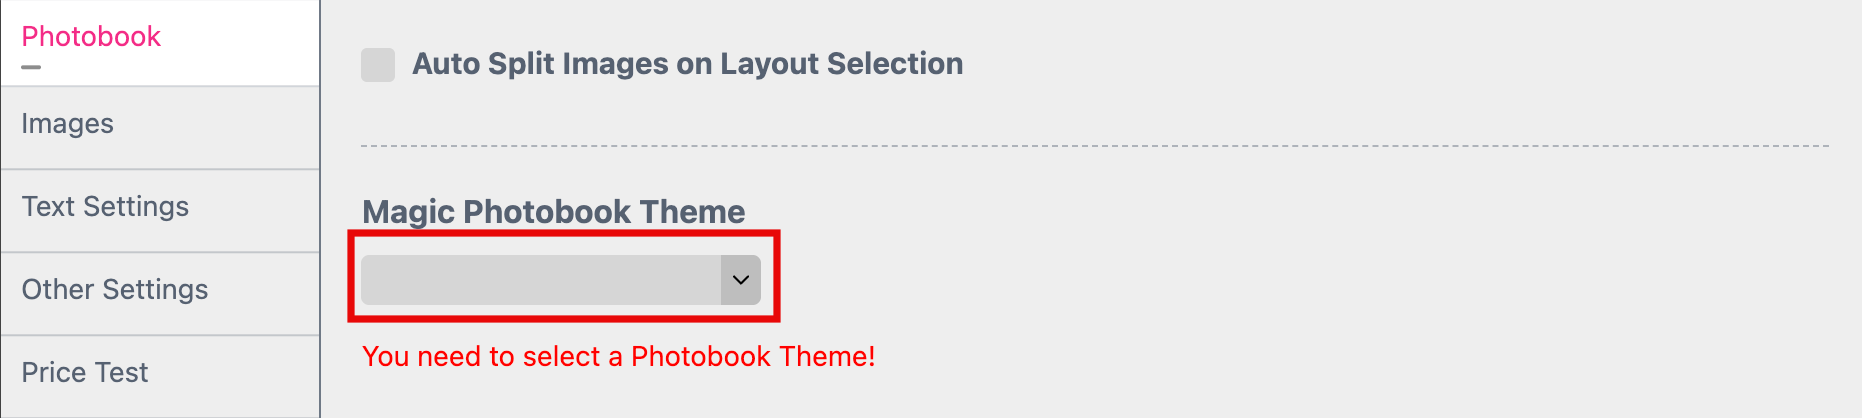
If you like to set up a Magic Photobook you first have to turn on the Show Magic Photobook Wizard feature. This automatically activates the option Image Collage Creation as well. You can not turn it off because it is essential for each Magic Photobook!
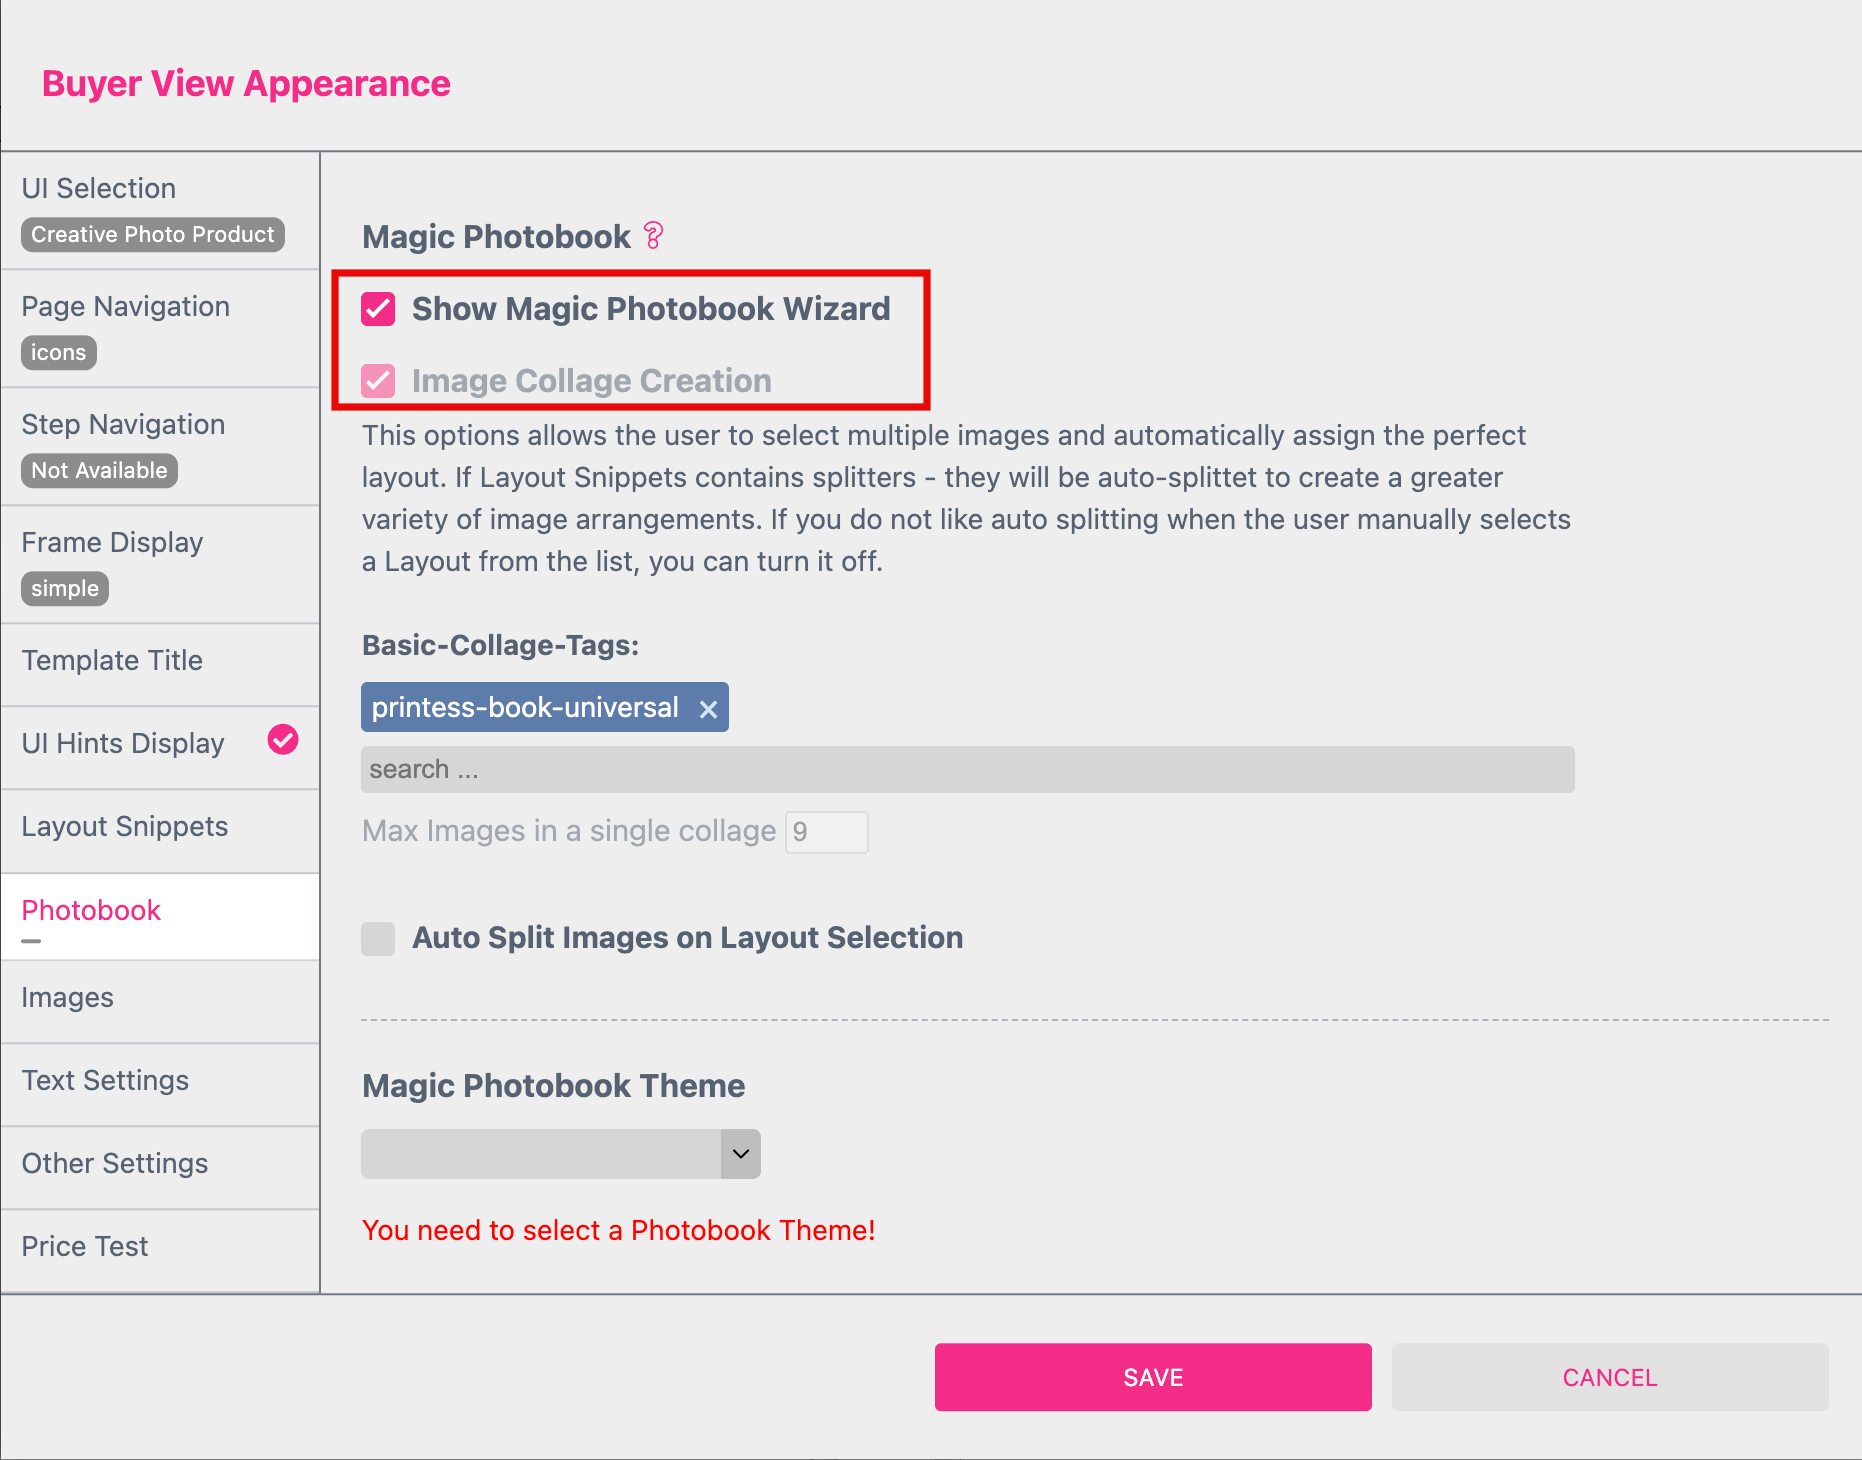
You find these Settings at the Photobook Tab of the Buyer View Appearance Setting. Just press the key “a” to open them at the Designer Side - if no frame is selected.
Any Magic Photo Book is based on two different Layout Library Tags.
Learn more about Layout Libraries
These Layout Snippets are used at the Buyer Side at the Layout Selection and the Re-Arrange-Images Dialog - together with the Layout Snippets of the Theme Tags.
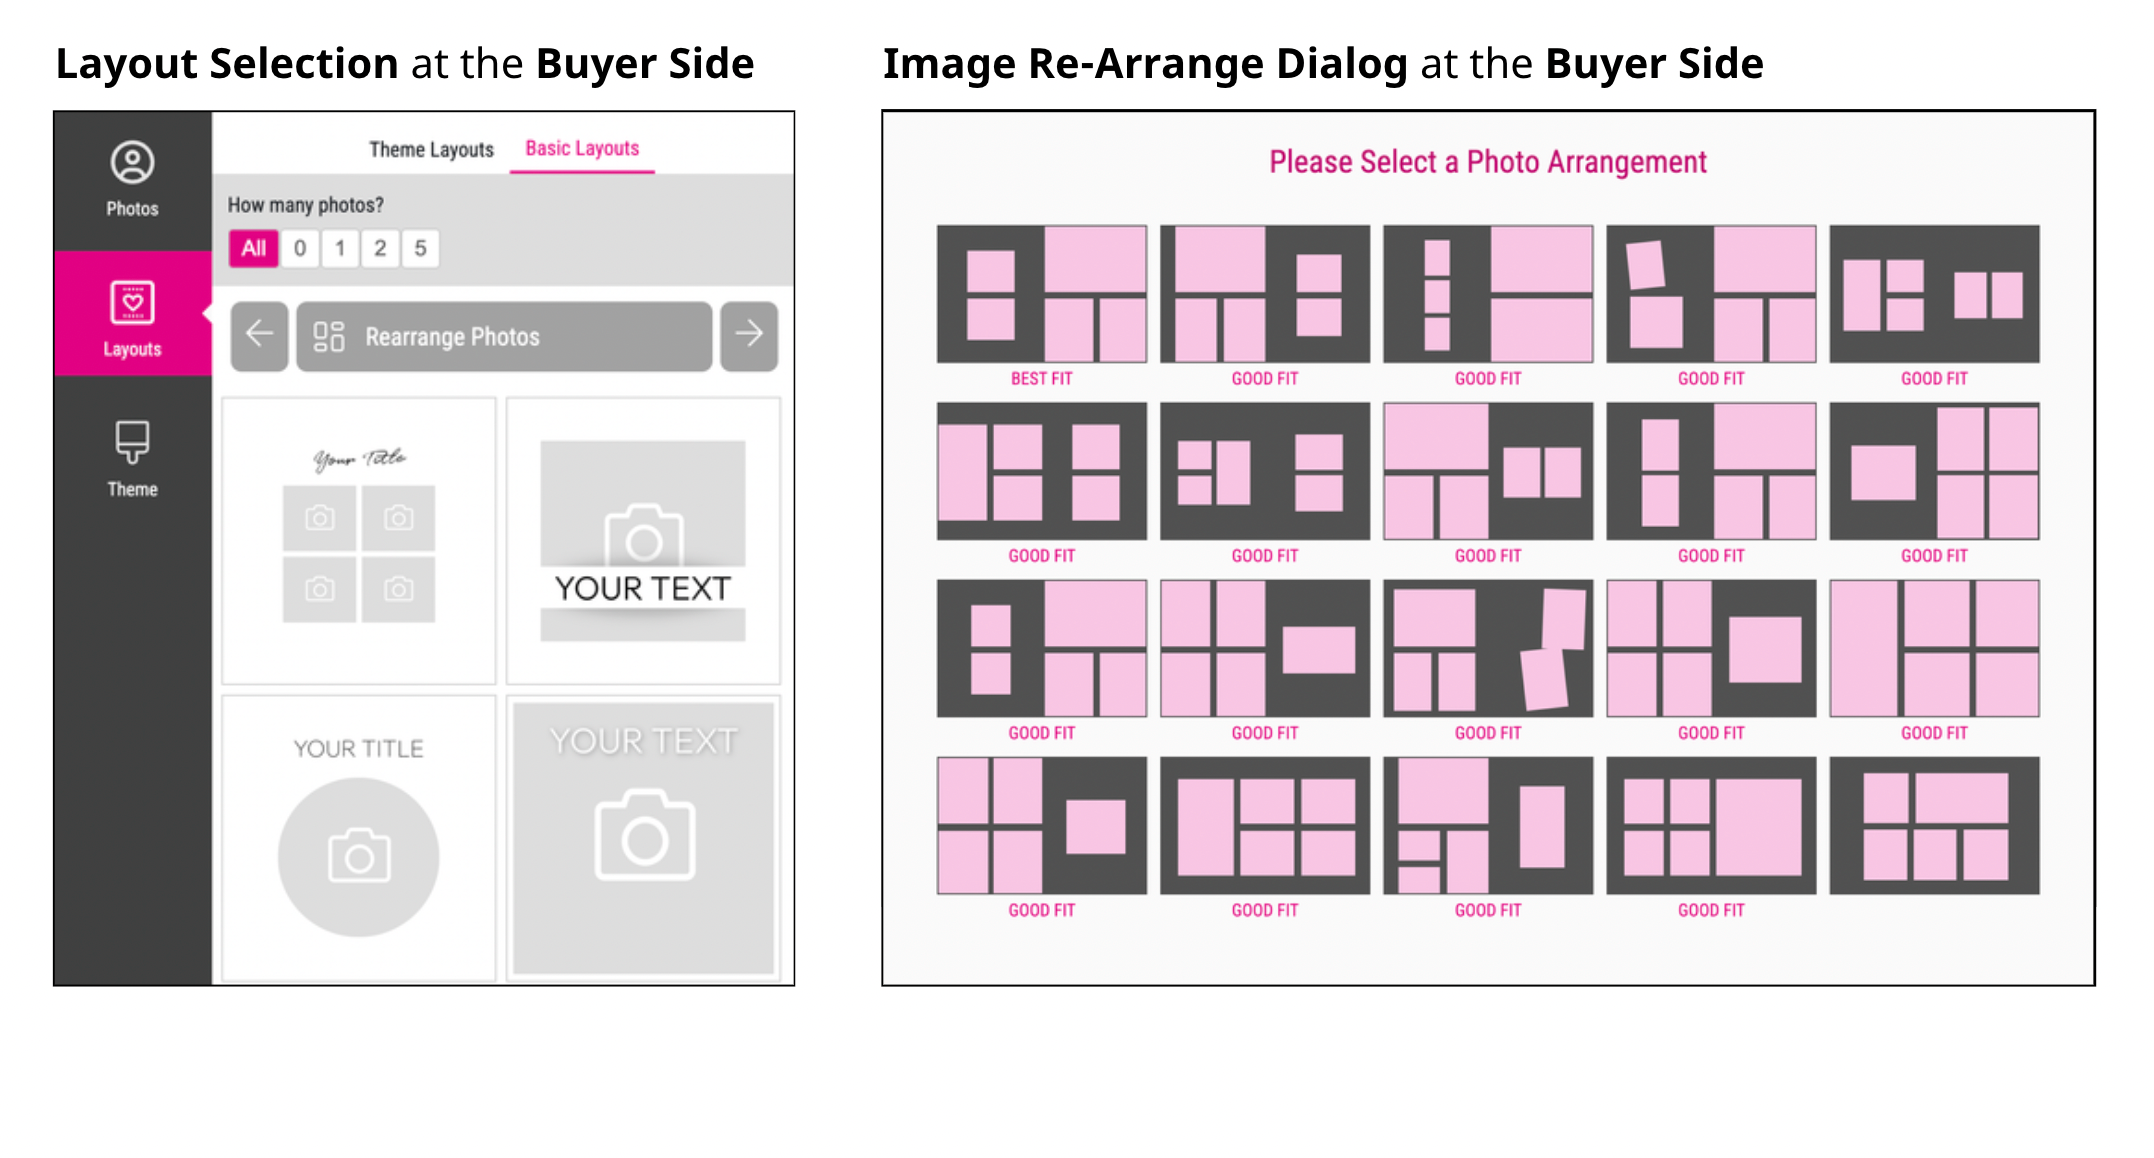
Specially for the Re-Arrange-Images Feature it is important that the Layout Snippets assigned under the Basic Collage Tag includes Splitter. They can split each image frame placed on the pages to fit to any number of images the Buyer wants to place - up to nine.
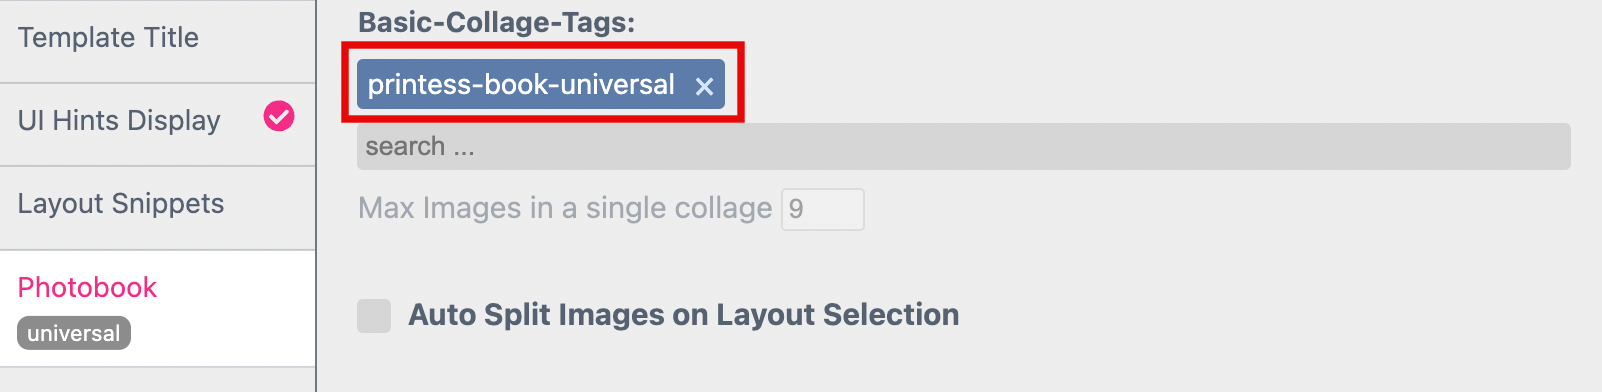
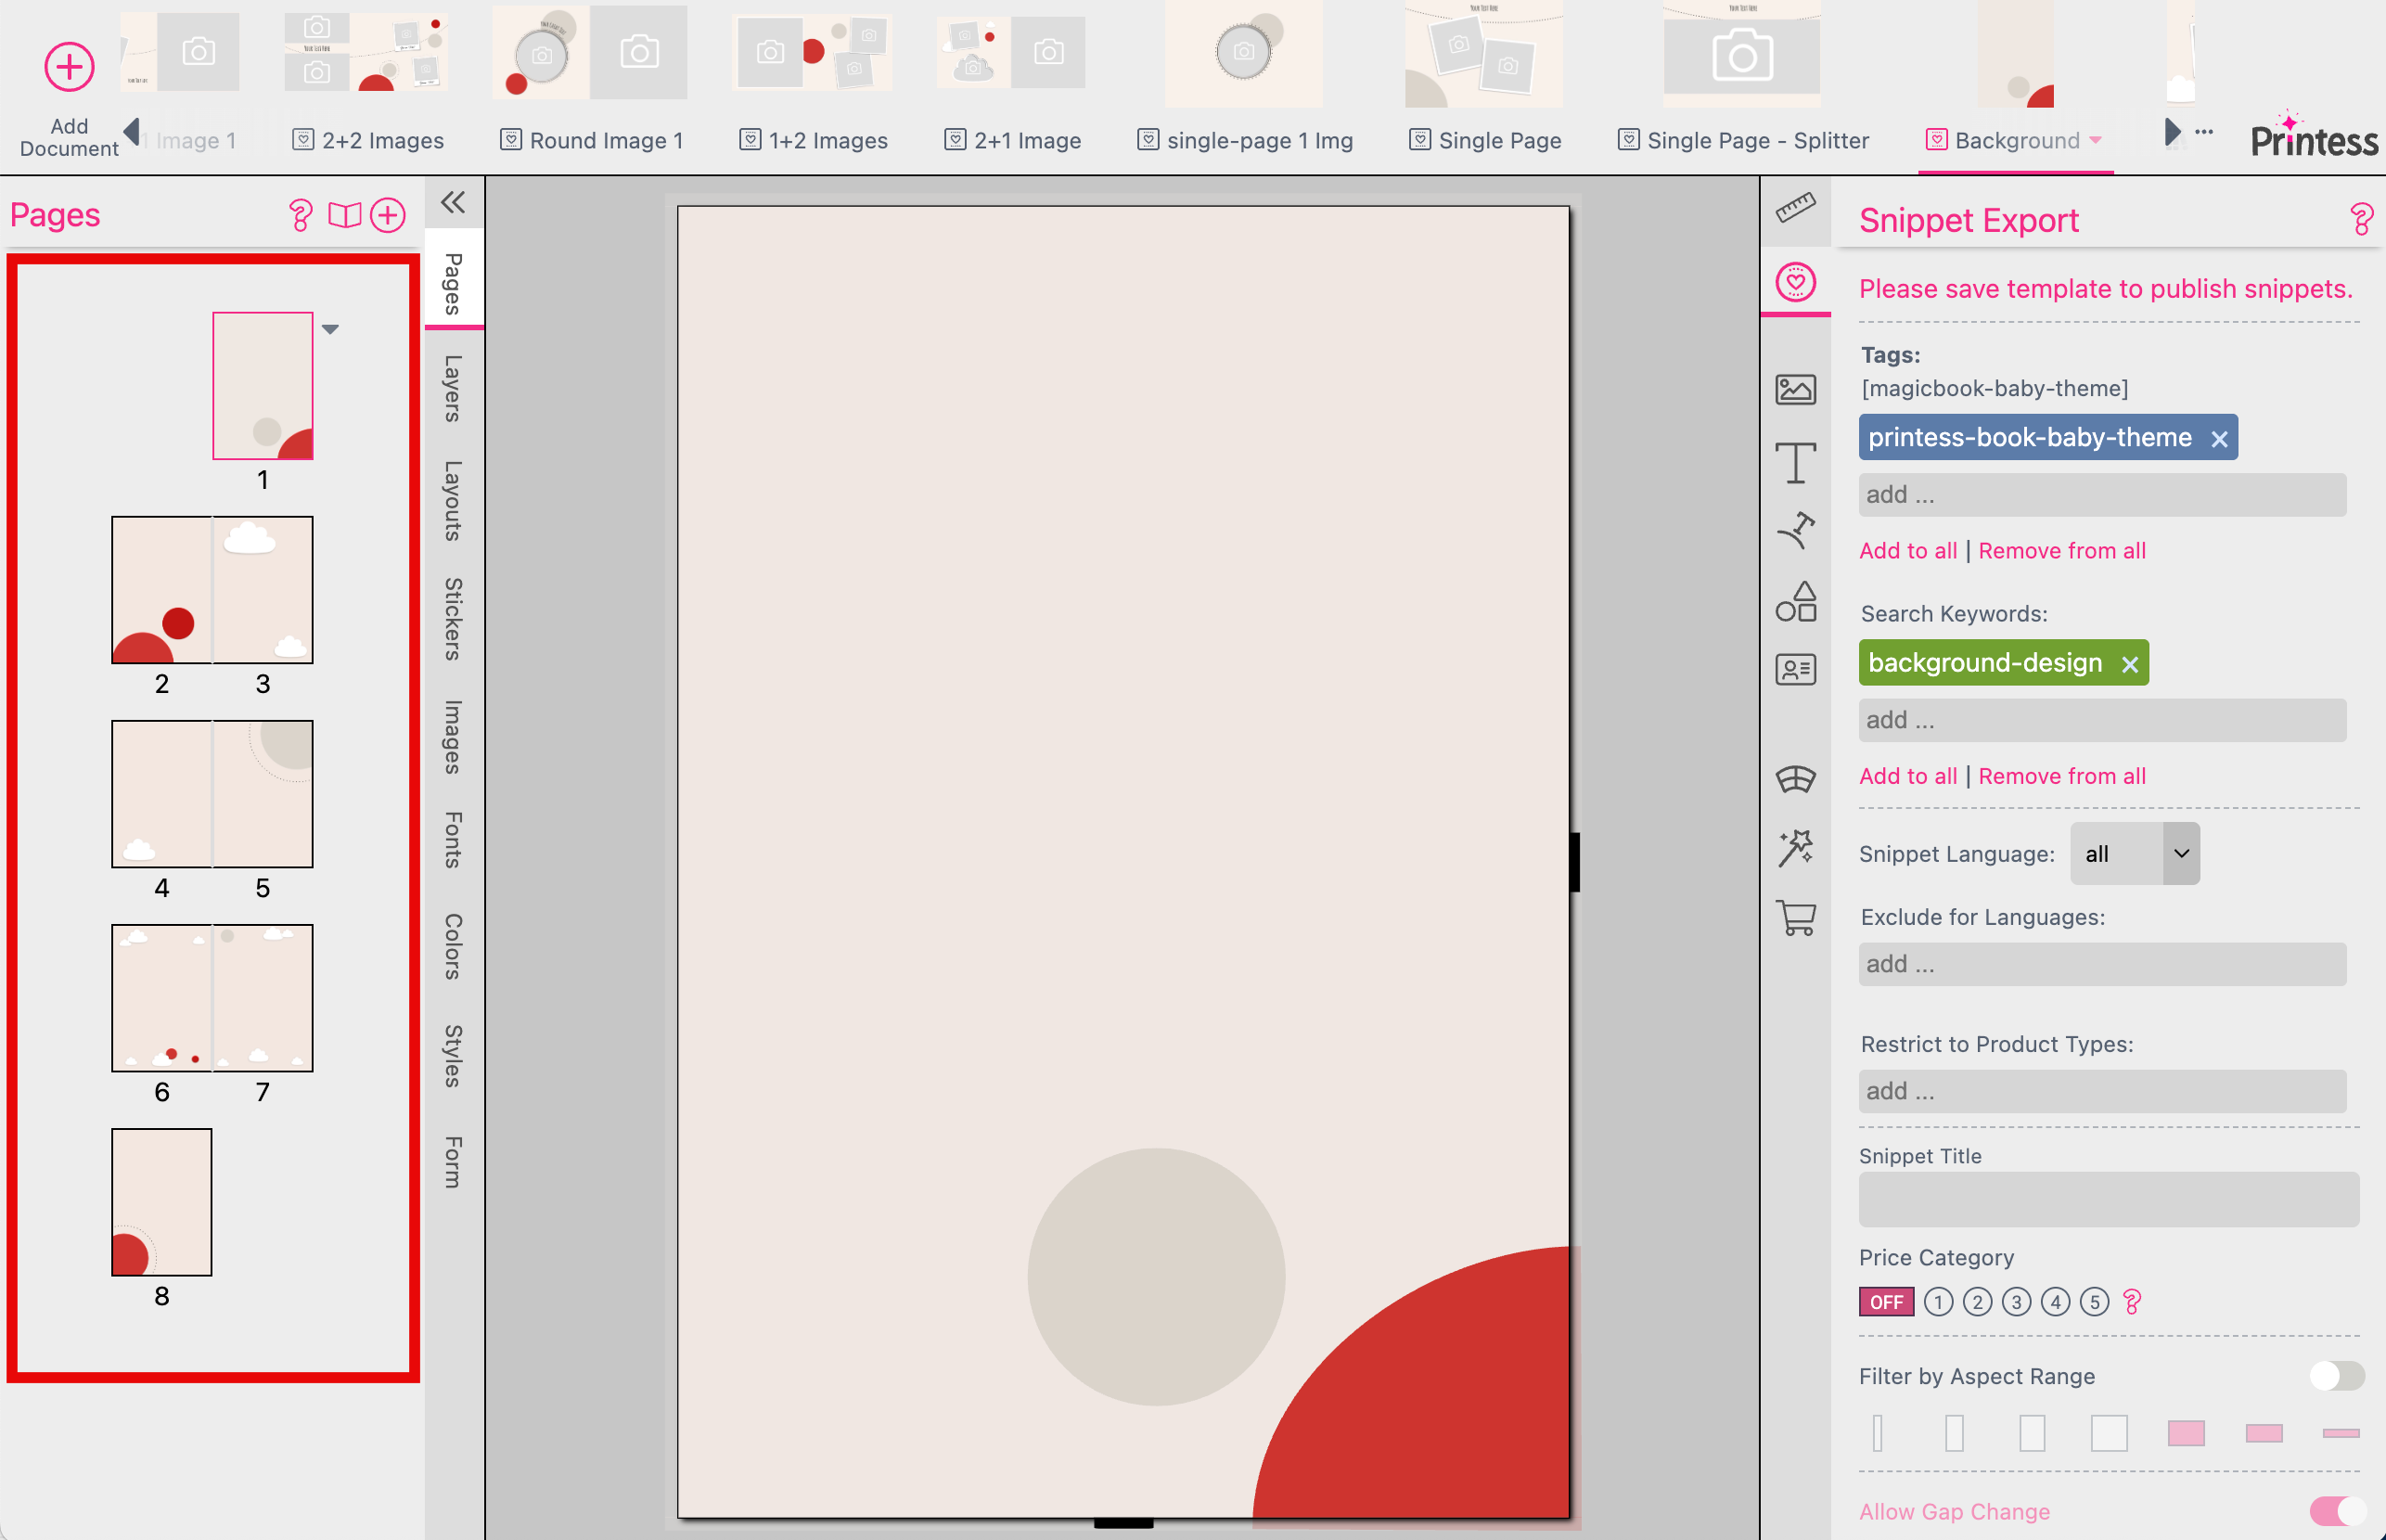
So first of all you have to go to the Account Portal to create a Photobook Theme to assign it here. At least you need a Universal Theme. The easiest way to set it up is using the existing Printess Layout Library with the Tag called printess-book-universal.
Learn how to set up Photobook Themes
If you have created your Universal Theme you can assign it here to press the Save button.
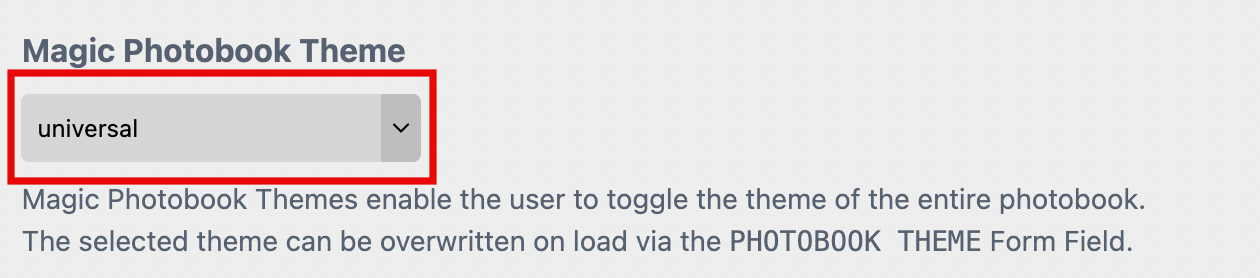
Note: If you have changed or added a Theme at the Account Portal and it does not appear in that drop down menu you have to reload your Printess Template first to update the drop down menu.
This assignment is for testing only! Later you have to overwrite this Tag through the Attach Parameters “PHOTOBOOK_THEME=tagname” when you load the editor. Or via a specific setting when using our shop integrations.
If you press the Save button a popup window will open where you have to confirm that Printess will automatically show the Image Search Bar at the Buyer Side on each page.
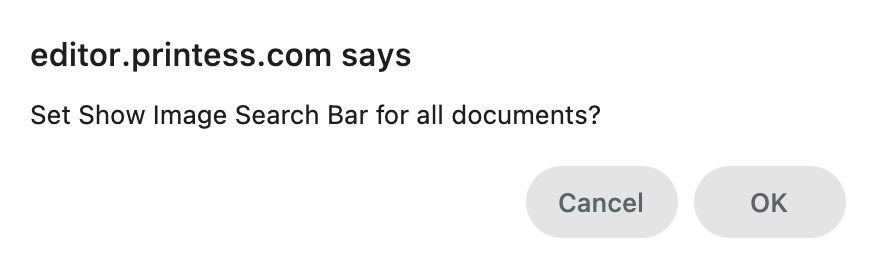
It enables the Buyer to search for an image name of the uploaded images.
The Magic of each Photobook comes from the automated split of image frames to match different numbers of images for the different Single- and Double-Pages. That’s why you have to add Single- and Double-Pages which includes Splitters to your Layout Library. Otherwise you would have to set up a separate Layout Snippet for each number of images possible - from 1-9. And even then it would always use the same Layout Snippet for the same number of images. So to make your Photobook design more diverse use Splitter image frames!
This is how a single image frame can split automatically if you set it to Splitter.

It could split into 9 single image frames in maximum.
Each Photobook Theme is based on one or more Layout Libraries. So in a first step you have to create your own Layout Library.
Learn more about Layout Libraries
To use it for a Photobook Theme it has to be set up in a special way.
You have to use special Keywords for the different Layout Snippets.
You have to create flexible designs which scales with any size of any Photobook Master.
Set up the Single Pages in Square Format like 21x21 and the Double Pages in a 2:1 ratio - in this case 42x21. (The format of the Cover automatically scales based on the size of the Single Pages.)
All Layout Snippets has to be transparent! Use the paper color to simulate the background color of your Layout Snippets.
The backgrounds has to be defined separately which could be done in two different ways.
Never mix up the Keyword-Ending -design and -basic in the same Layout Library
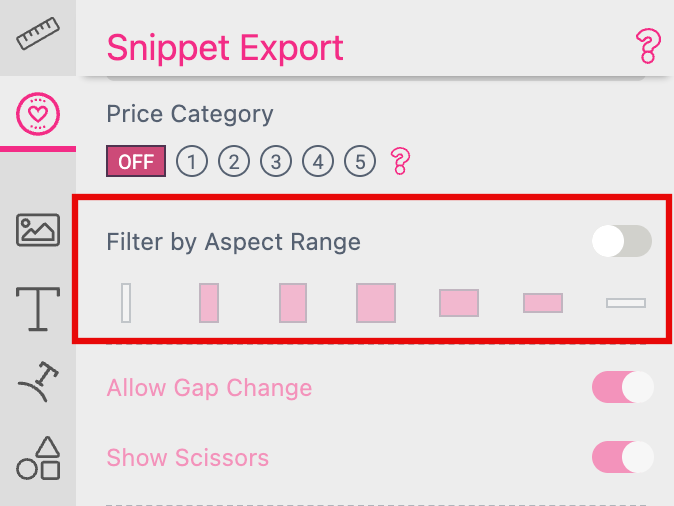
If you are setting up a Layout Library where all the included Documents are using Keywords which are starting with cover-, single-page-, double-page- or background you can use a special feature for testing. If you switch to the Buyer Side, you can toggle through three different aspect ratios of each single Layout Snippet. And for the Cover Layout Snippet you can also toggle the Spine Width.

But this feature is only available at the Buyer Side if the option Filter By Aspect Range is turned off for each Document.
To build a Layout Library to be used as a Theme you have to use specific Keywords for the different pages of the different types of Photobook Themes. The two main Photobook Theme Types are:
Keywords are used to get all these Layout Snippets sorted through a Keyword Menu so that you can assign them to the right pages and spreads of your Photobook Master. The Keywords of the Double Pages are used for the initial rendering of each AI generated Photobook as well.
Note If you are using different Keywords your Magic Photobook will NOT work!
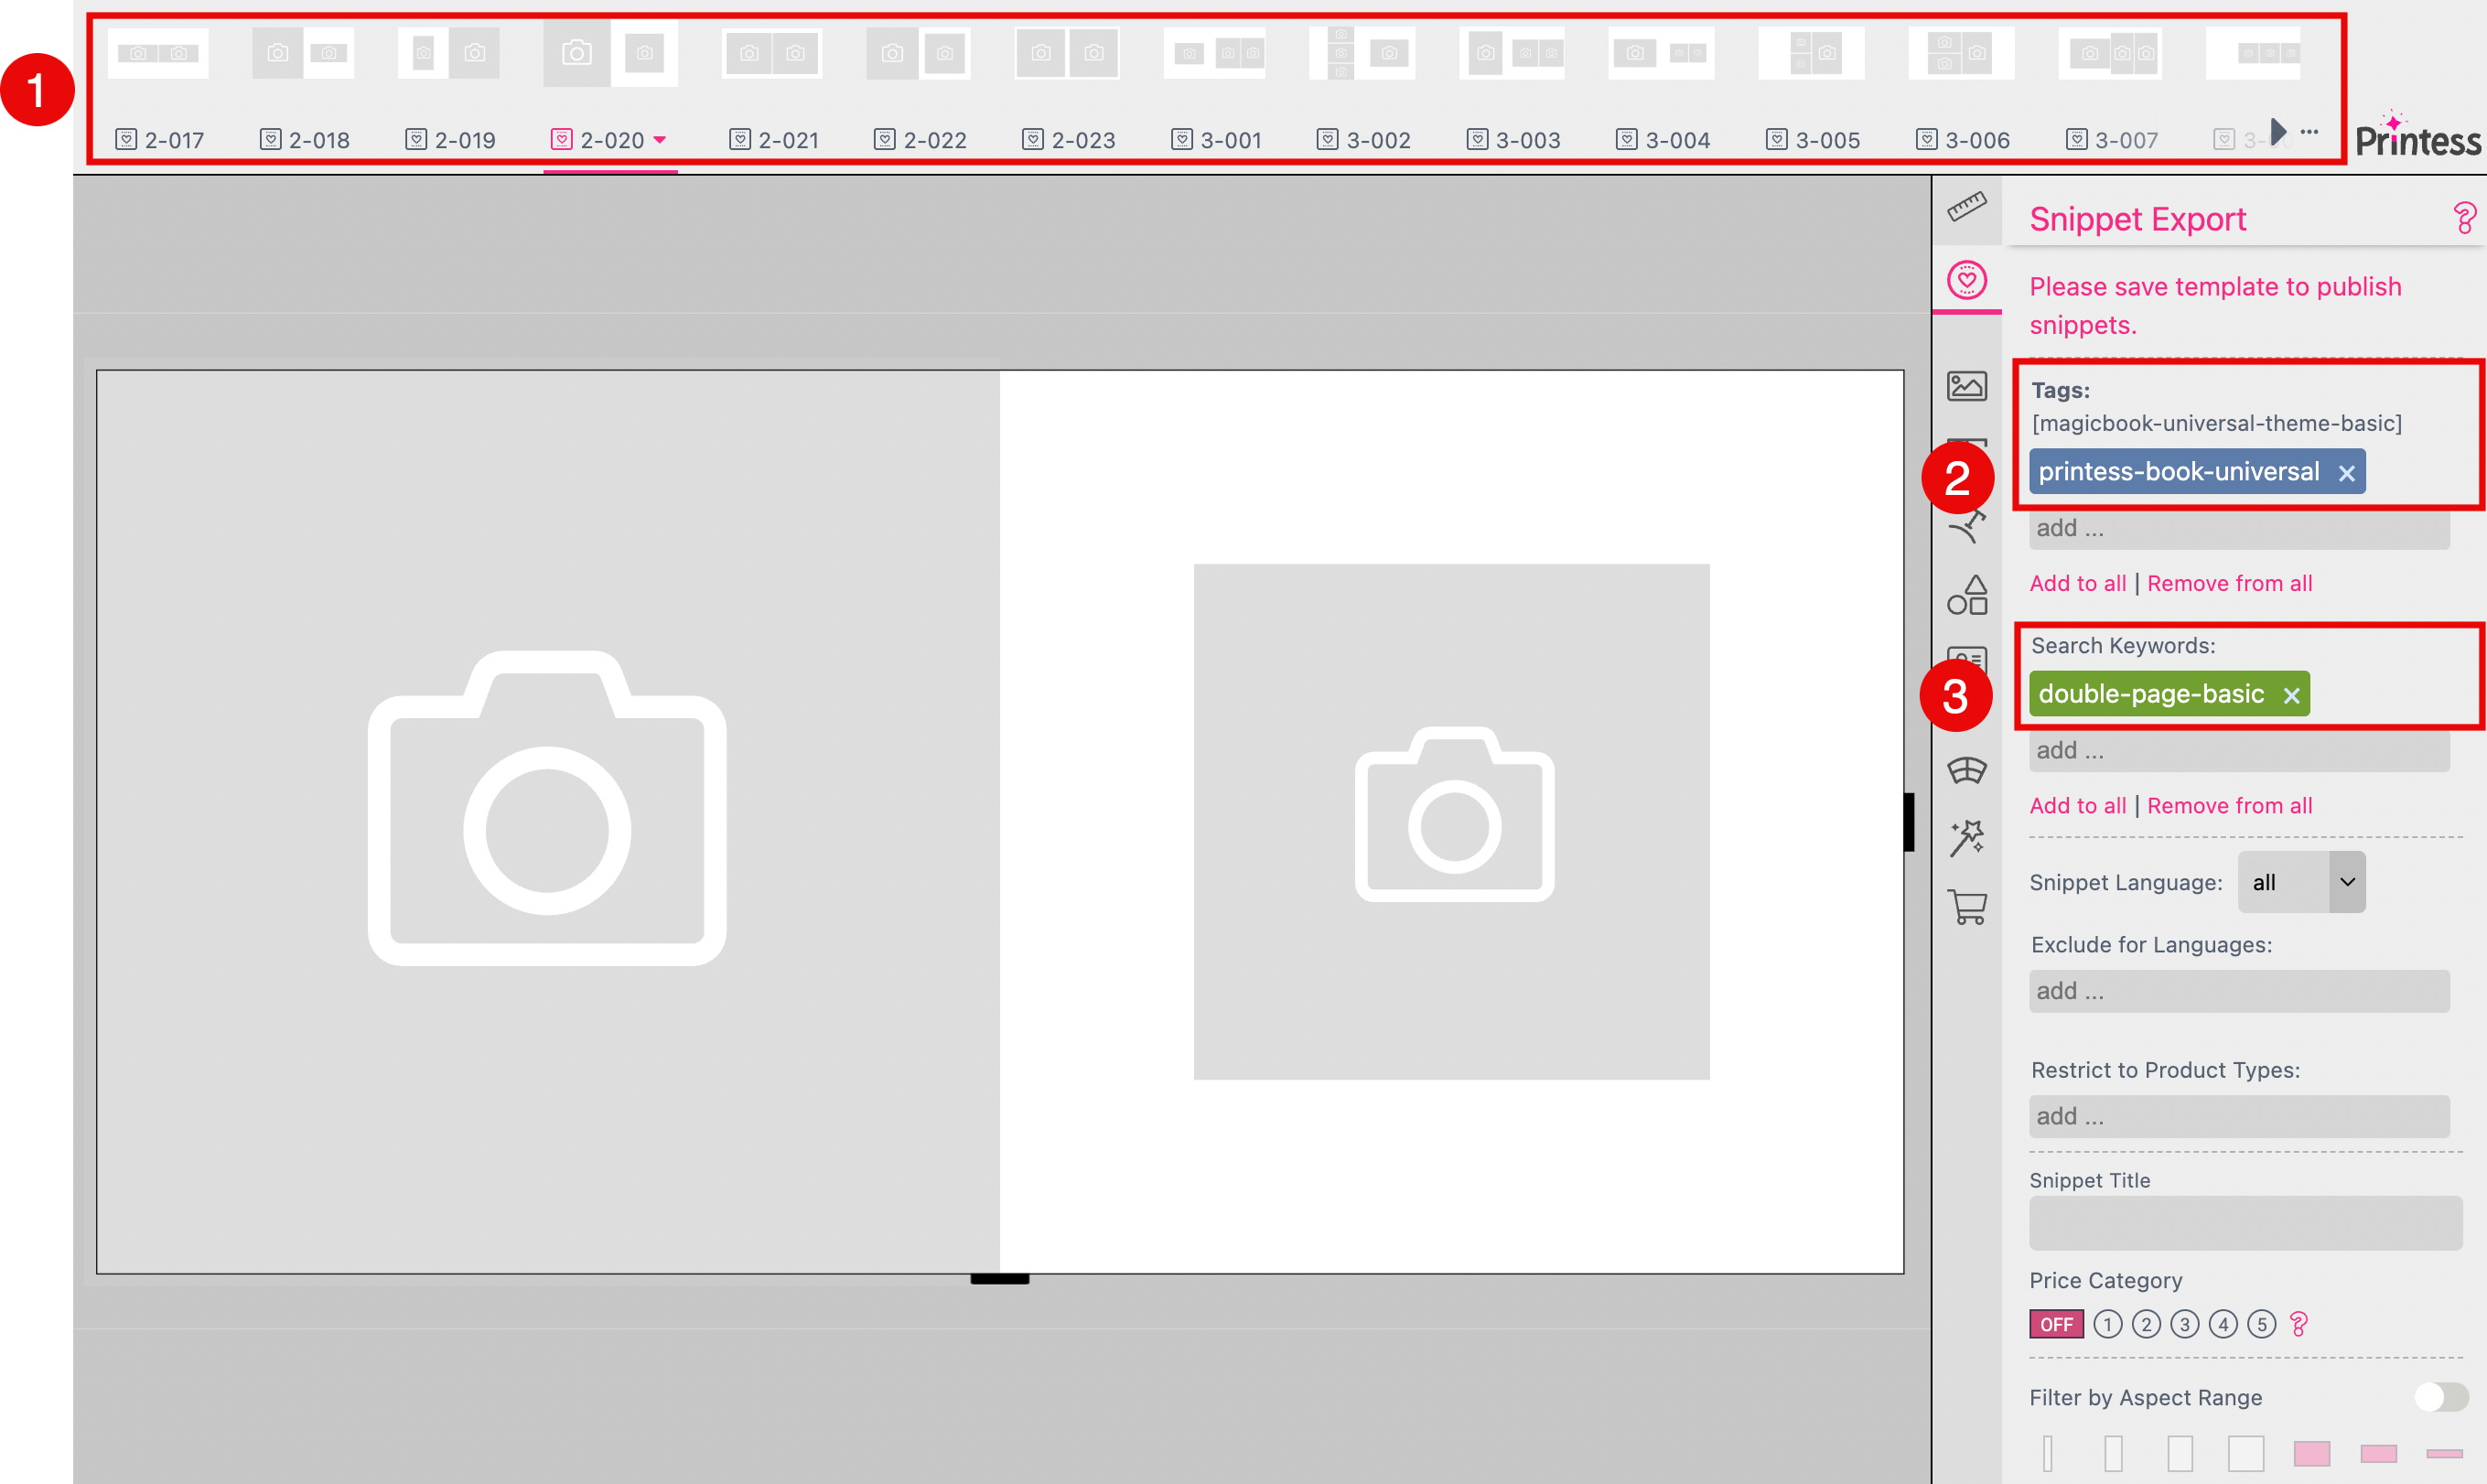
Use the Keyword single-page-basic, double-page-basic and cover-basic for Layout Snippets which includes image and text frames only - and no backgrounds.
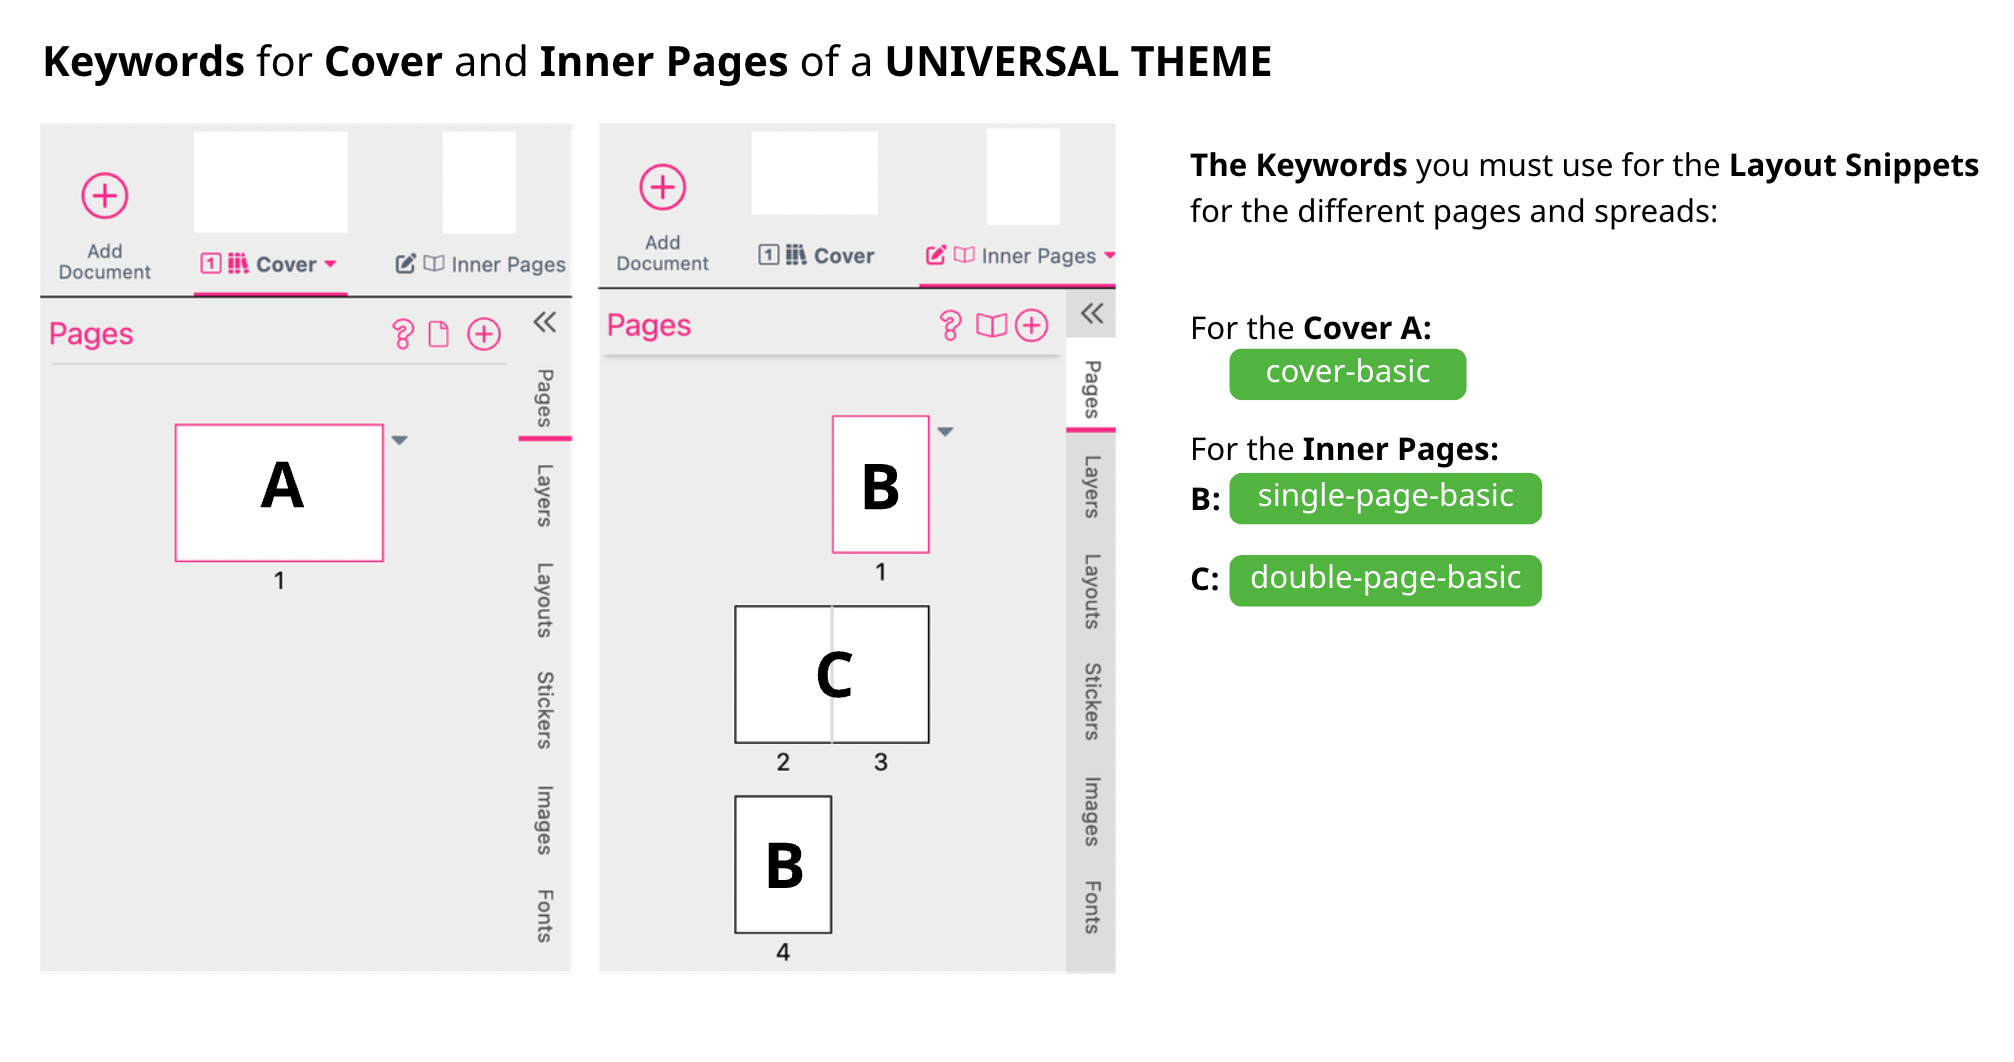
These Keywords are used for the Printess Layout Library with the Tag printess-book-universal.
These are the most versatile Layout Snippets. They do not include any graphic elements and so they could be used together with your different -design Templates.
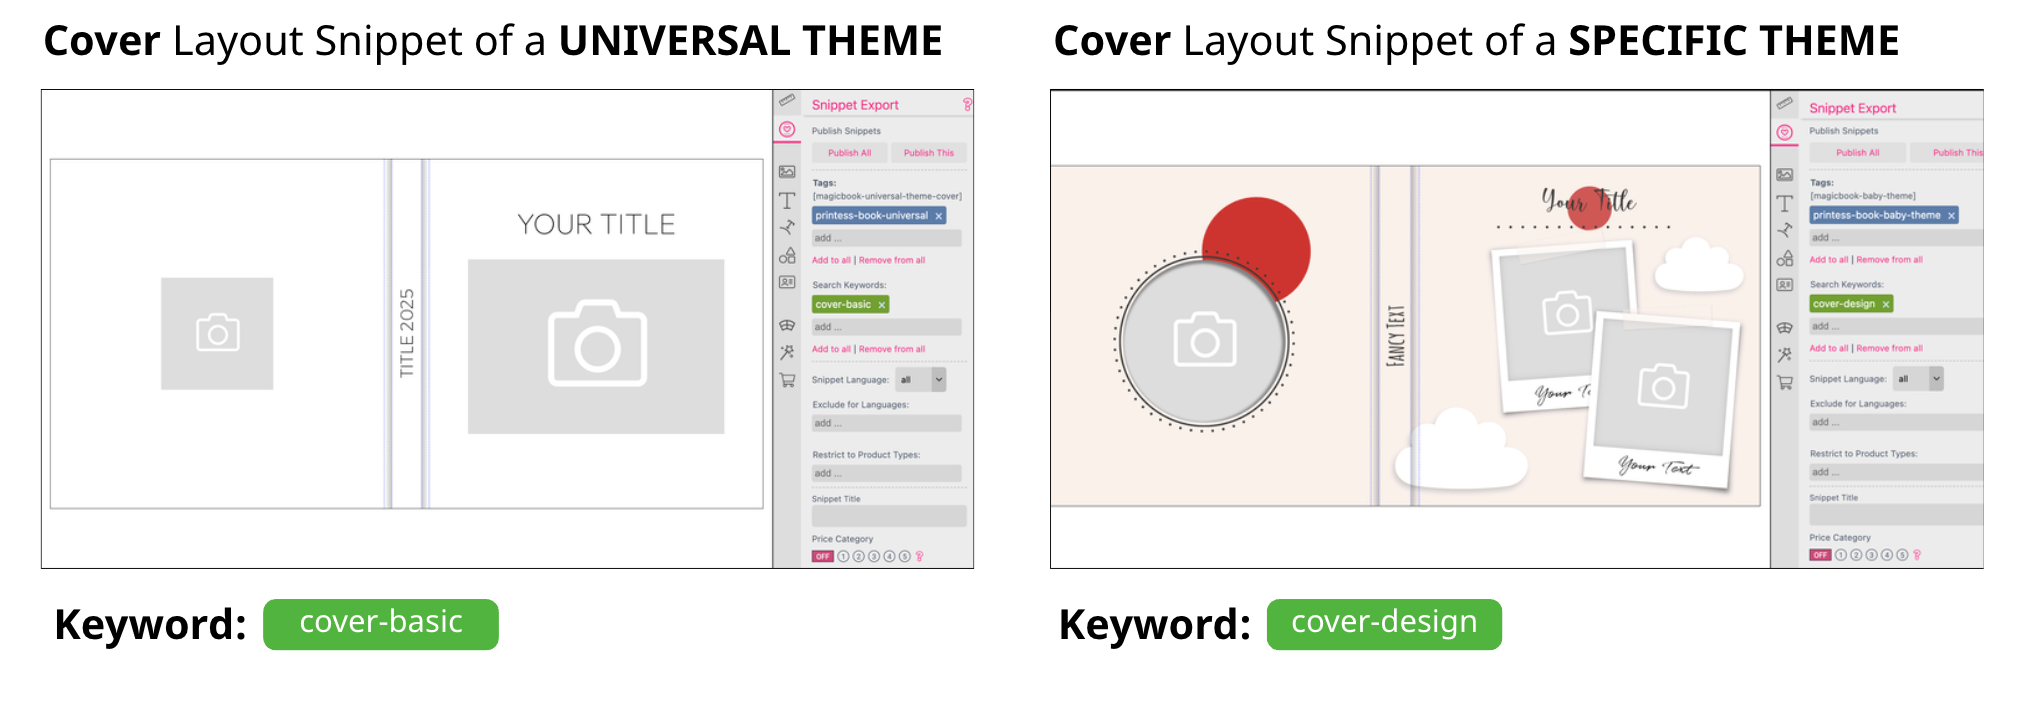
For the Layout Snippets made for the Cover we recommend to set up a separate Layout Library using the SAME Tag. That’s because of the large number of different designs needed. In our case the Layout Library got the name “magicbook-universal-theme-cover” but all Layout Snippets got the same Tag like the Layout Library shown above. And of course all included Layout Snippets got the same Keyword - cover-basic.
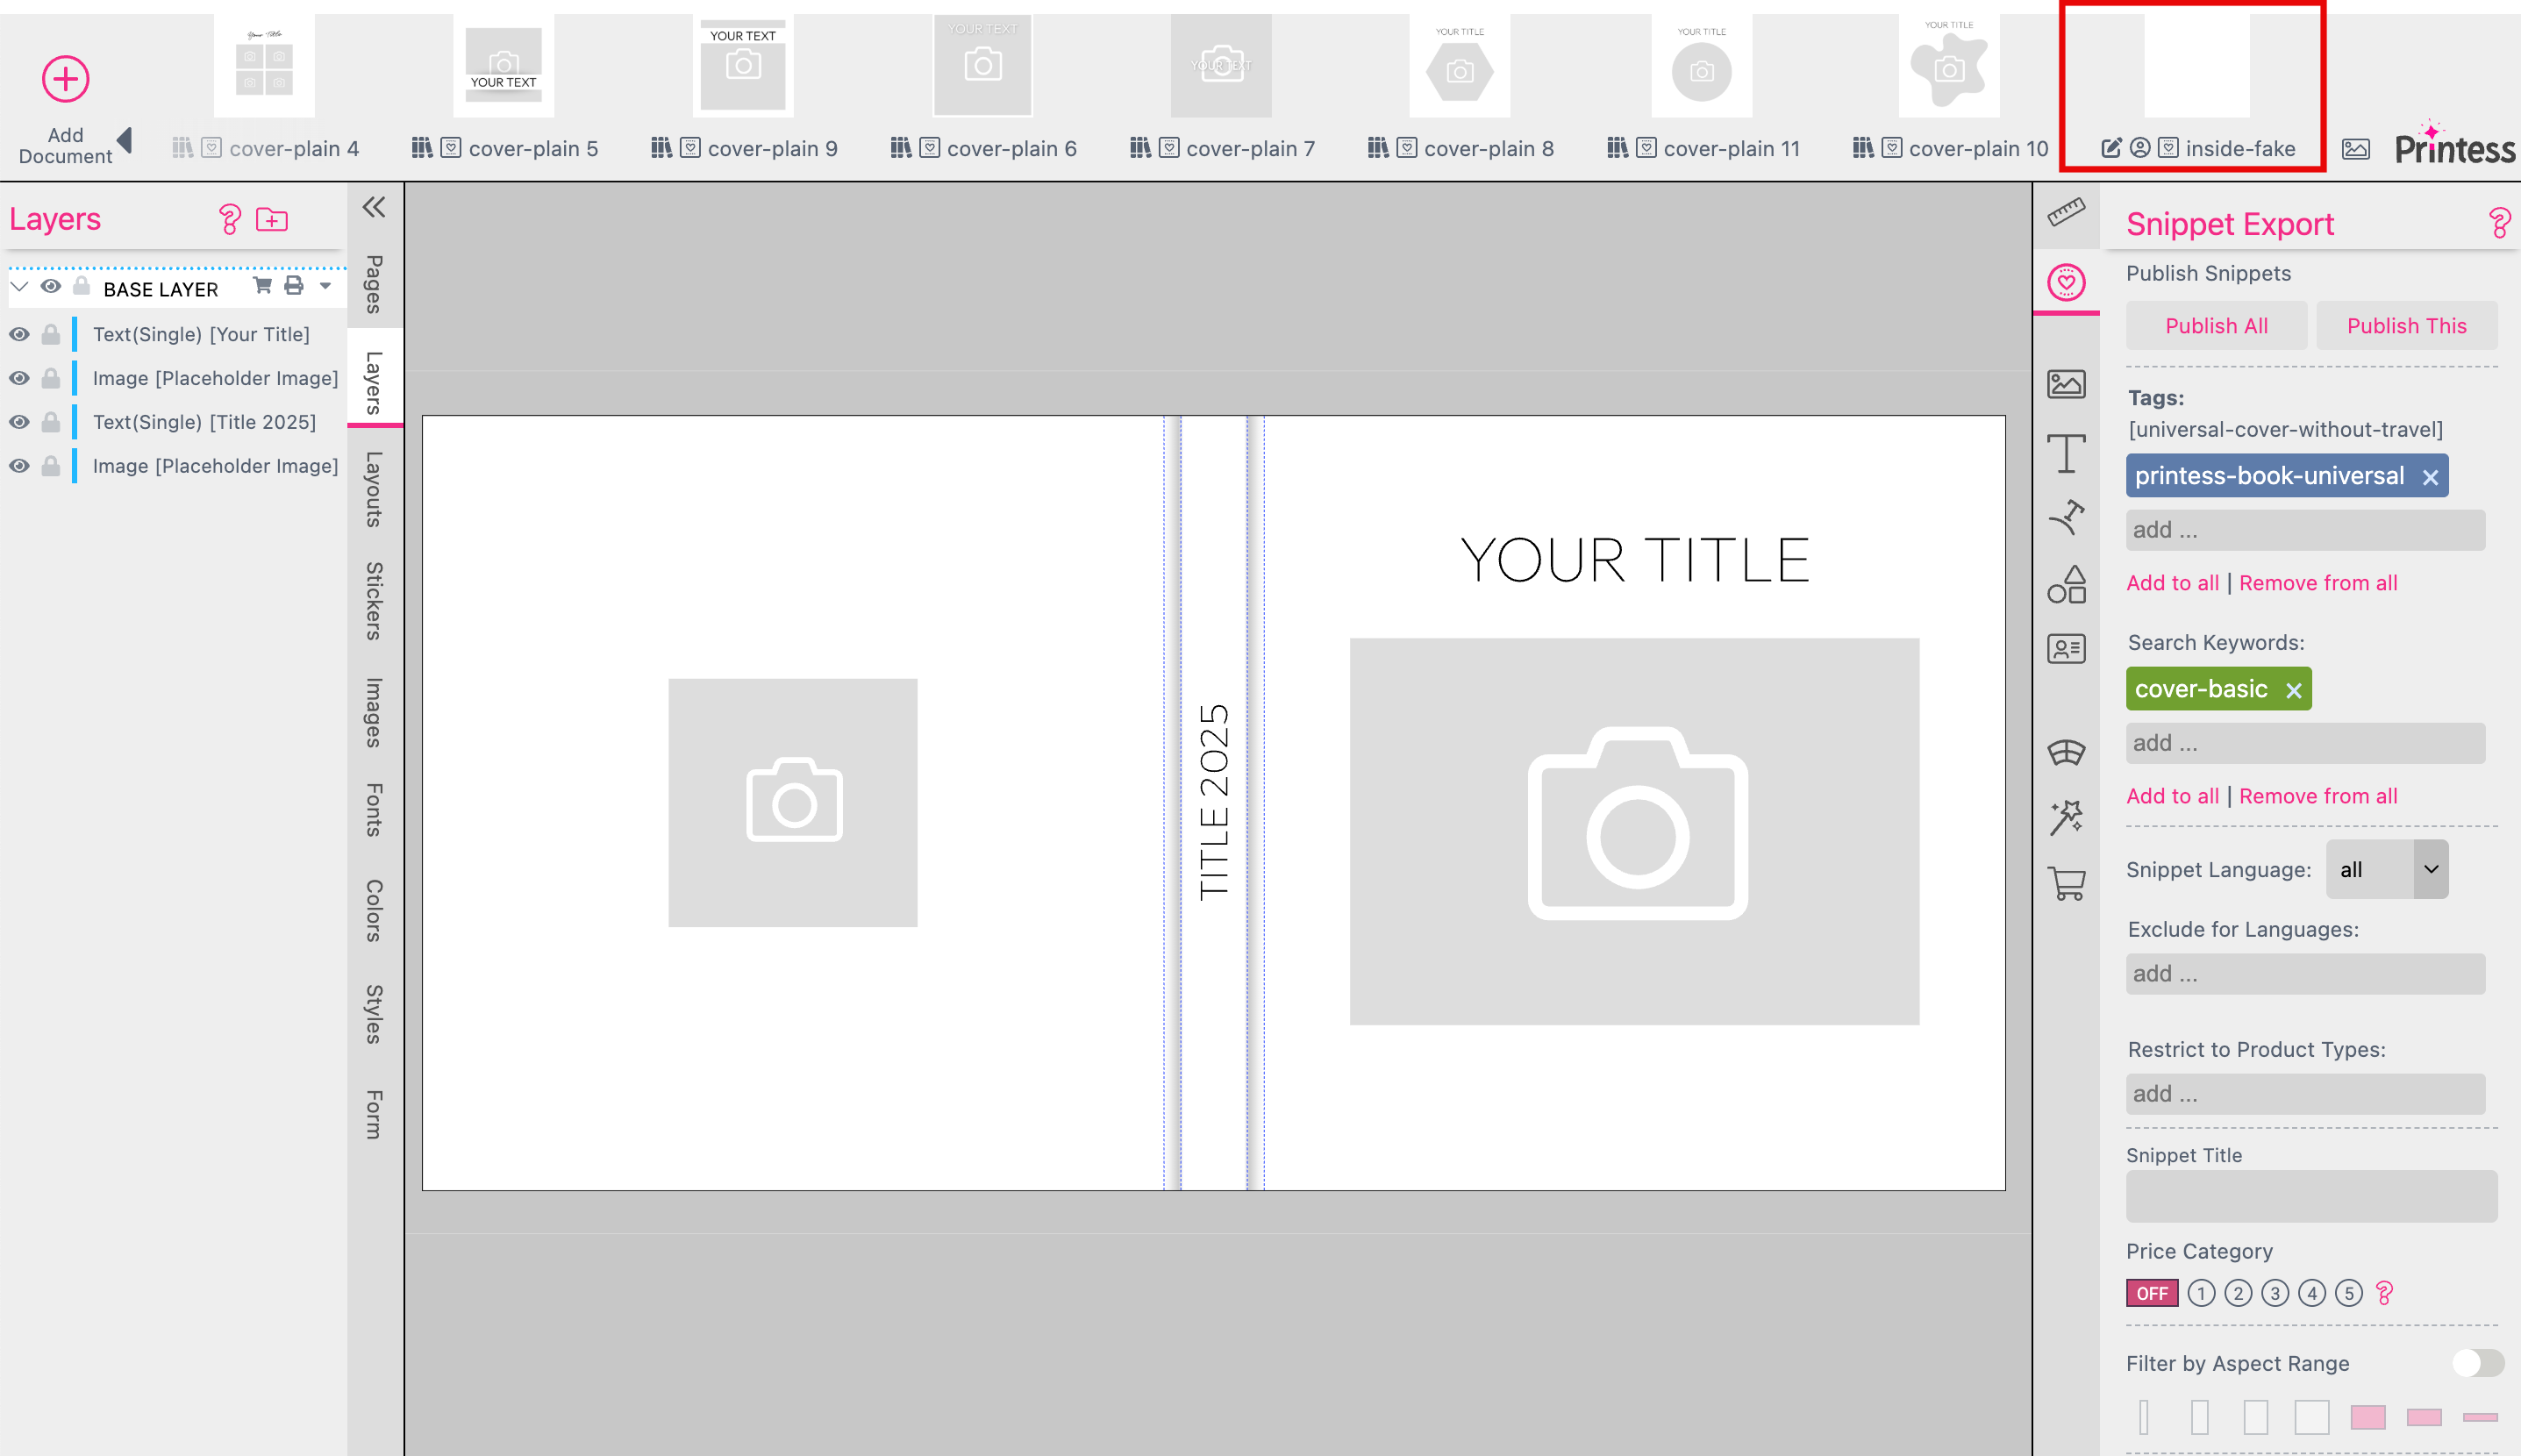
Anytime you would like to create a Cover design you have to add a Inside Pages Document. Otherwise you will not be able to create a Cover with Spine. This works exactly like for the Photobook Master. It is explained above here. But please name the Inner Pages Document within a Layout Library “fake-inside-page”. Because it will not be published like the other Documents of your Layout Library. So please neither assign a Keyword for it - nor a Tag!
Note: Please do not forget to assign a Thumbnail Image to your Cover Layout Snippet. You need it later when you set up your Photobook Theme. How to assign a Thumbnail.
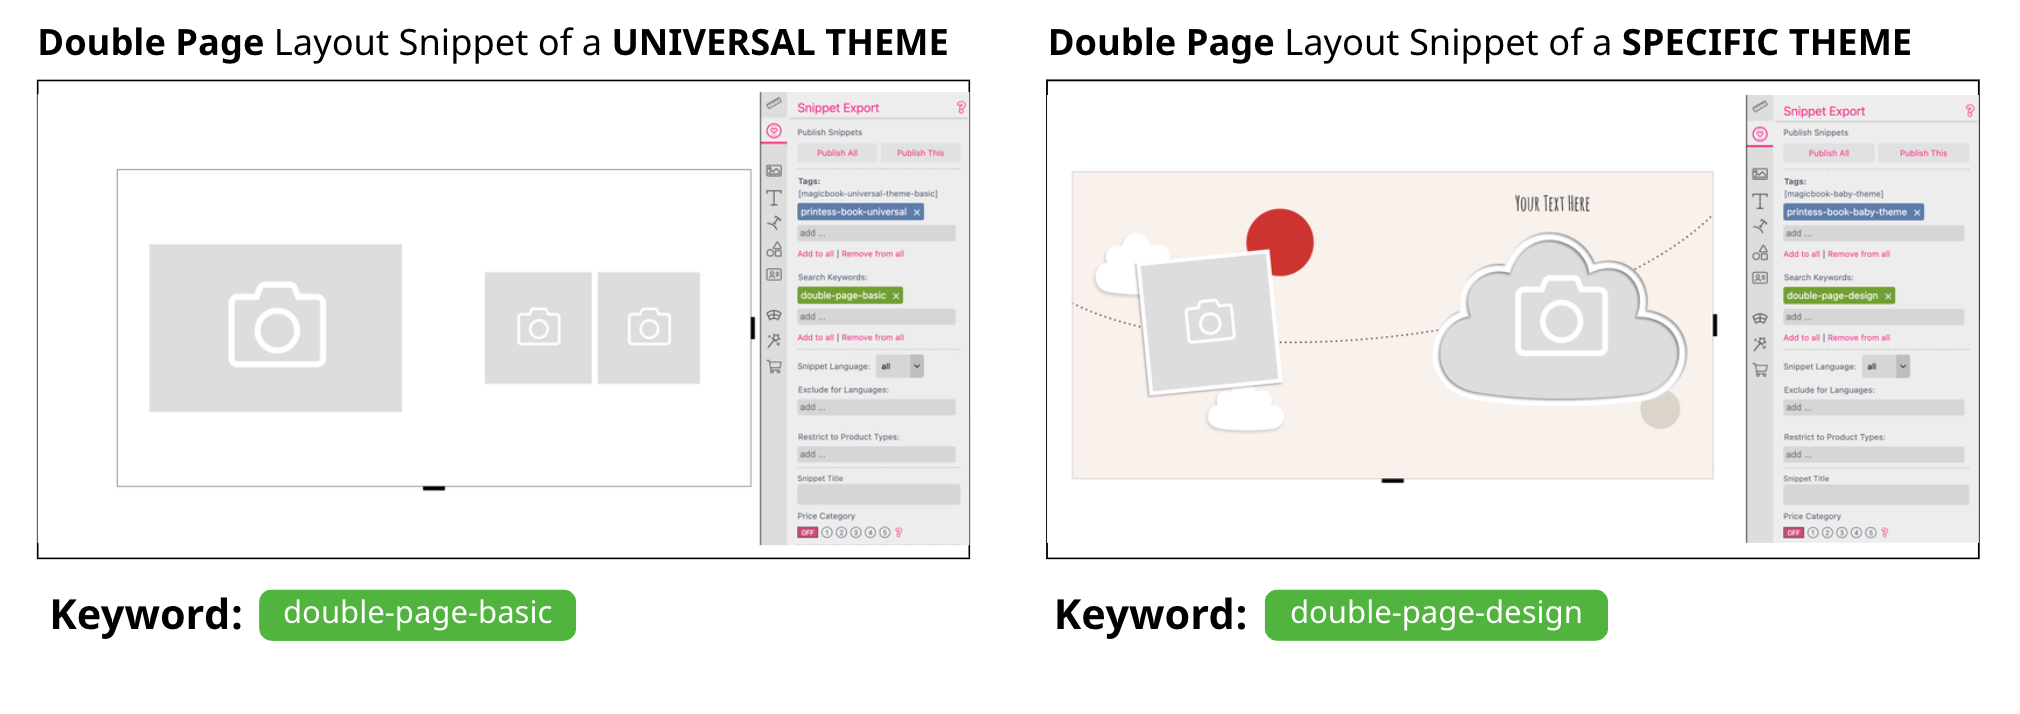
Use the Keyword single-page-design, double-page-design and cover-design for Layout Snippets which includes designs for SPECIFIC THEMES.
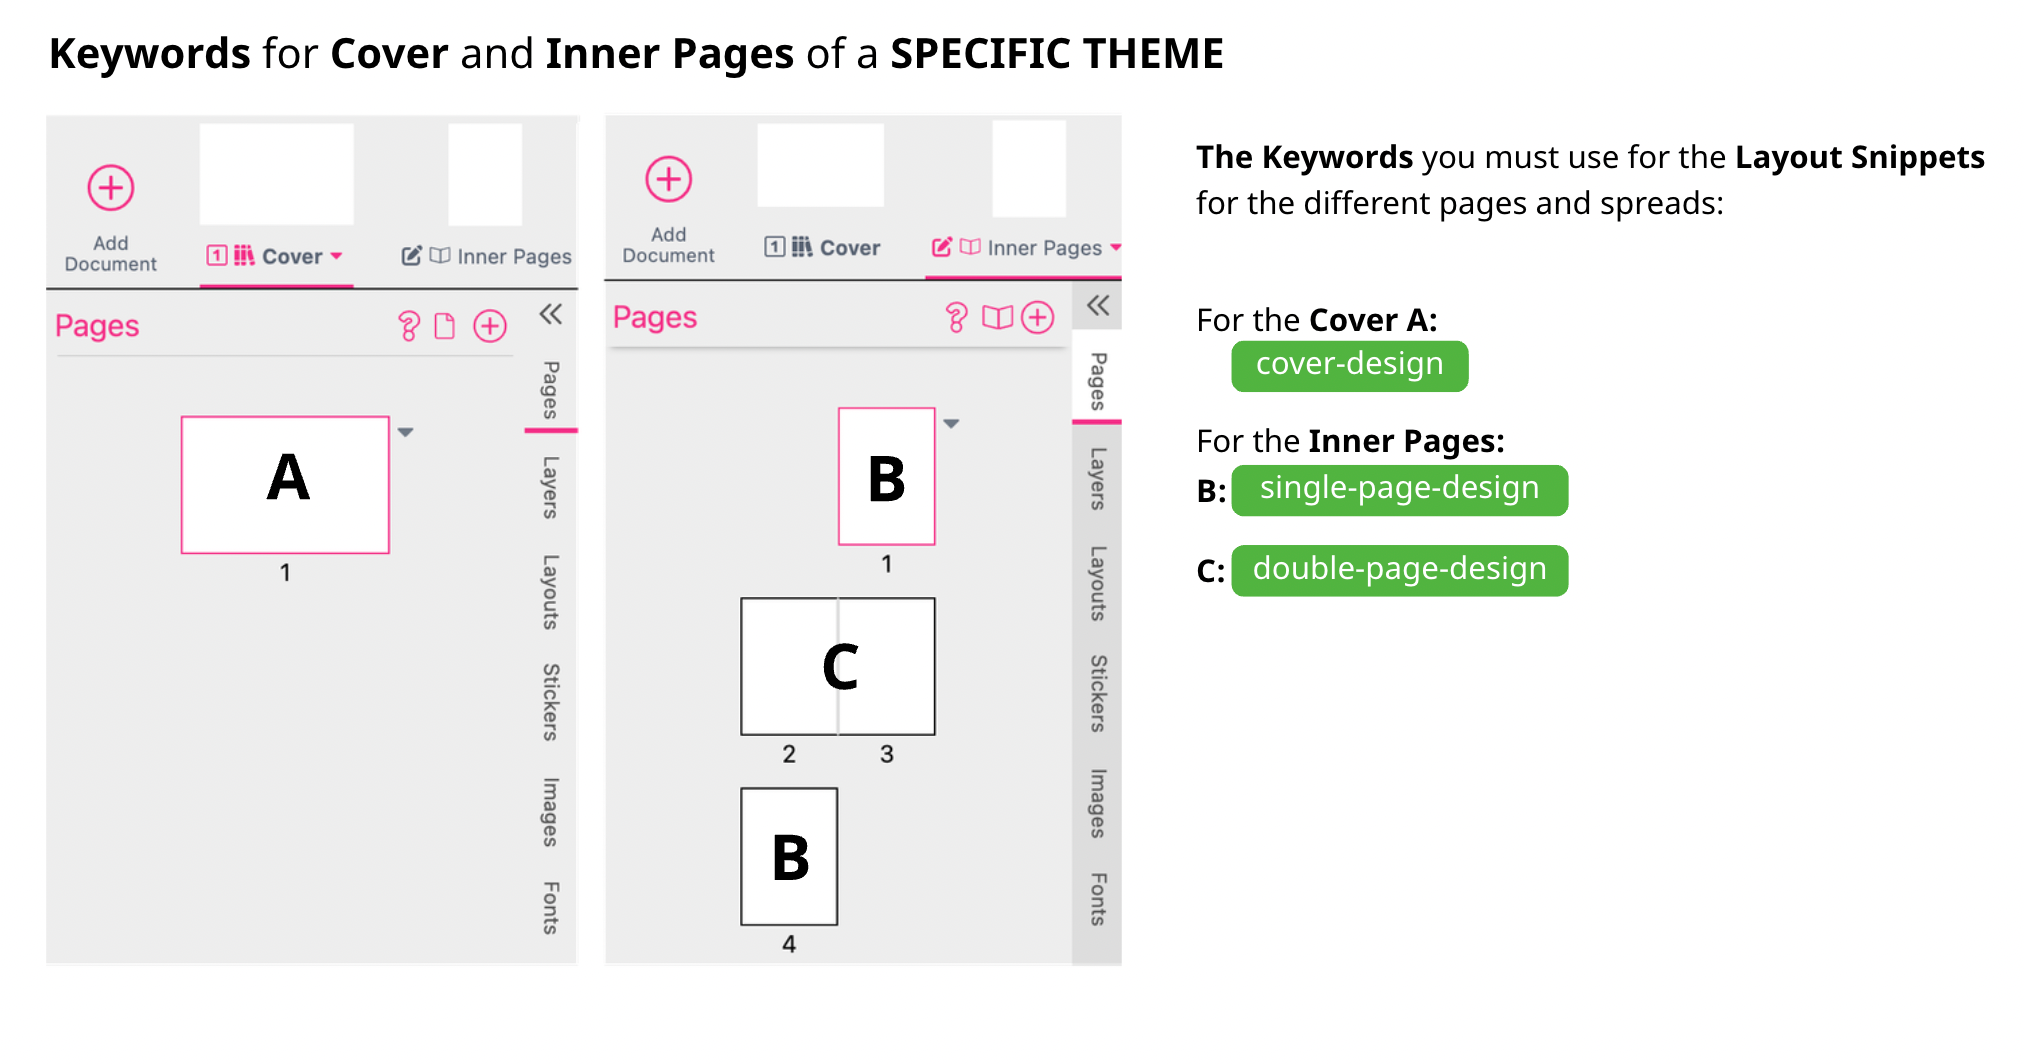
These Keywords are used for the Printess Layout Library with the Tag printess-book-baby-theme for example. Using the -design Keywords indicates that this is a Specific Photobook Theme.
These Layout Libraries differ from the ones used for a Universal Theme. They are designed for a special occasion like birthdays, weddings, or vacations. Consequently, a static number of images may be needed to meet the design requirements - like in our example.
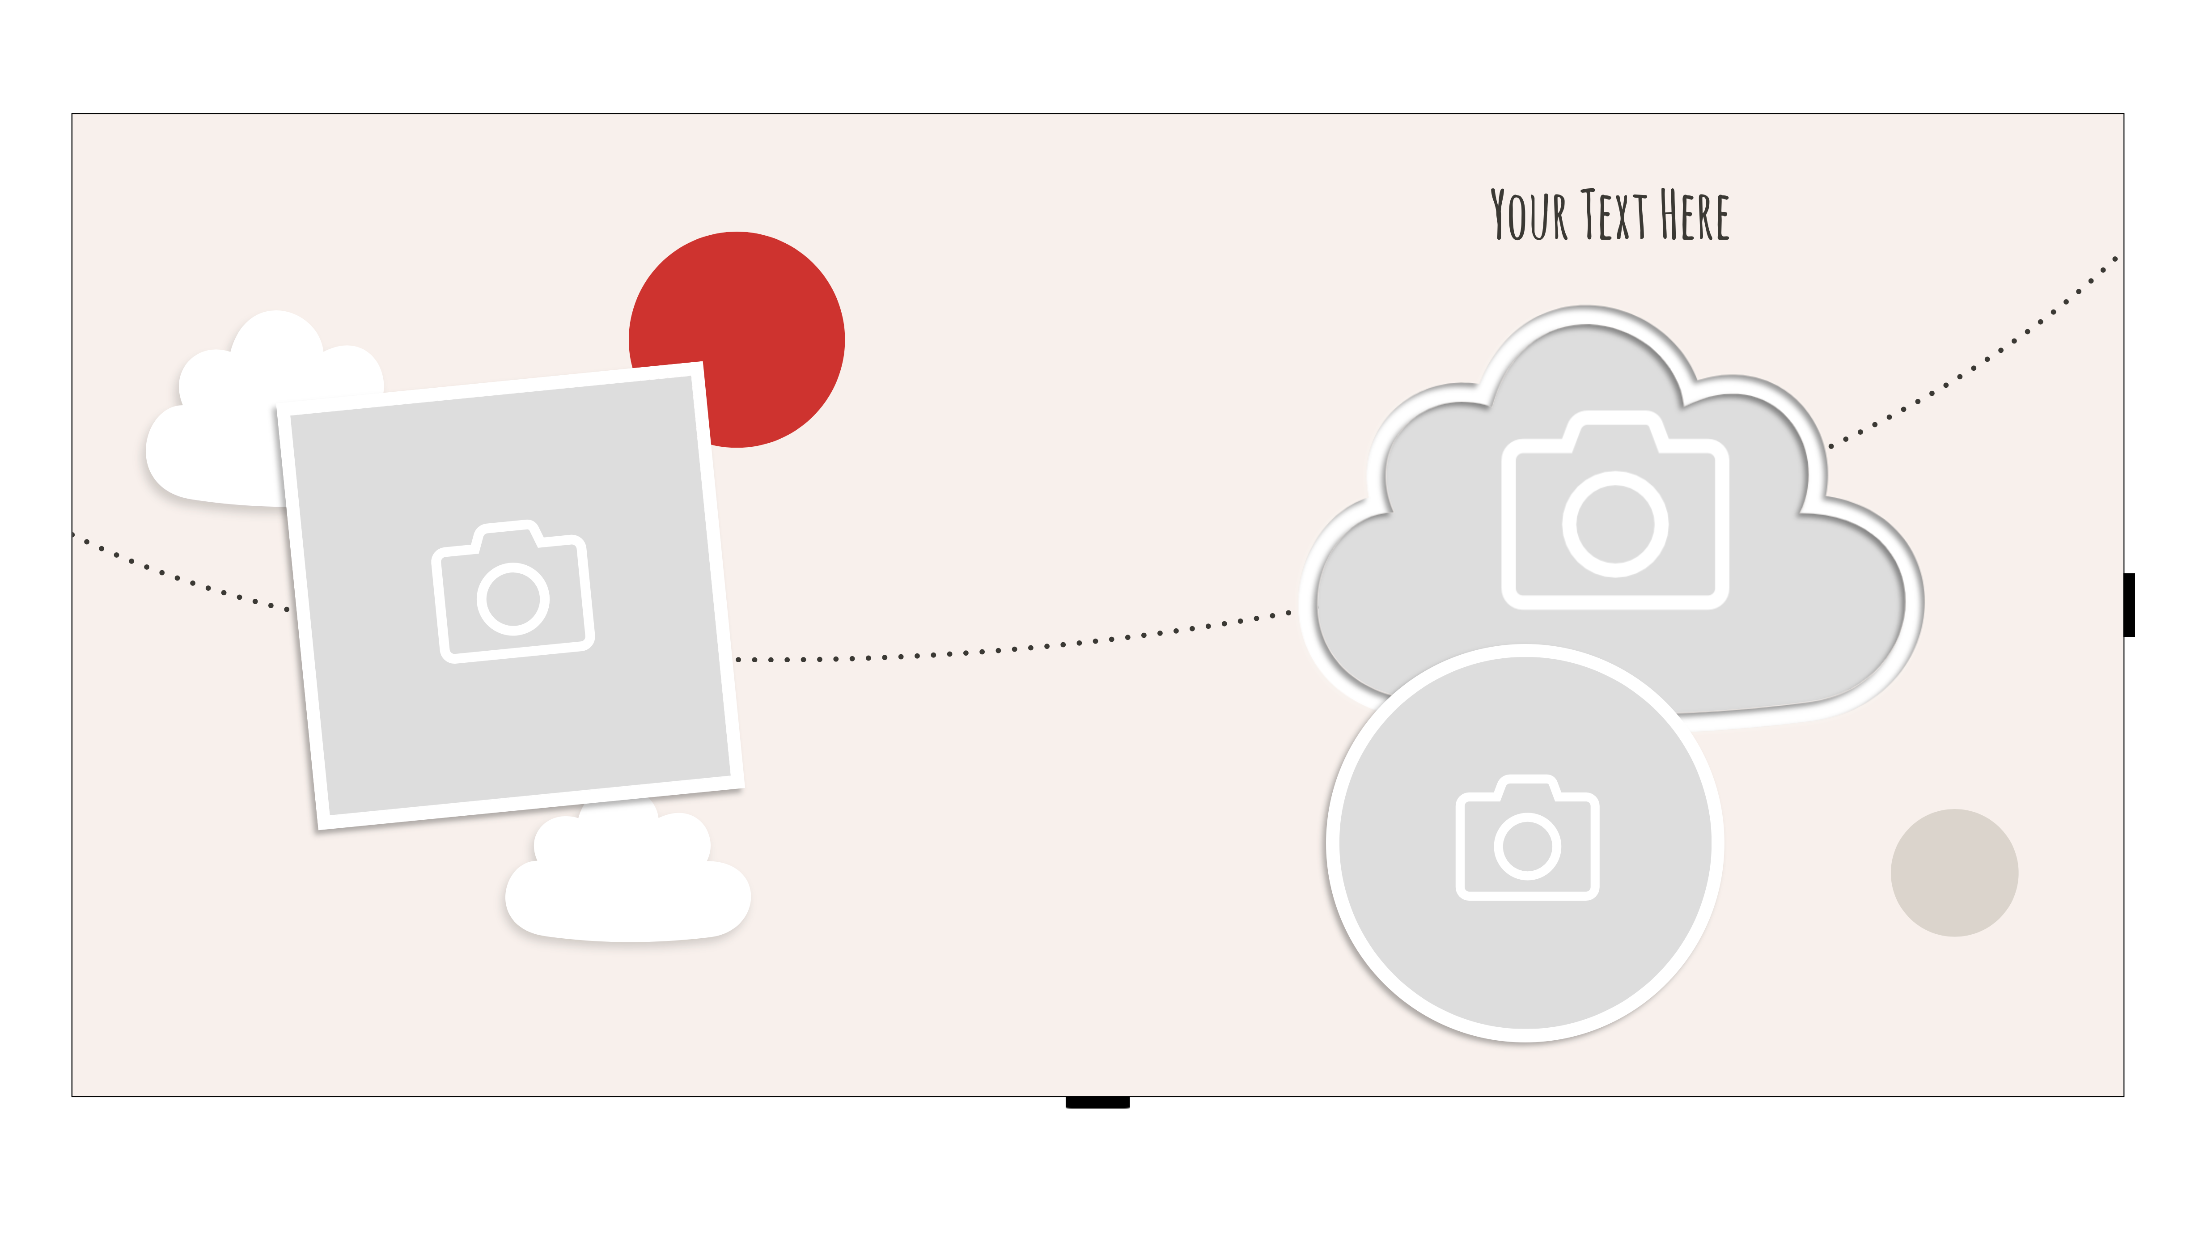
These three images frames of the Layout Snippet above do not have the Splitter option activated because of their shapes and designs. This makes this Layout Snippet look very nice but it could only be used for a Double-Page with three images.
But the Magic of each Photobook comes from the automated split of image frames to match different numbers of images for the different Double-Pages. That’s why you have to add Double- and Single-Pages which includes Splitters to your Layout Library - like this example.
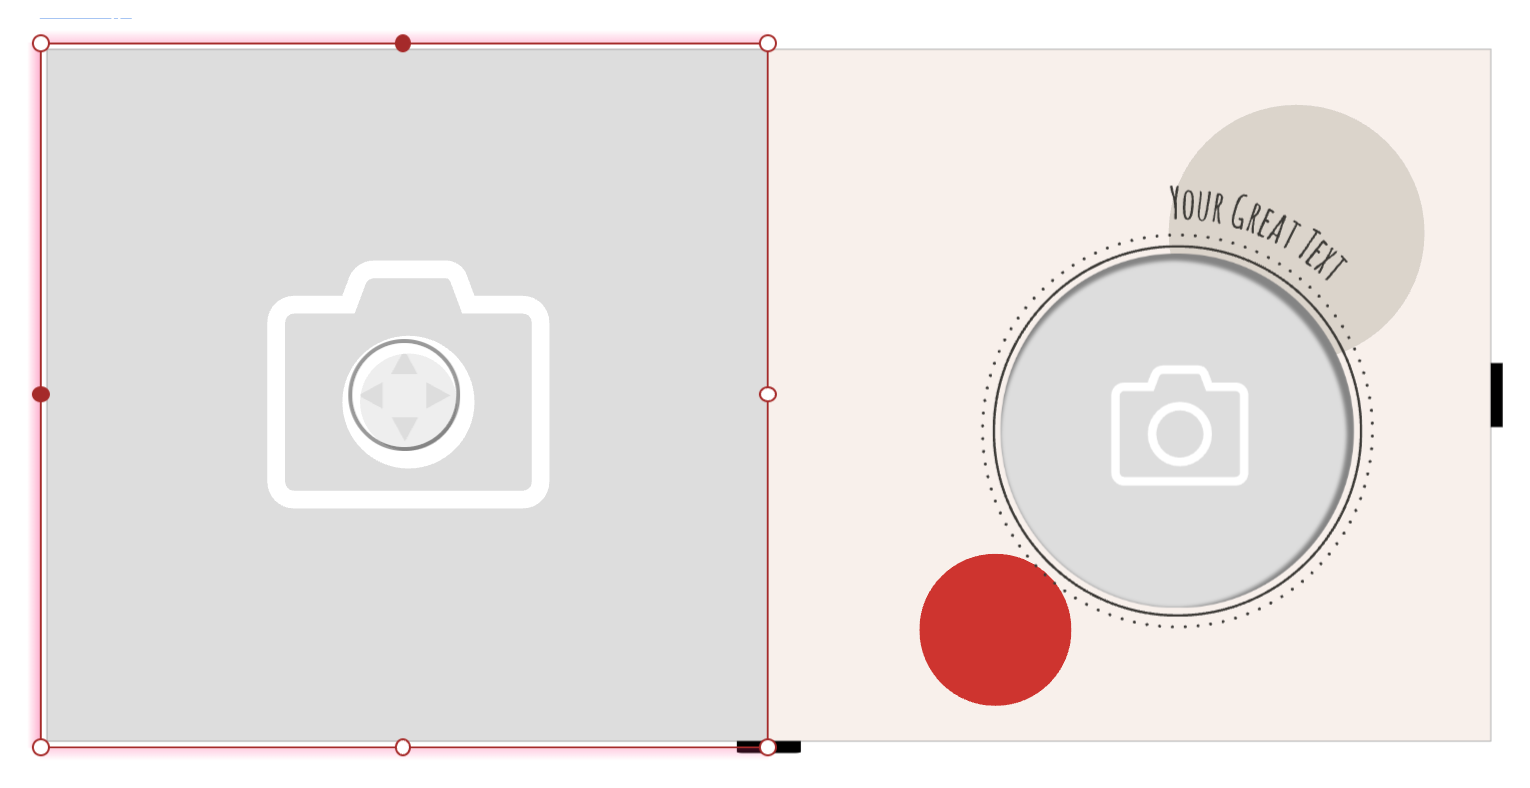
The red aura indicates that this frame is set to Splitter. So this image frame can automatically be splitted - depending on the number of images which has to be placed.
To be able to create a Layout Snippet for a Cover you need to set up an Inner Pages Document within your Layout Library - otherwise you can not set the Document for the Cover to Cover & Spine!
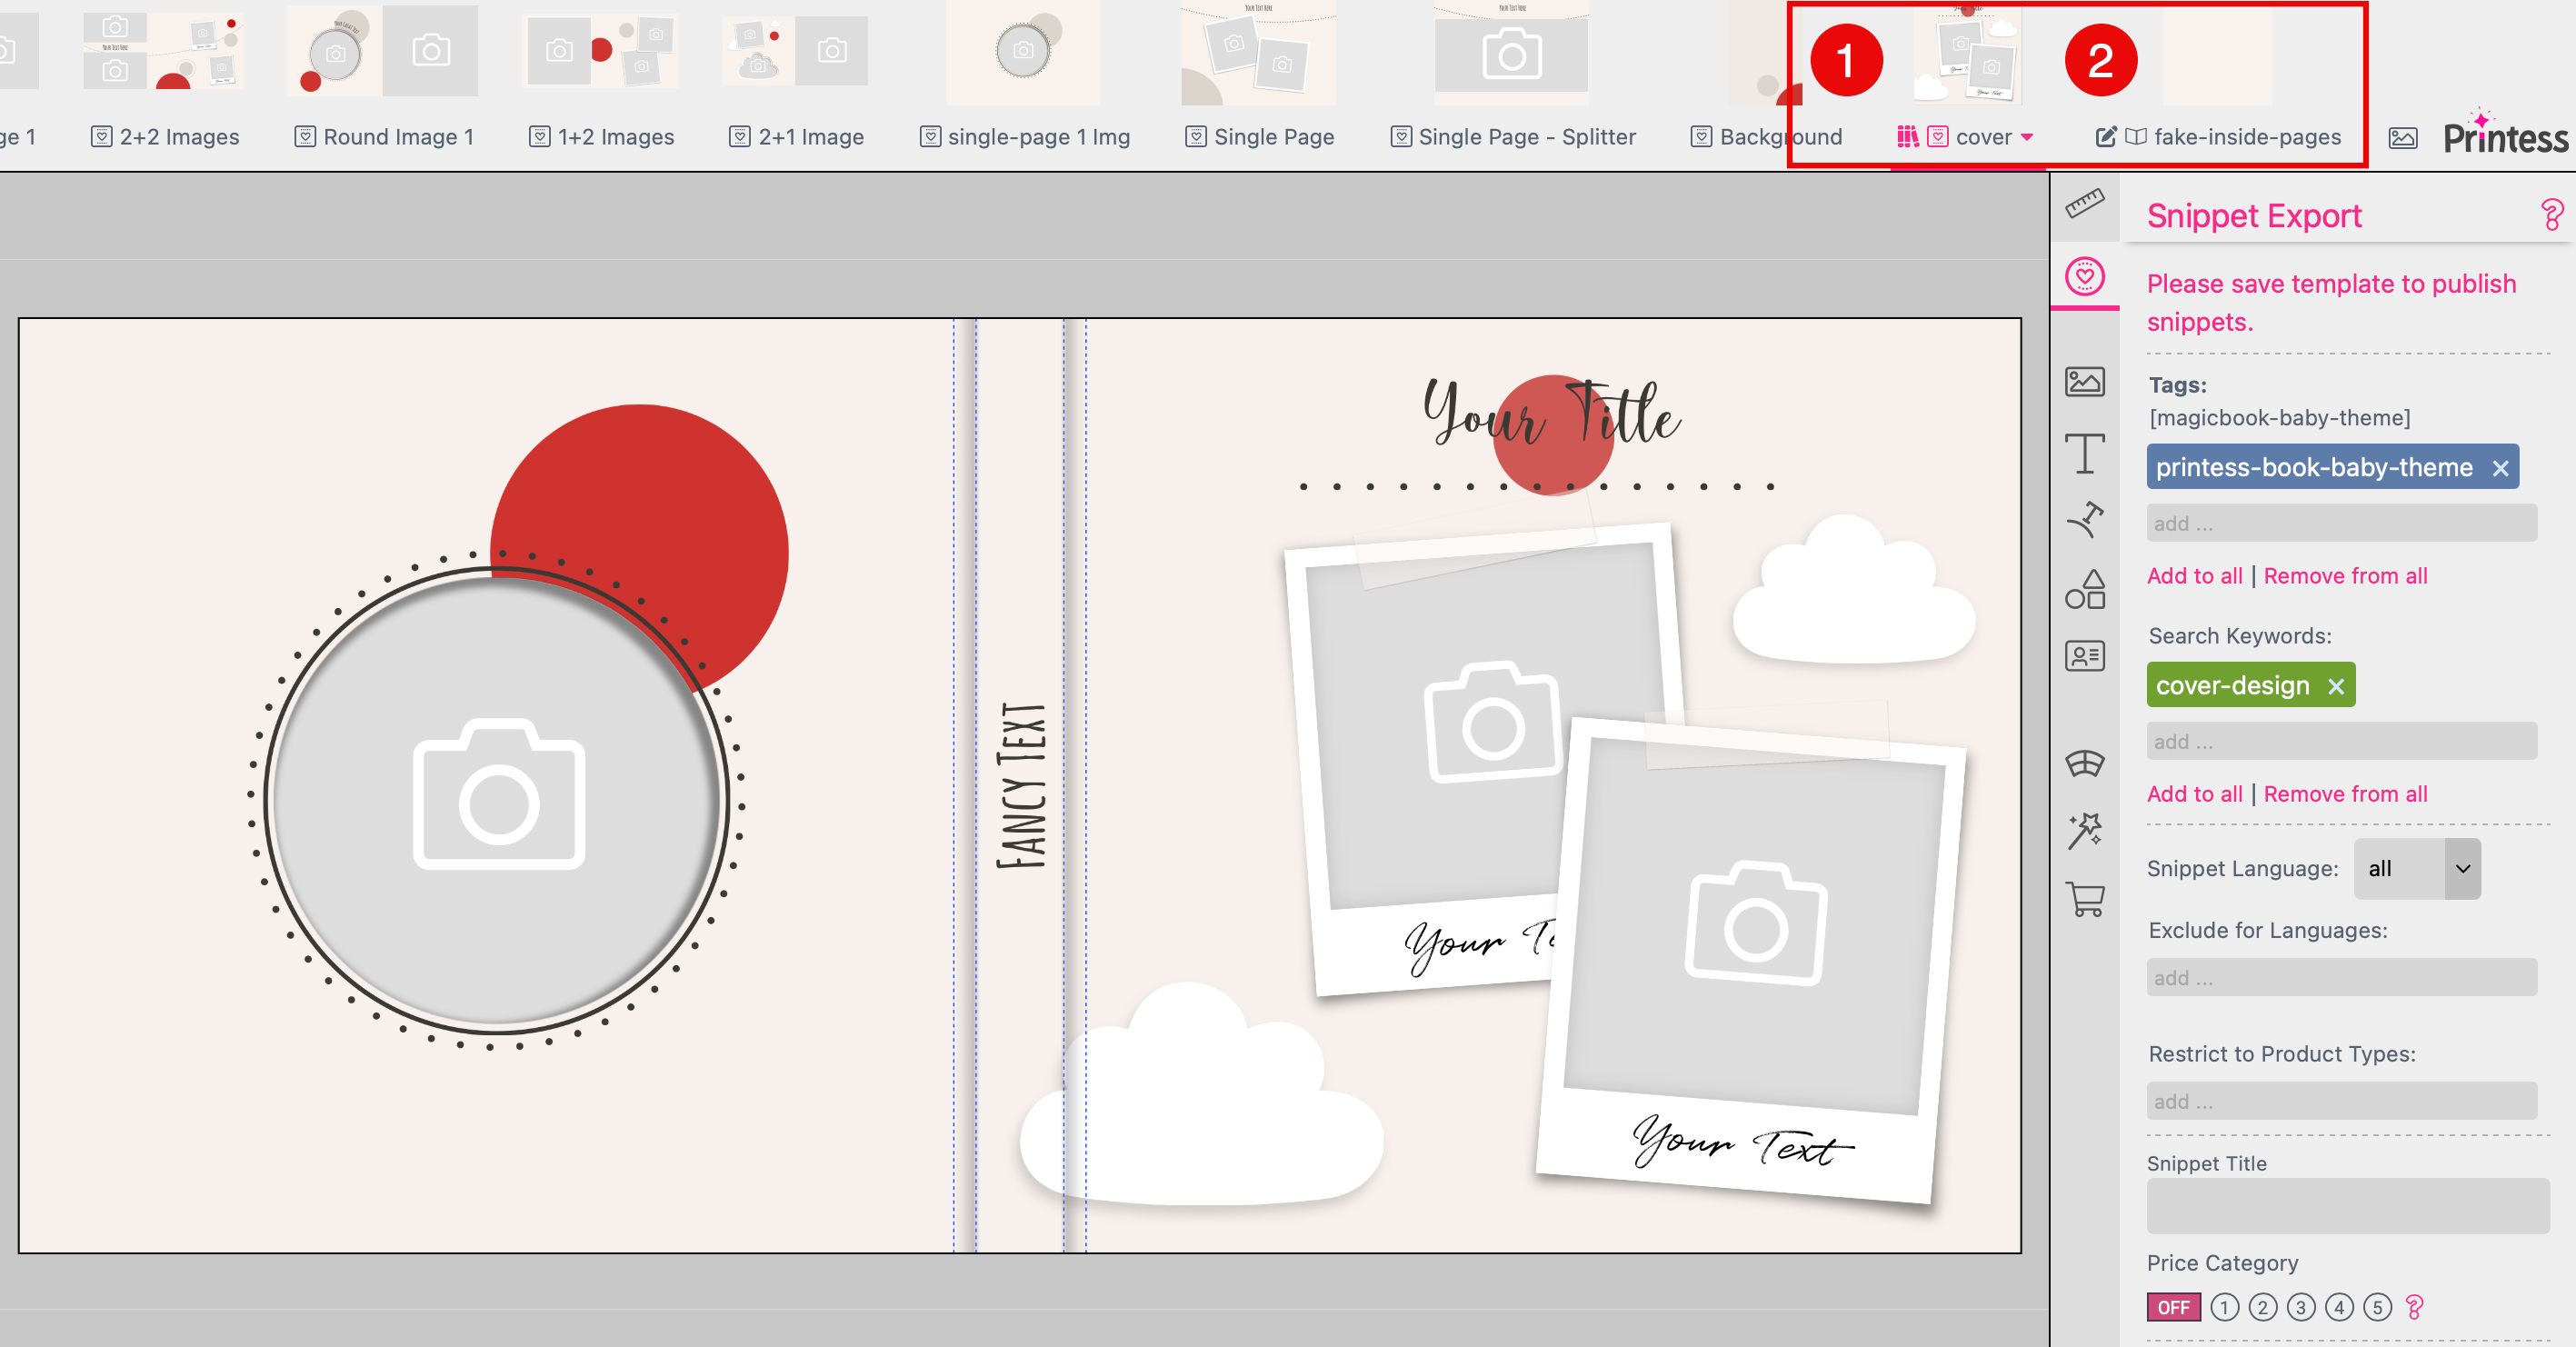
This example shows a Cover Layout Snippet of a Specific Theme but it is the same for a Cover Layout Snippet for a Universal Theme. Also there you have to work with a fake Inner Pages Document in your Layout Library.
This works exactly like for the Photobook Master. It is explained above here.
Do not use any Splitter on any of your Cover Layout Snippets!
Note: Please do not forget to assign a Thumbnail Image to your Cover Layout Snippet. You need it later when you set up your Photobook Theme. How to assign a Thumbnail.
For the Covers you have these two Keywords to use: cover-basic and cover-design. These are important:
This is an example Keyword Menu like you have to use for the Covers. Please do not name it printess… when you set up your own Keyword Menu. Just use the Keywords.

It includes two Categories:
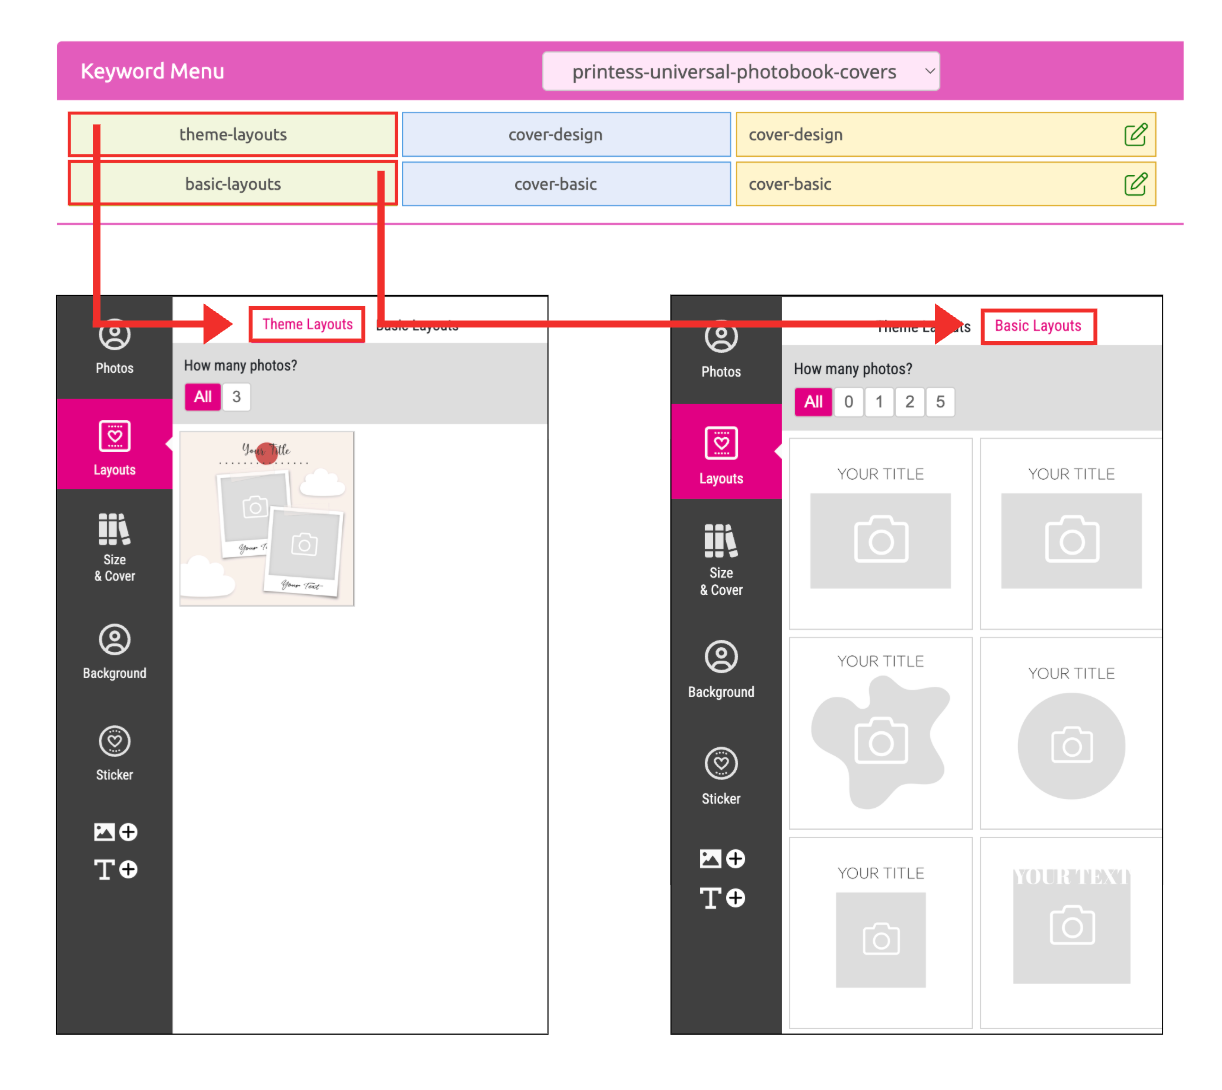
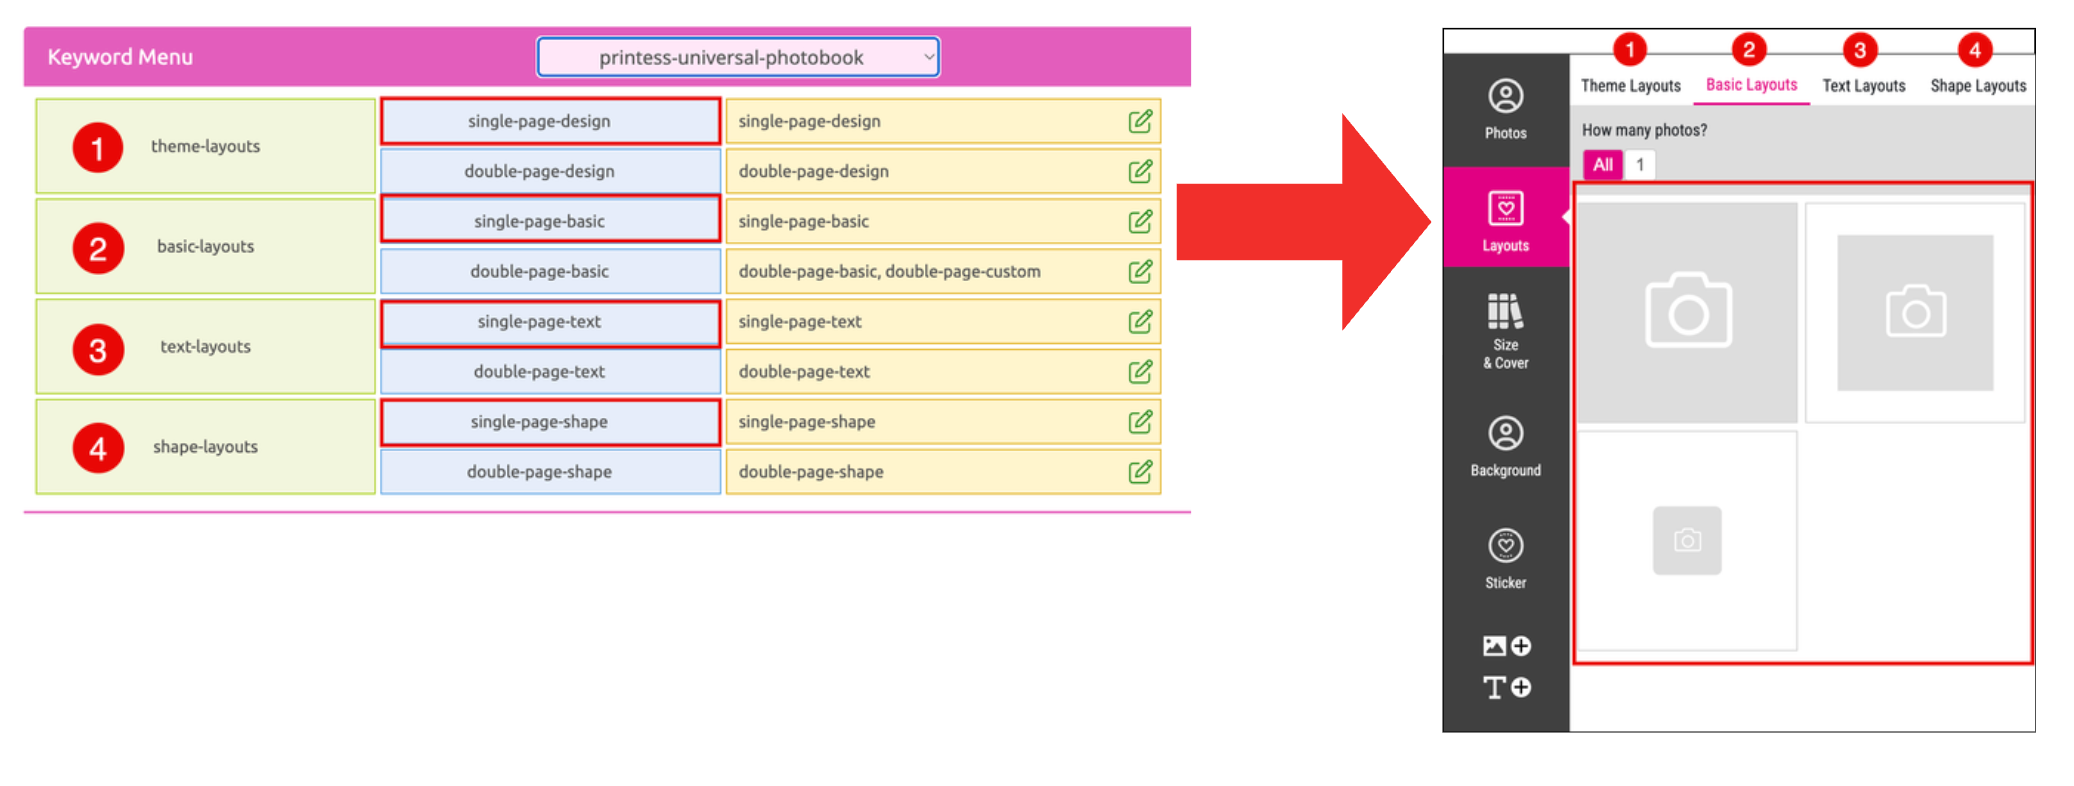
At your Photobook Master you are now using the Categories and their Topics to assign the Layout Snippets to the Cover Page - based on the Keyword Menu you have selected and on the Layout Library Tags assigned - in this example printess-book-baby-theme and printess-book-universal.
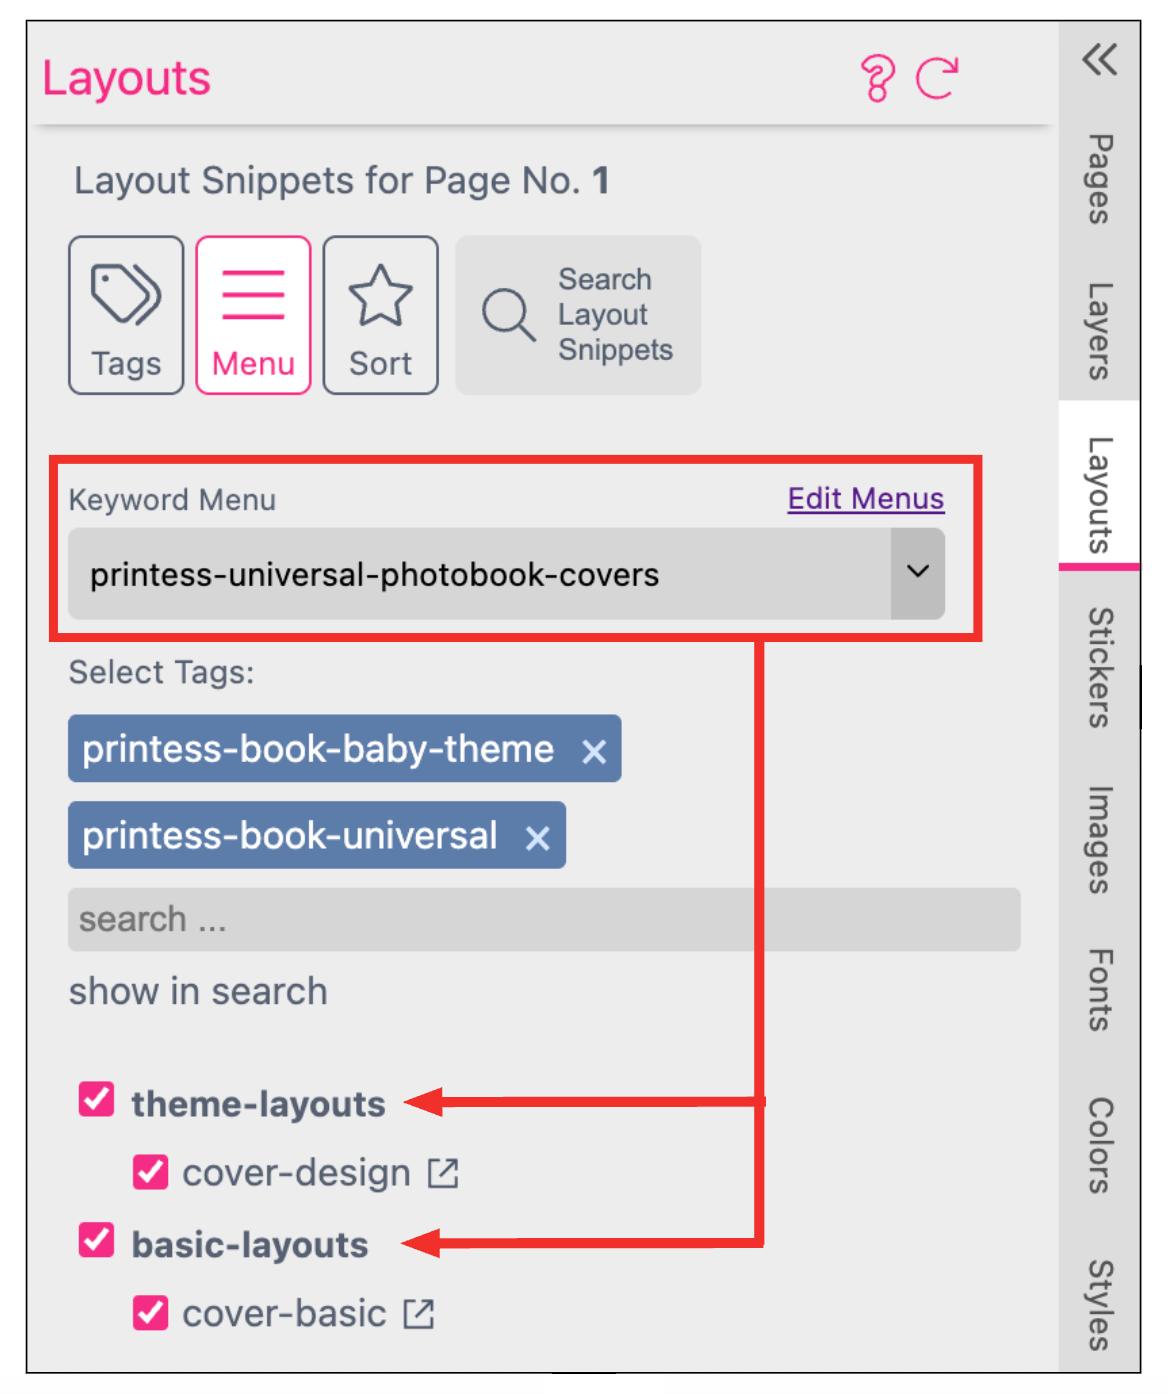
At the Buyer Side the assigned Layout Snippets are displayed under the different Categories filtered by the Topics of the Keyword Menu.
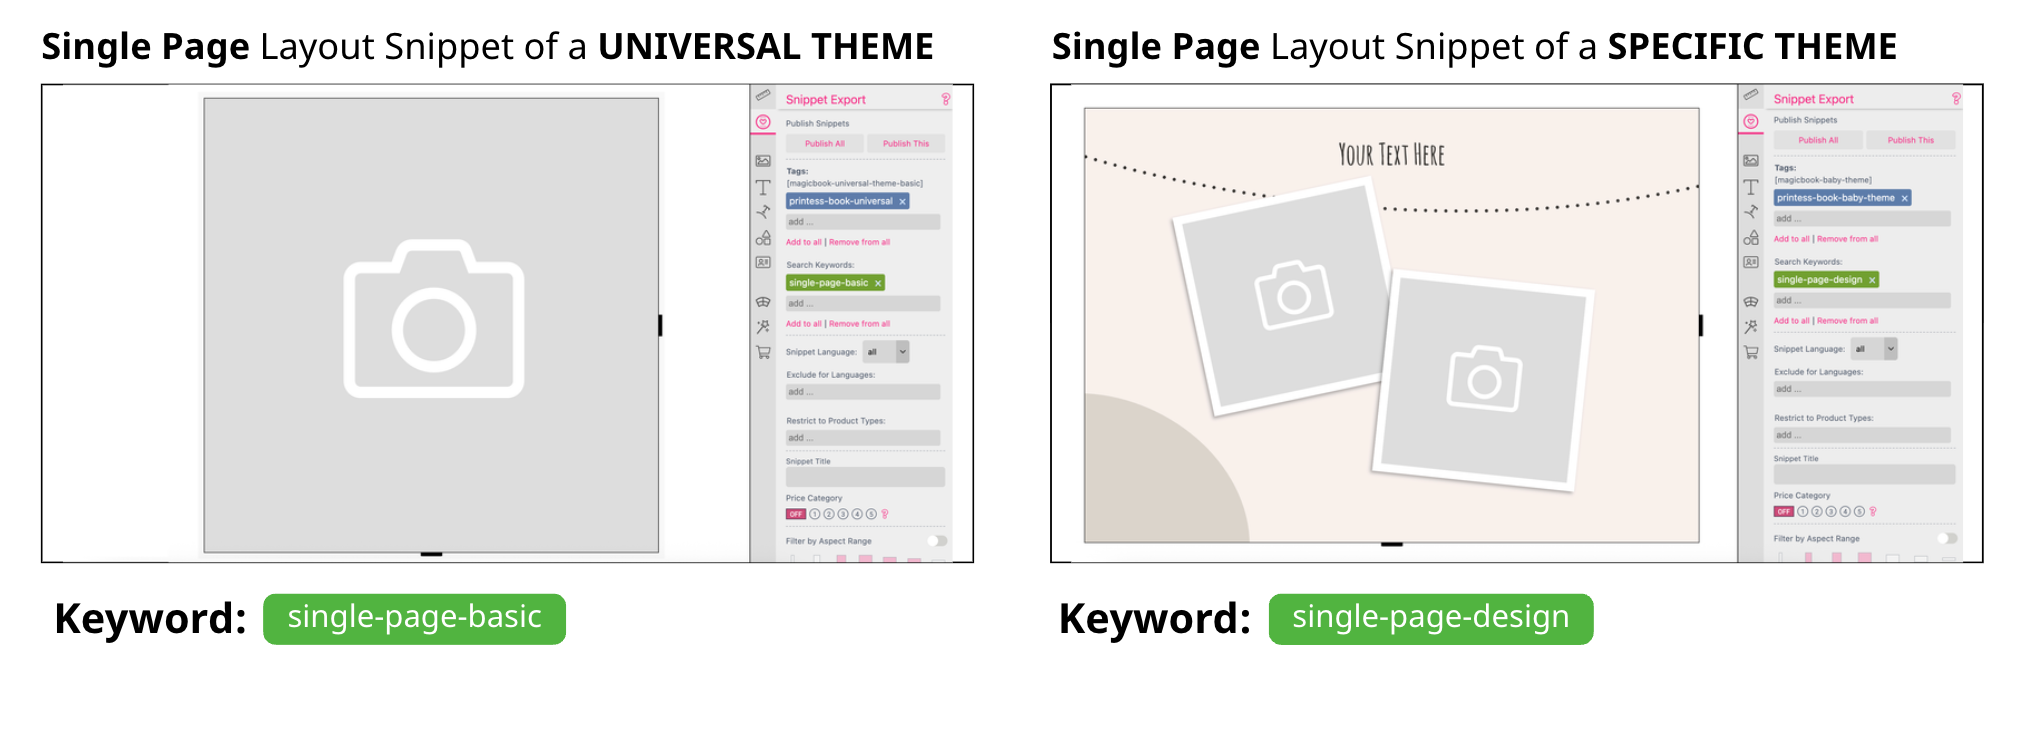
For the Single Pages you have these two Keywords to use: single-page-basic and single-page-design. These are important:
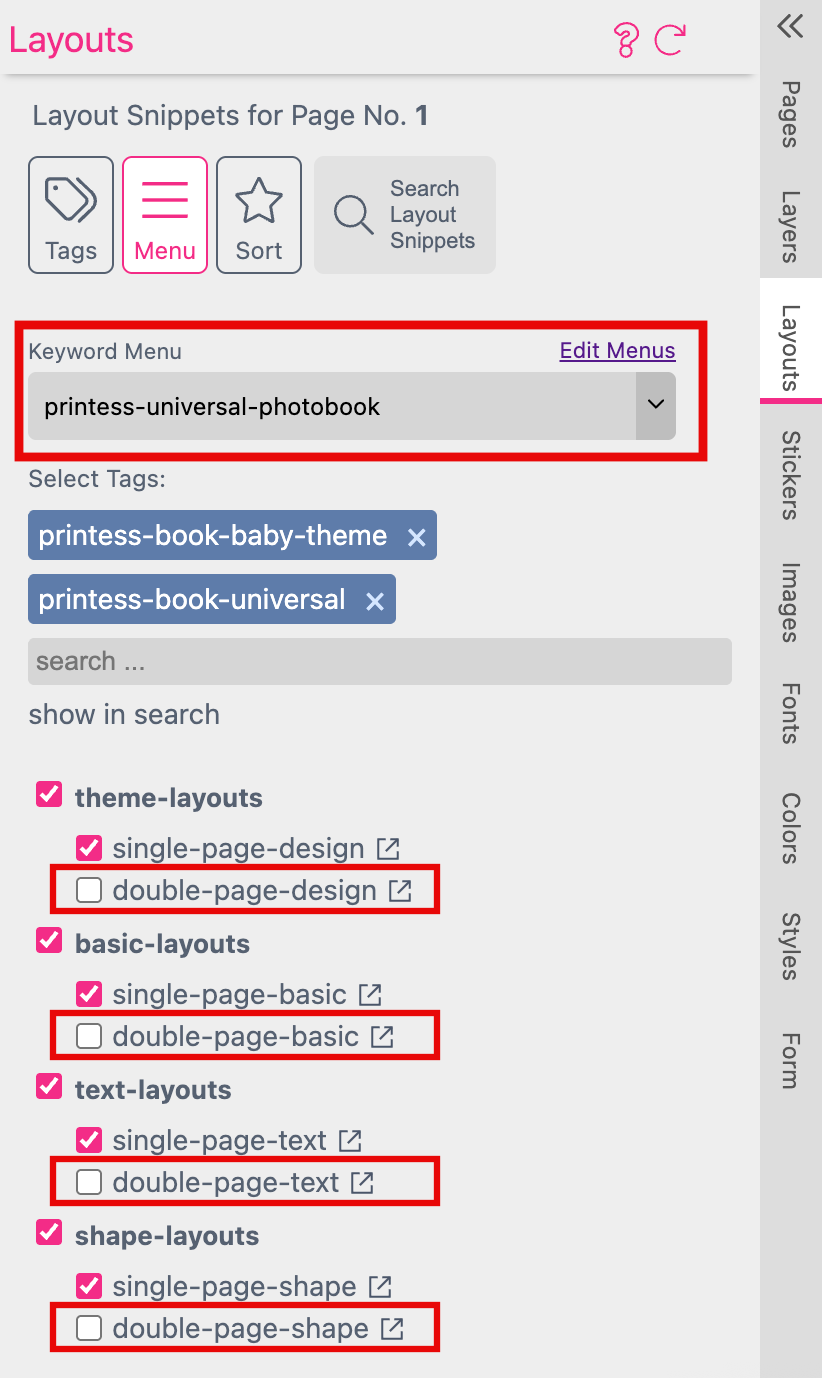
The Single Pages and Double Pages are using the same Keyword Menu. This is an example Keyword Menu like you have to use for these Pages. Please do not name it printess… when you set up your own Keyword Menu. Just use the Keywords.
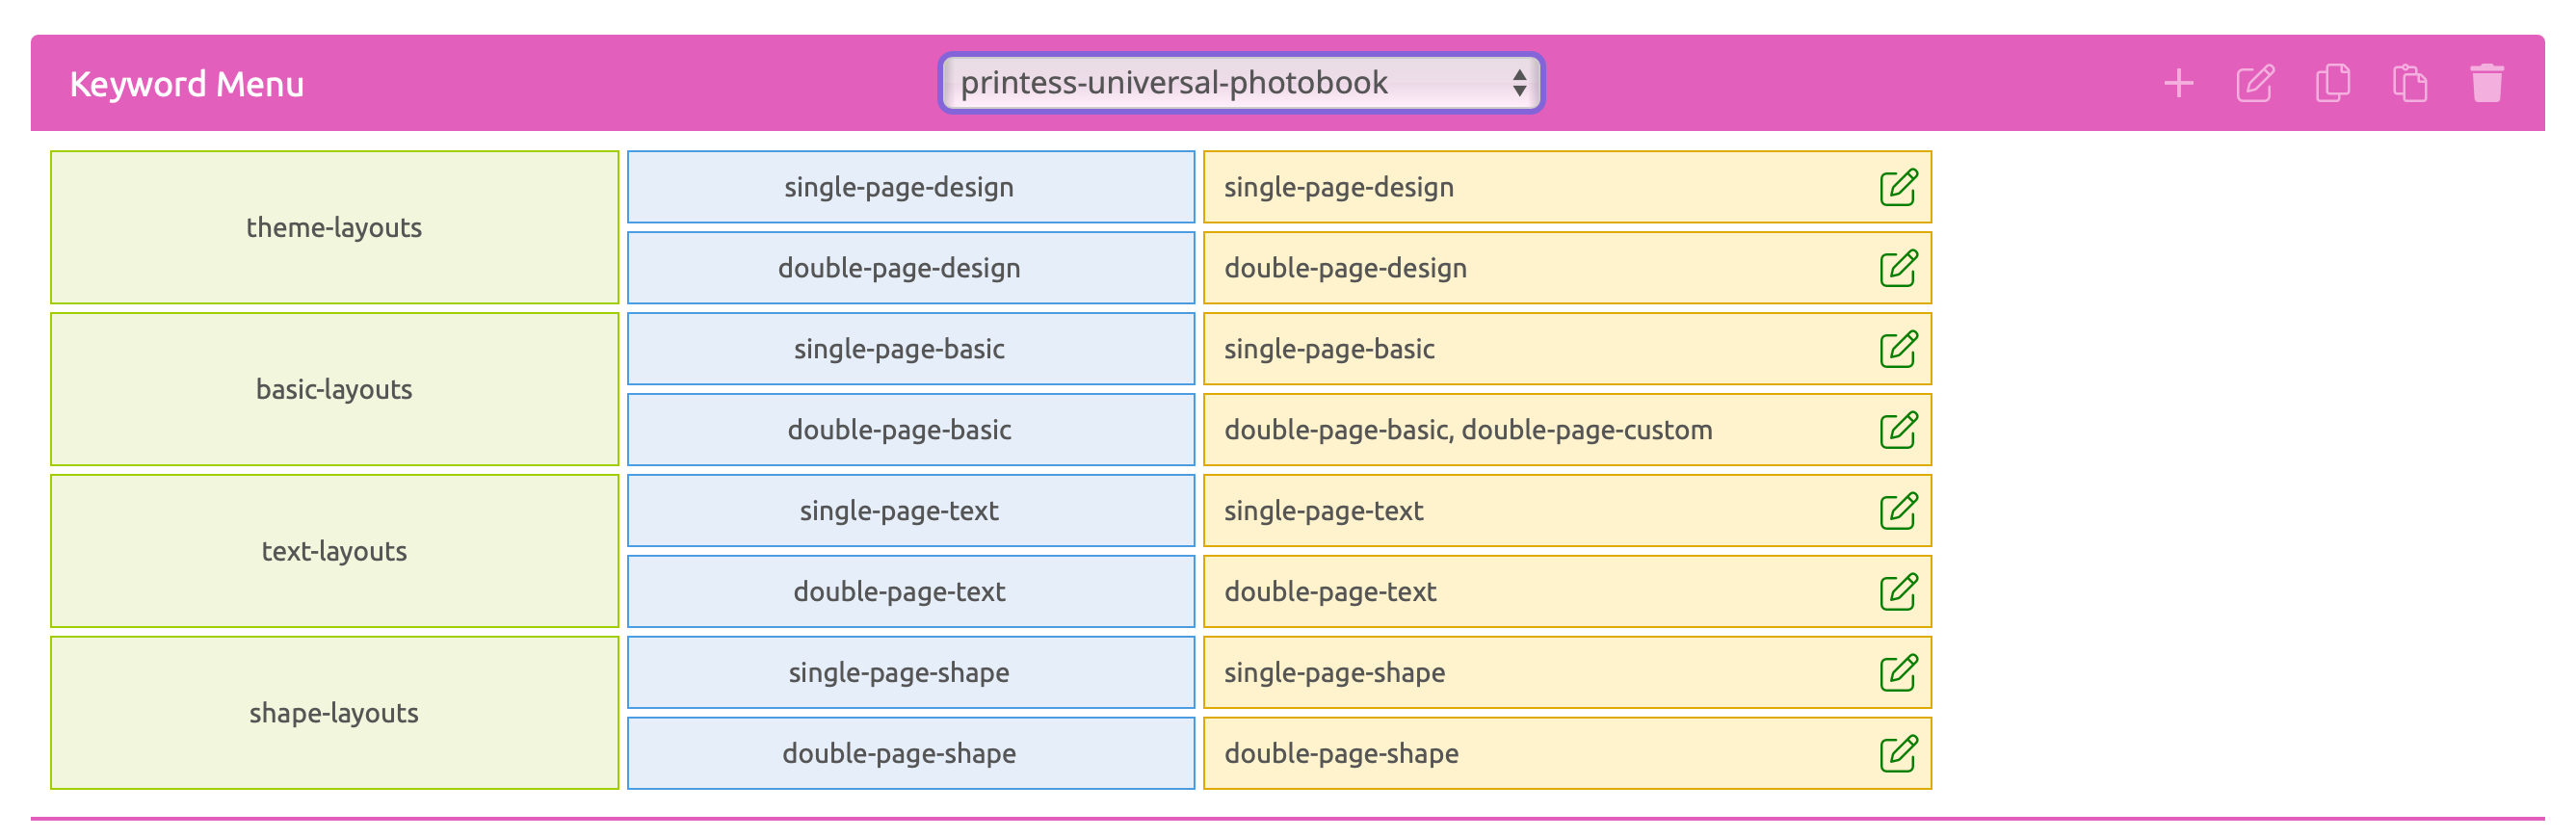
It includes more than the two essential Categories “theme-layouts” and “basic-layout” to show you that option. Any Category includes the Topics for Single Page Layout Snippets and Double Page Layout Snippets.
To assign the Layout Snippets for a Single Page to your Photobook Master just turn off the Double Page Topics.
At the Buyer Side the assigned Layout Snippets are displayed under the different Categories filtered by the Topics “single-page…” of the Keyword Menu.
For the Double Pages you have these two Keywords to use: double-page-basic and double-page-design. These are important:
The Keyword double-page-design is also important for the AI generated Photobook.
The Single Pages and Double Pages are using the same Keyword Menu. This is an example Keyword Menu like you have to use for these Pages. Please do not name it printess… when you set up your own Keyword Menu. Just use the Keywords.
It includes more than the two essential Categories “theme-layouts” and “basic-layout” to show you that option. Any Category includes the Topics for Single Page Layout Snippets and Double Page Layout Snippets.
To assign the Layout Snippets for a Double Page to your Photobook Master just turn off the Single Page Topics.
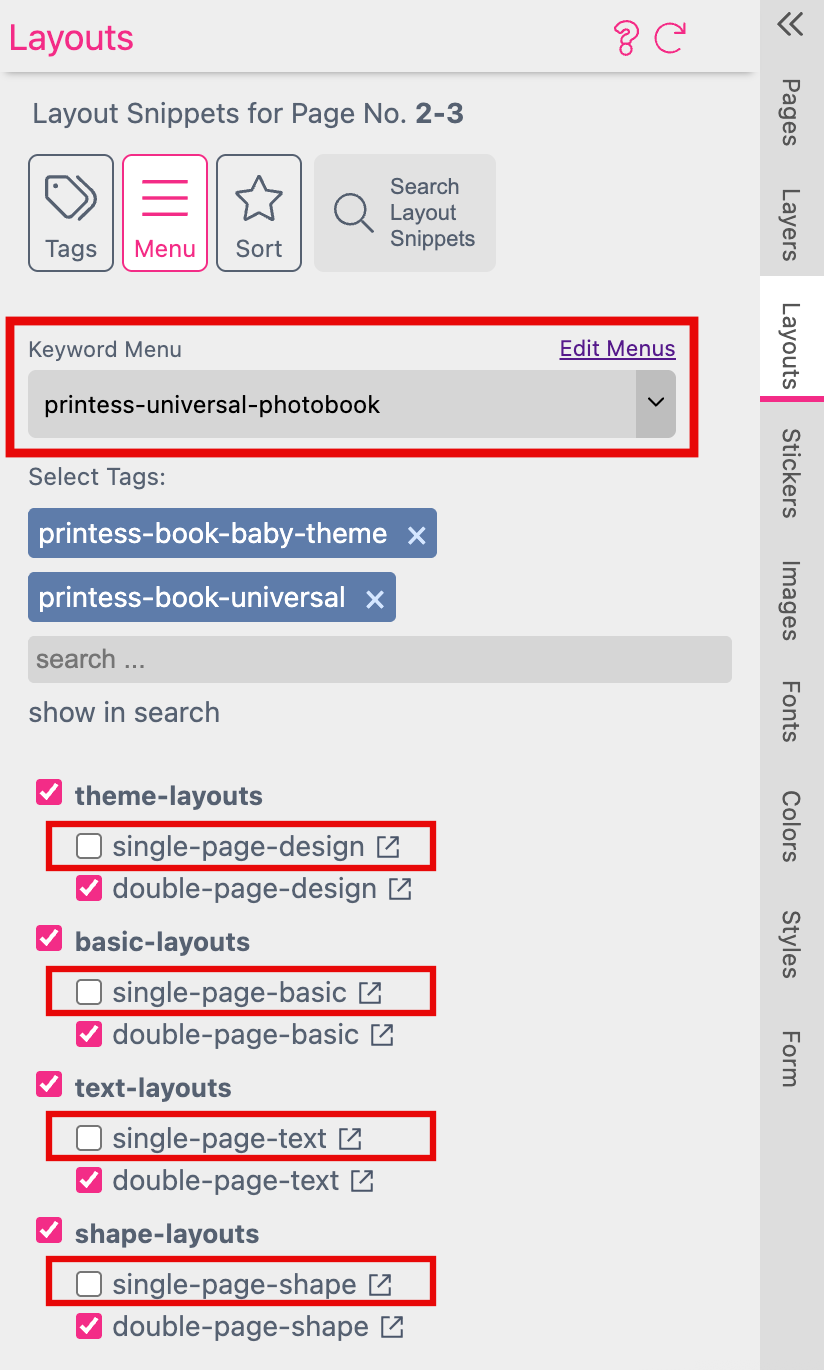
At the Buyer Side the assigned Layout Snippets are displayed under the different Categories filtered by the Topics “double-page…” of the Keyword Menu.

The Background Keywords are using the same Keyword Menu. This is an example Keyword Menu like you have to use for the Cover and Inner Pages Document of your Photobook Master. Please do not name it printess… when you set up your own Keyword Menu. Just use the Keywords.
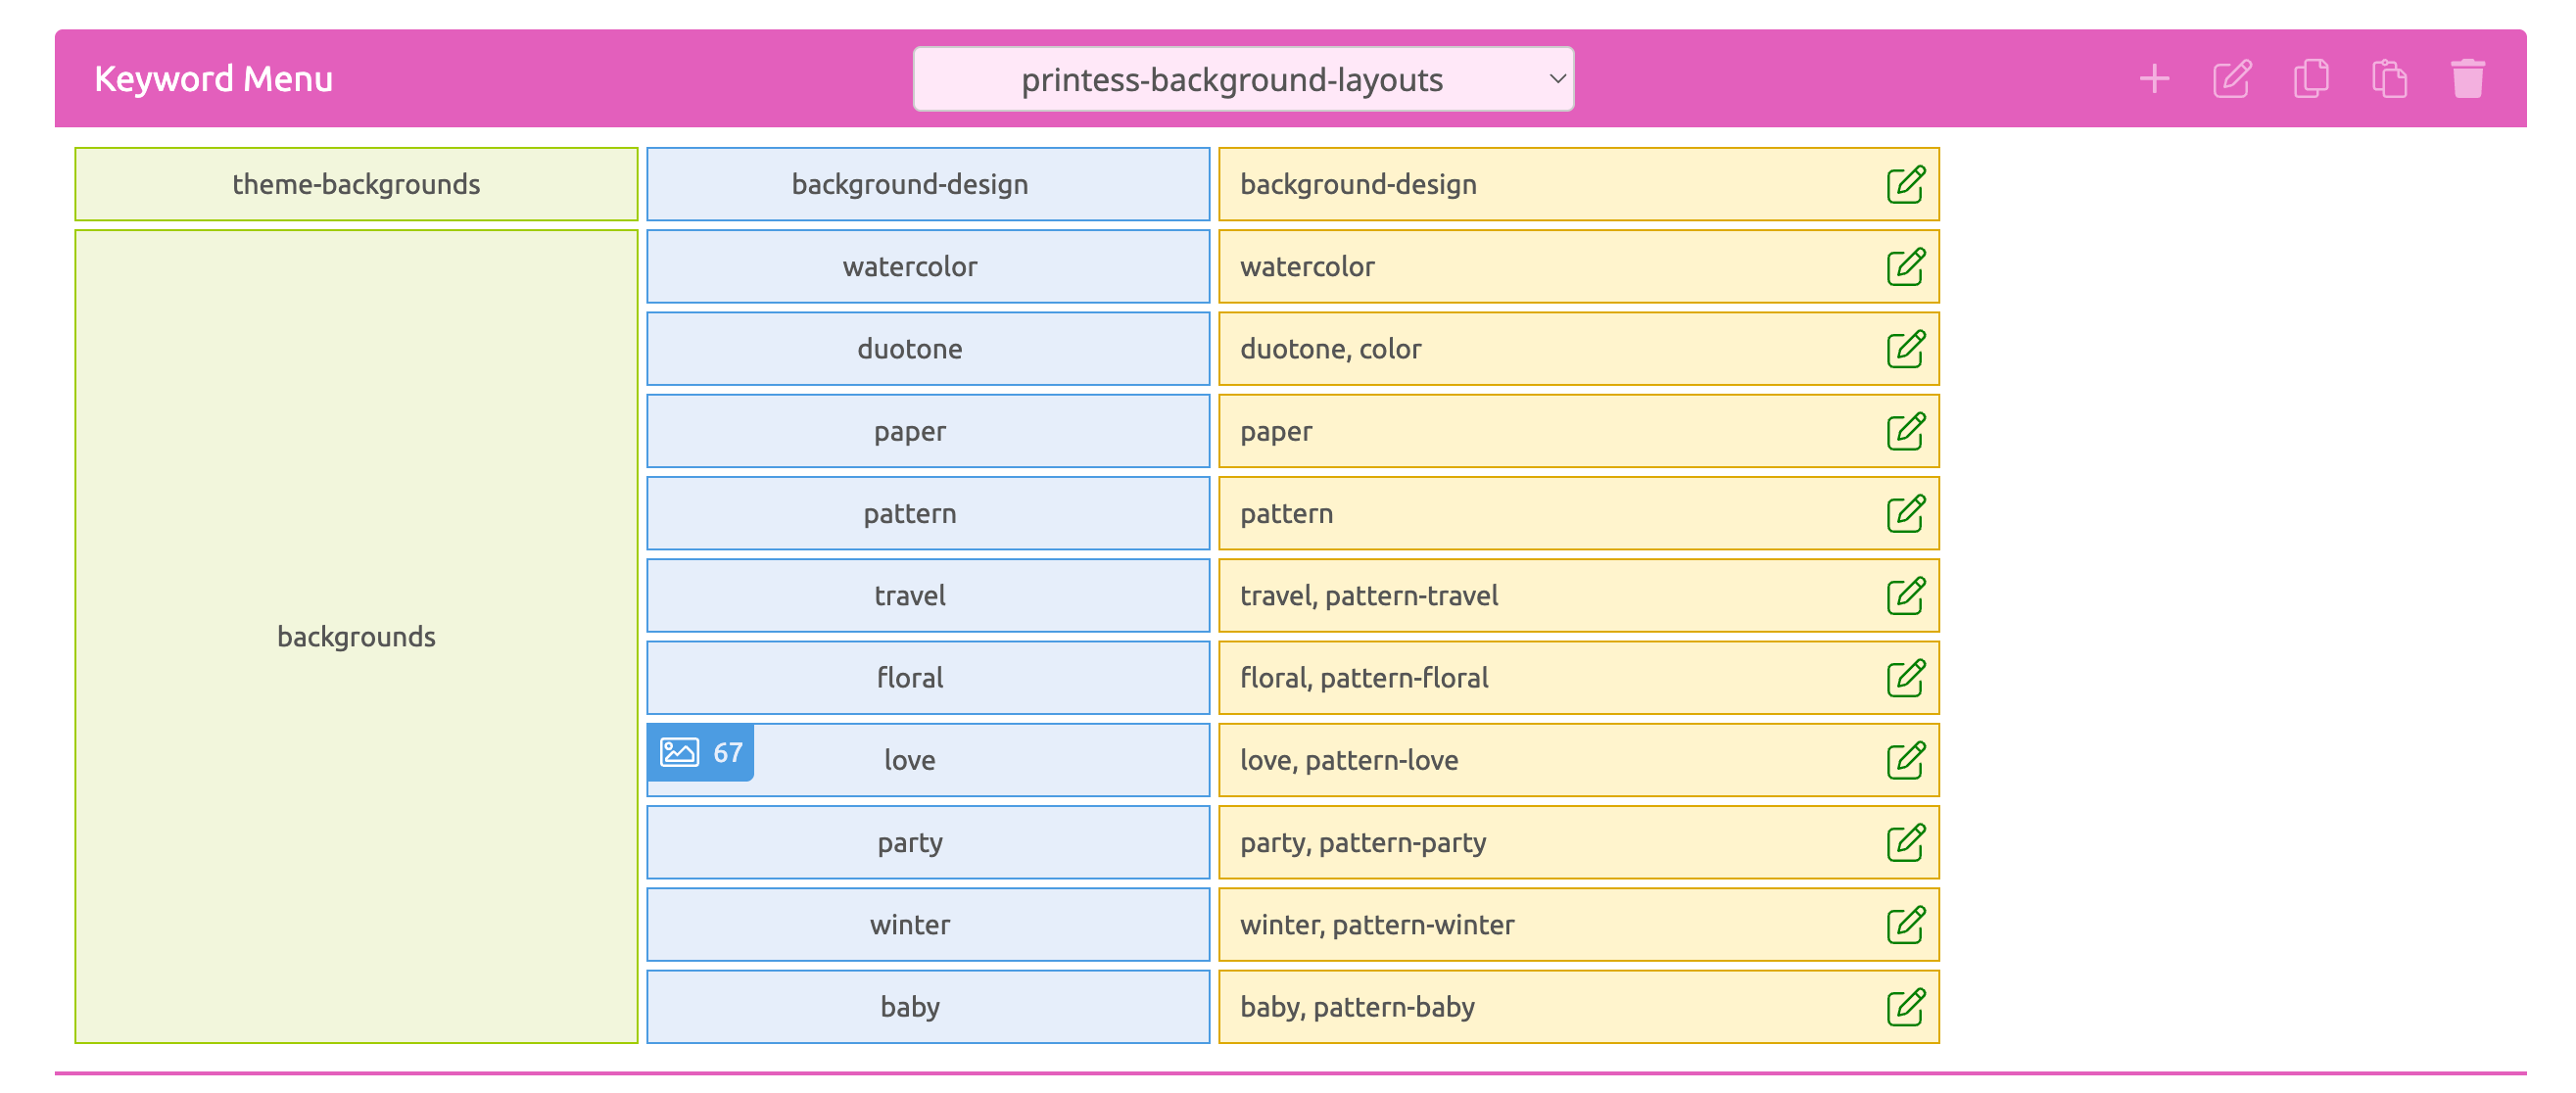
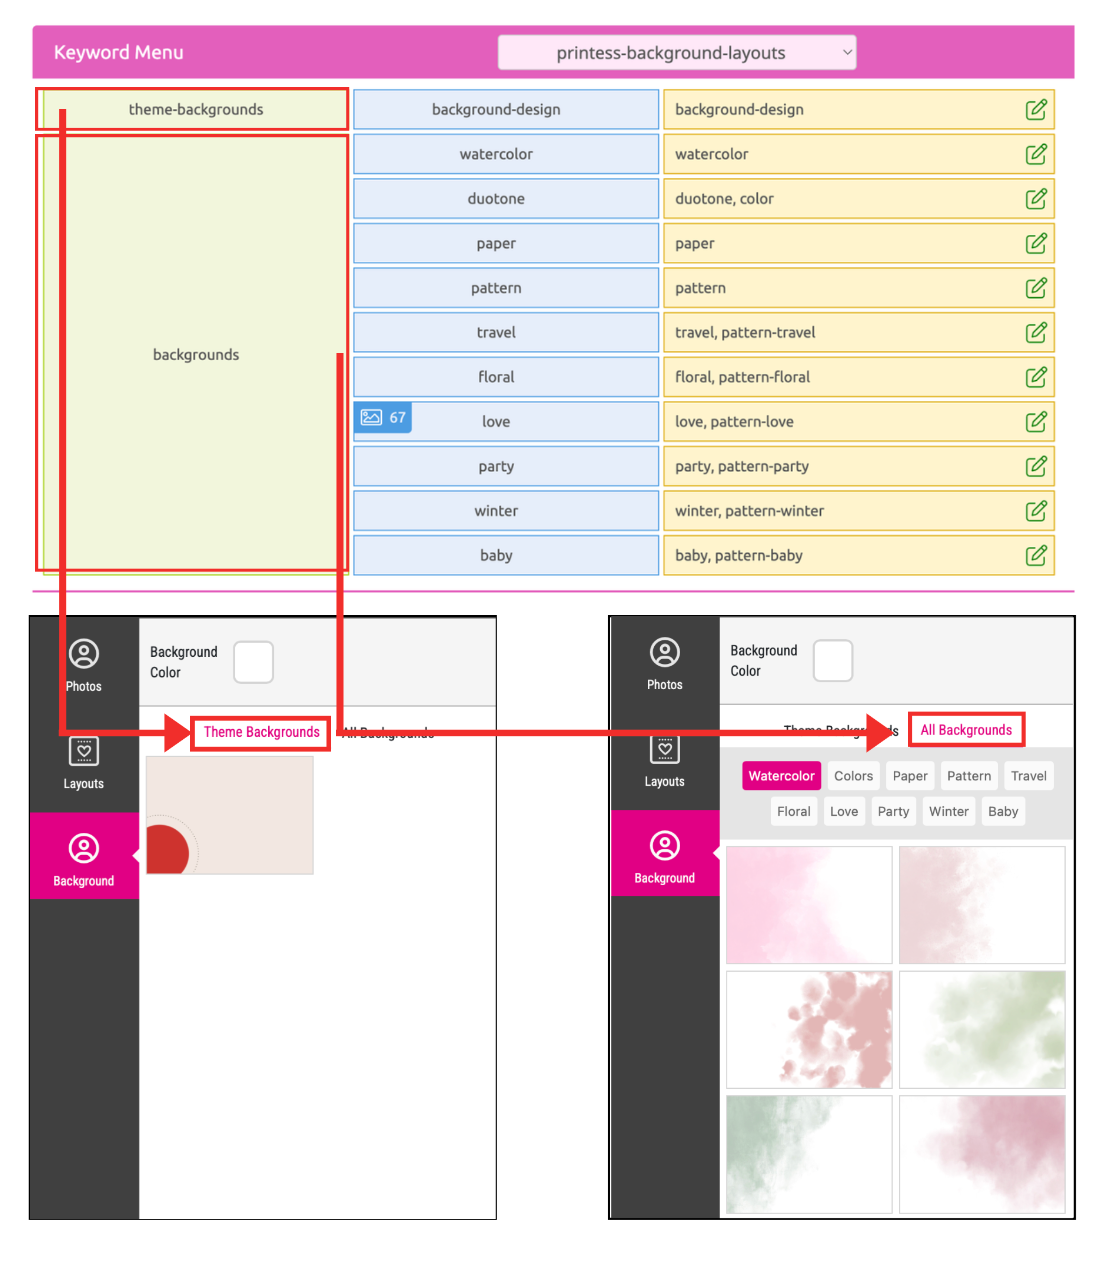
It includes a Category for the backgrounds which are part of your Layout Libraries used for Specific Themes called “theme-backgrounds” and a second Category for any other background Layout Snippets.
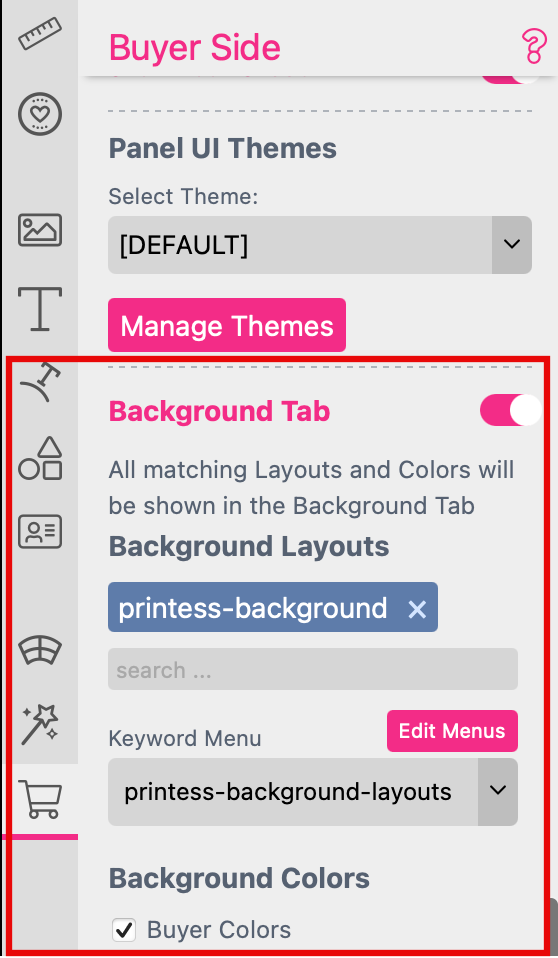
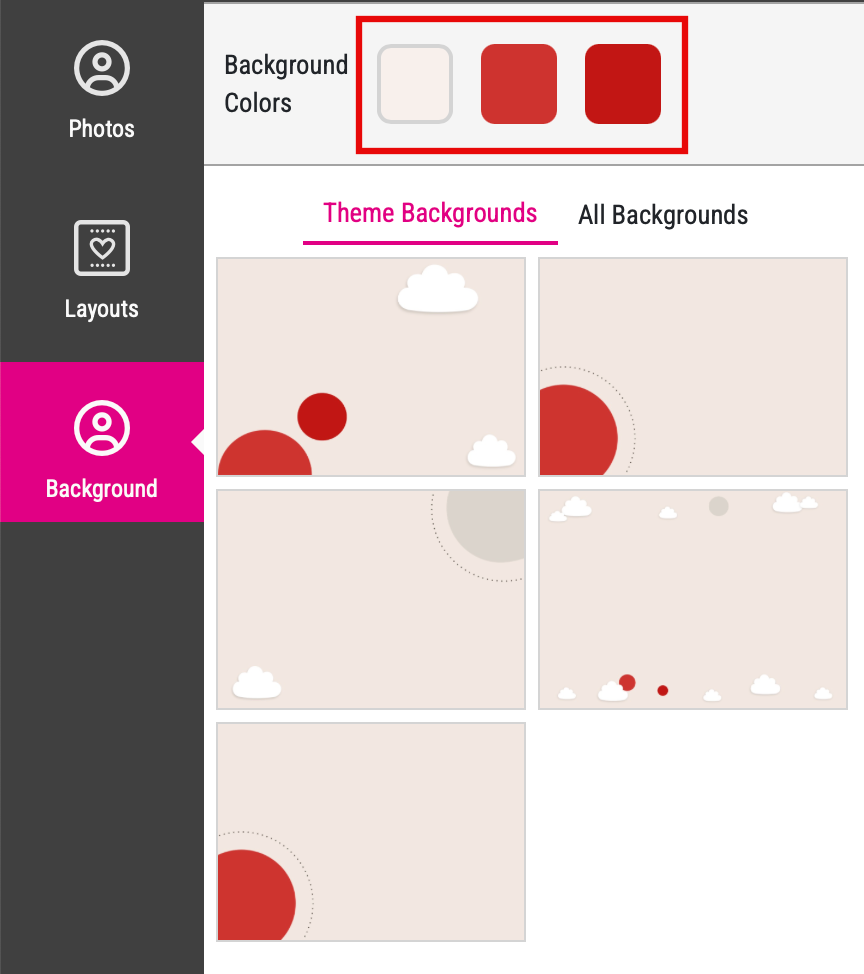
To assign the background Layout Snippets you have to use the Buyer Side Setting Tab of the Cover and the Inner Pages Document to turn on the option Background Tab. Here the Keyword Menu and the Tag for the Printess backgrounds are assigned by default. Also the option for the Buyer to change the background color is activated.
At the Buyer Side the assigned Layout Snippets are displayed under the different Categories filtered by the different Topics of the Keyword Menu.
The setup for the two different Categories of background Layout Snippets differs. Depending if they will be used for a Specific Theme or not. However, they have some important characteristics in common:
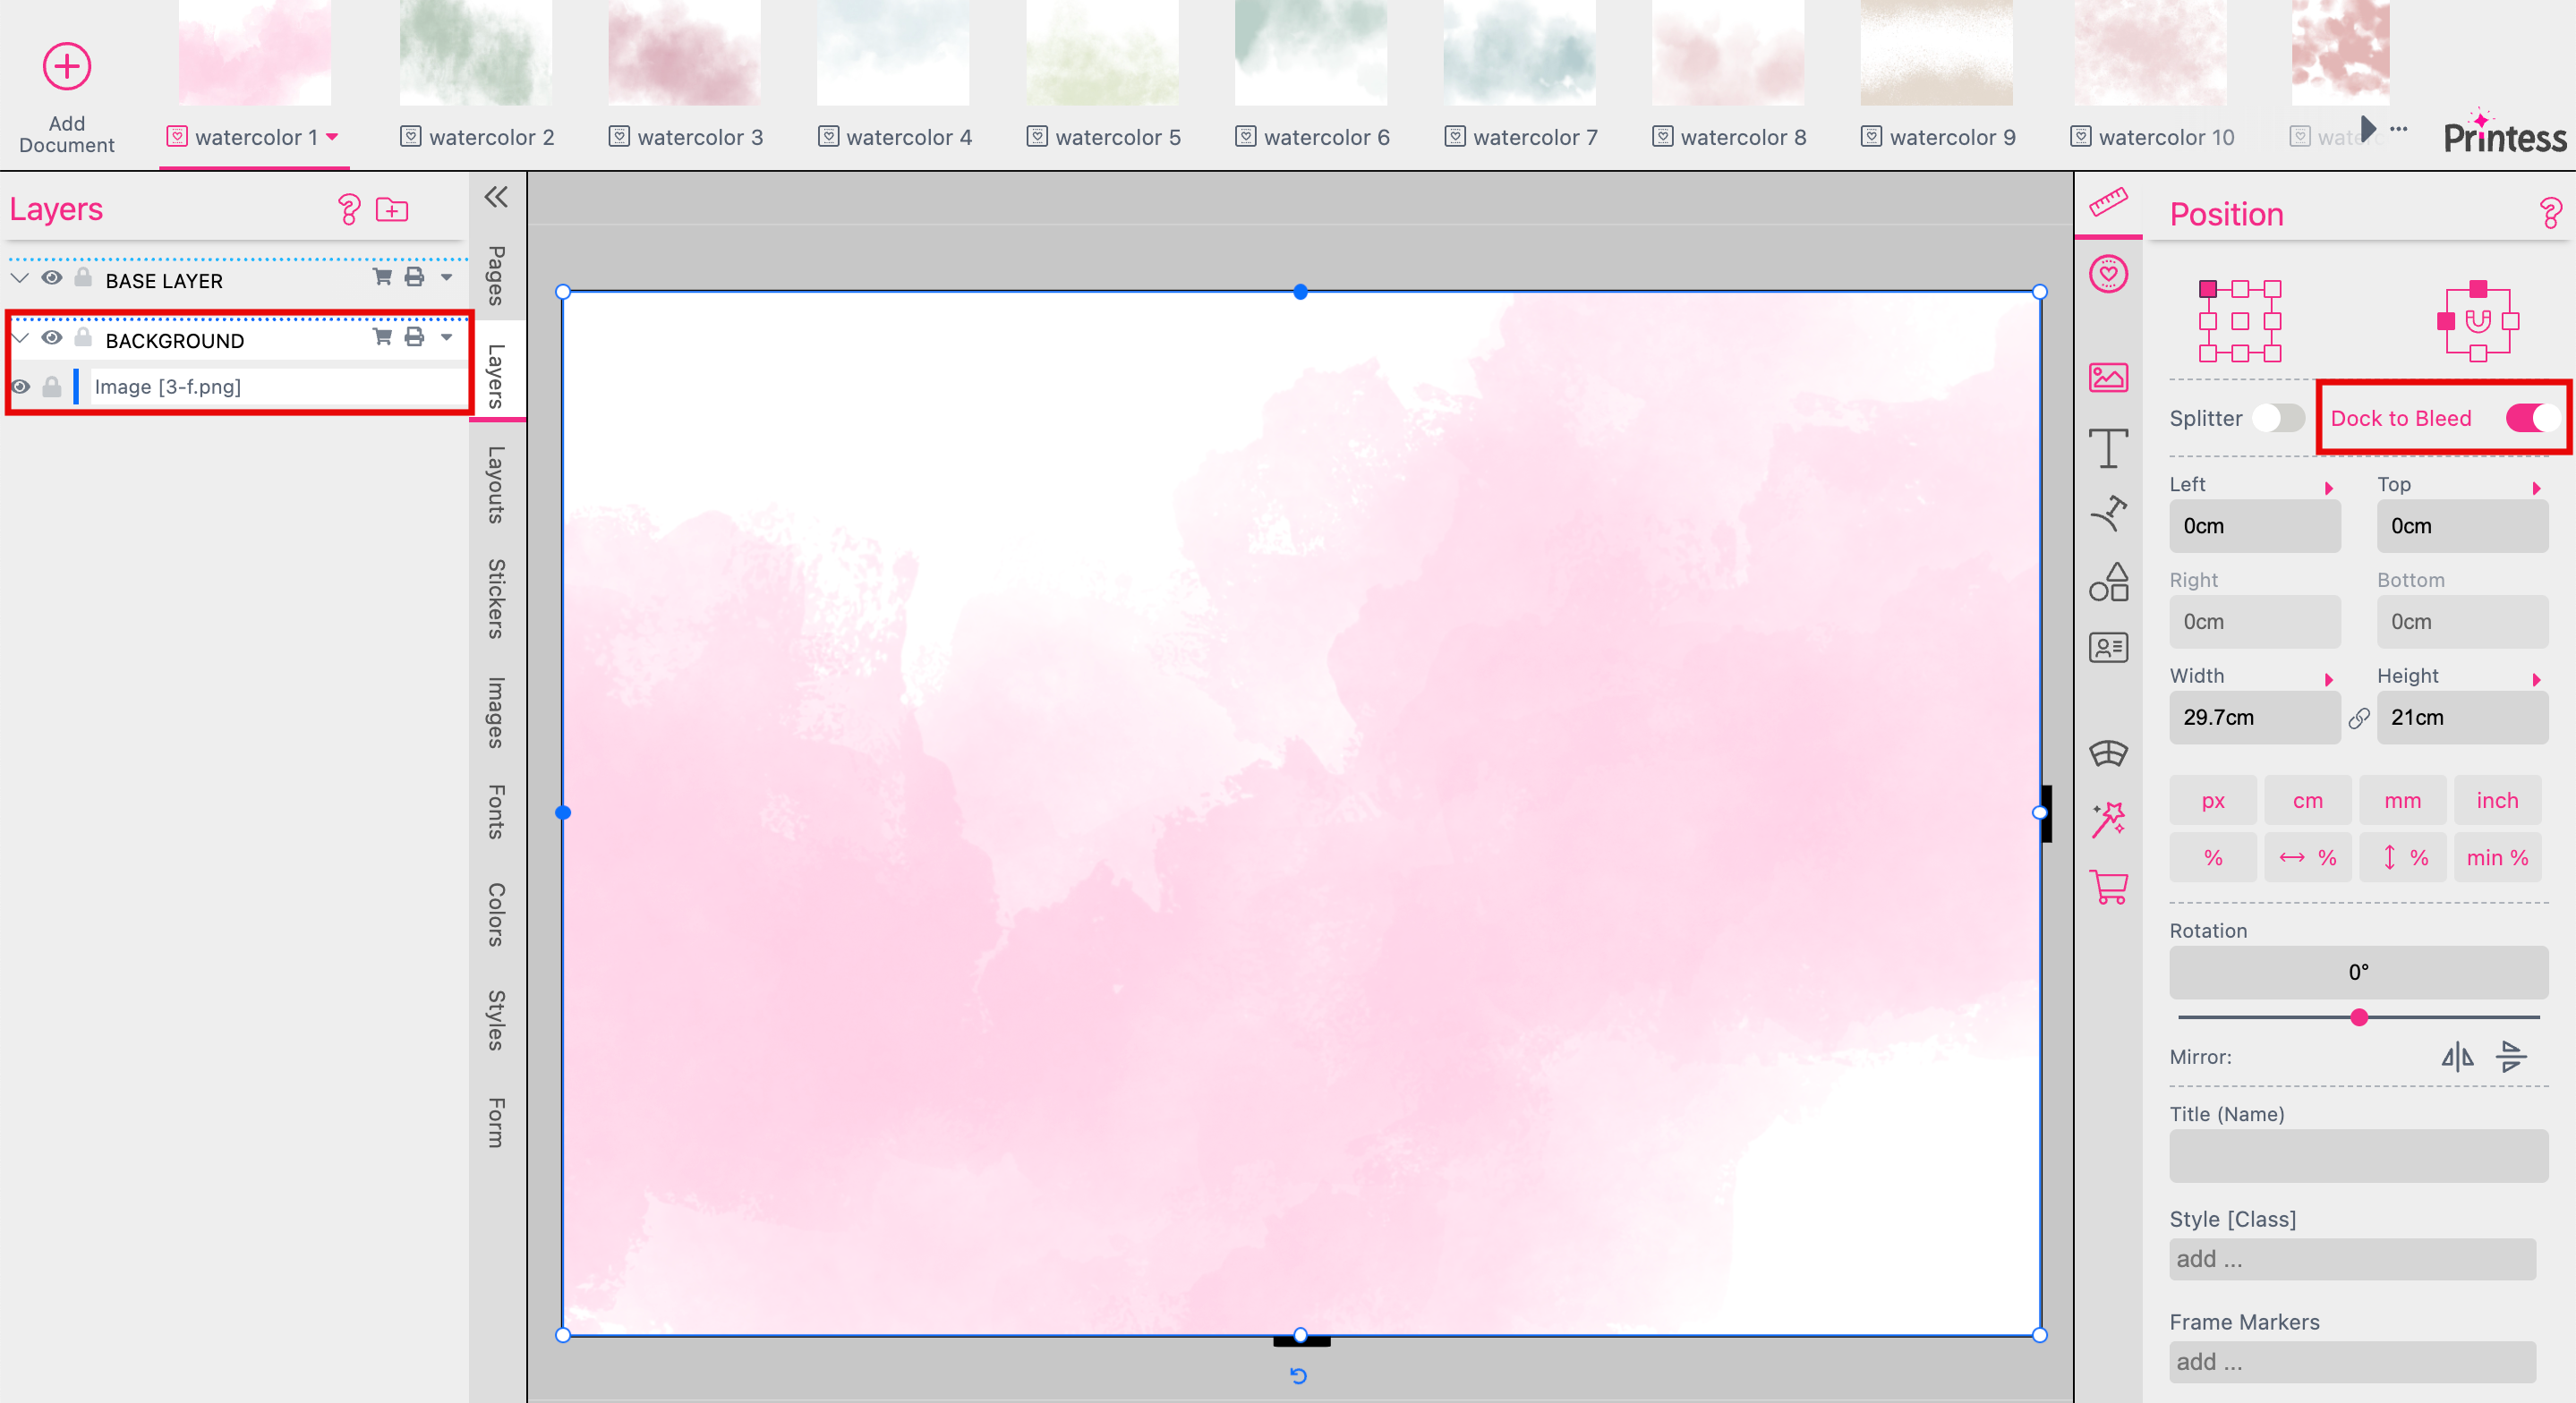
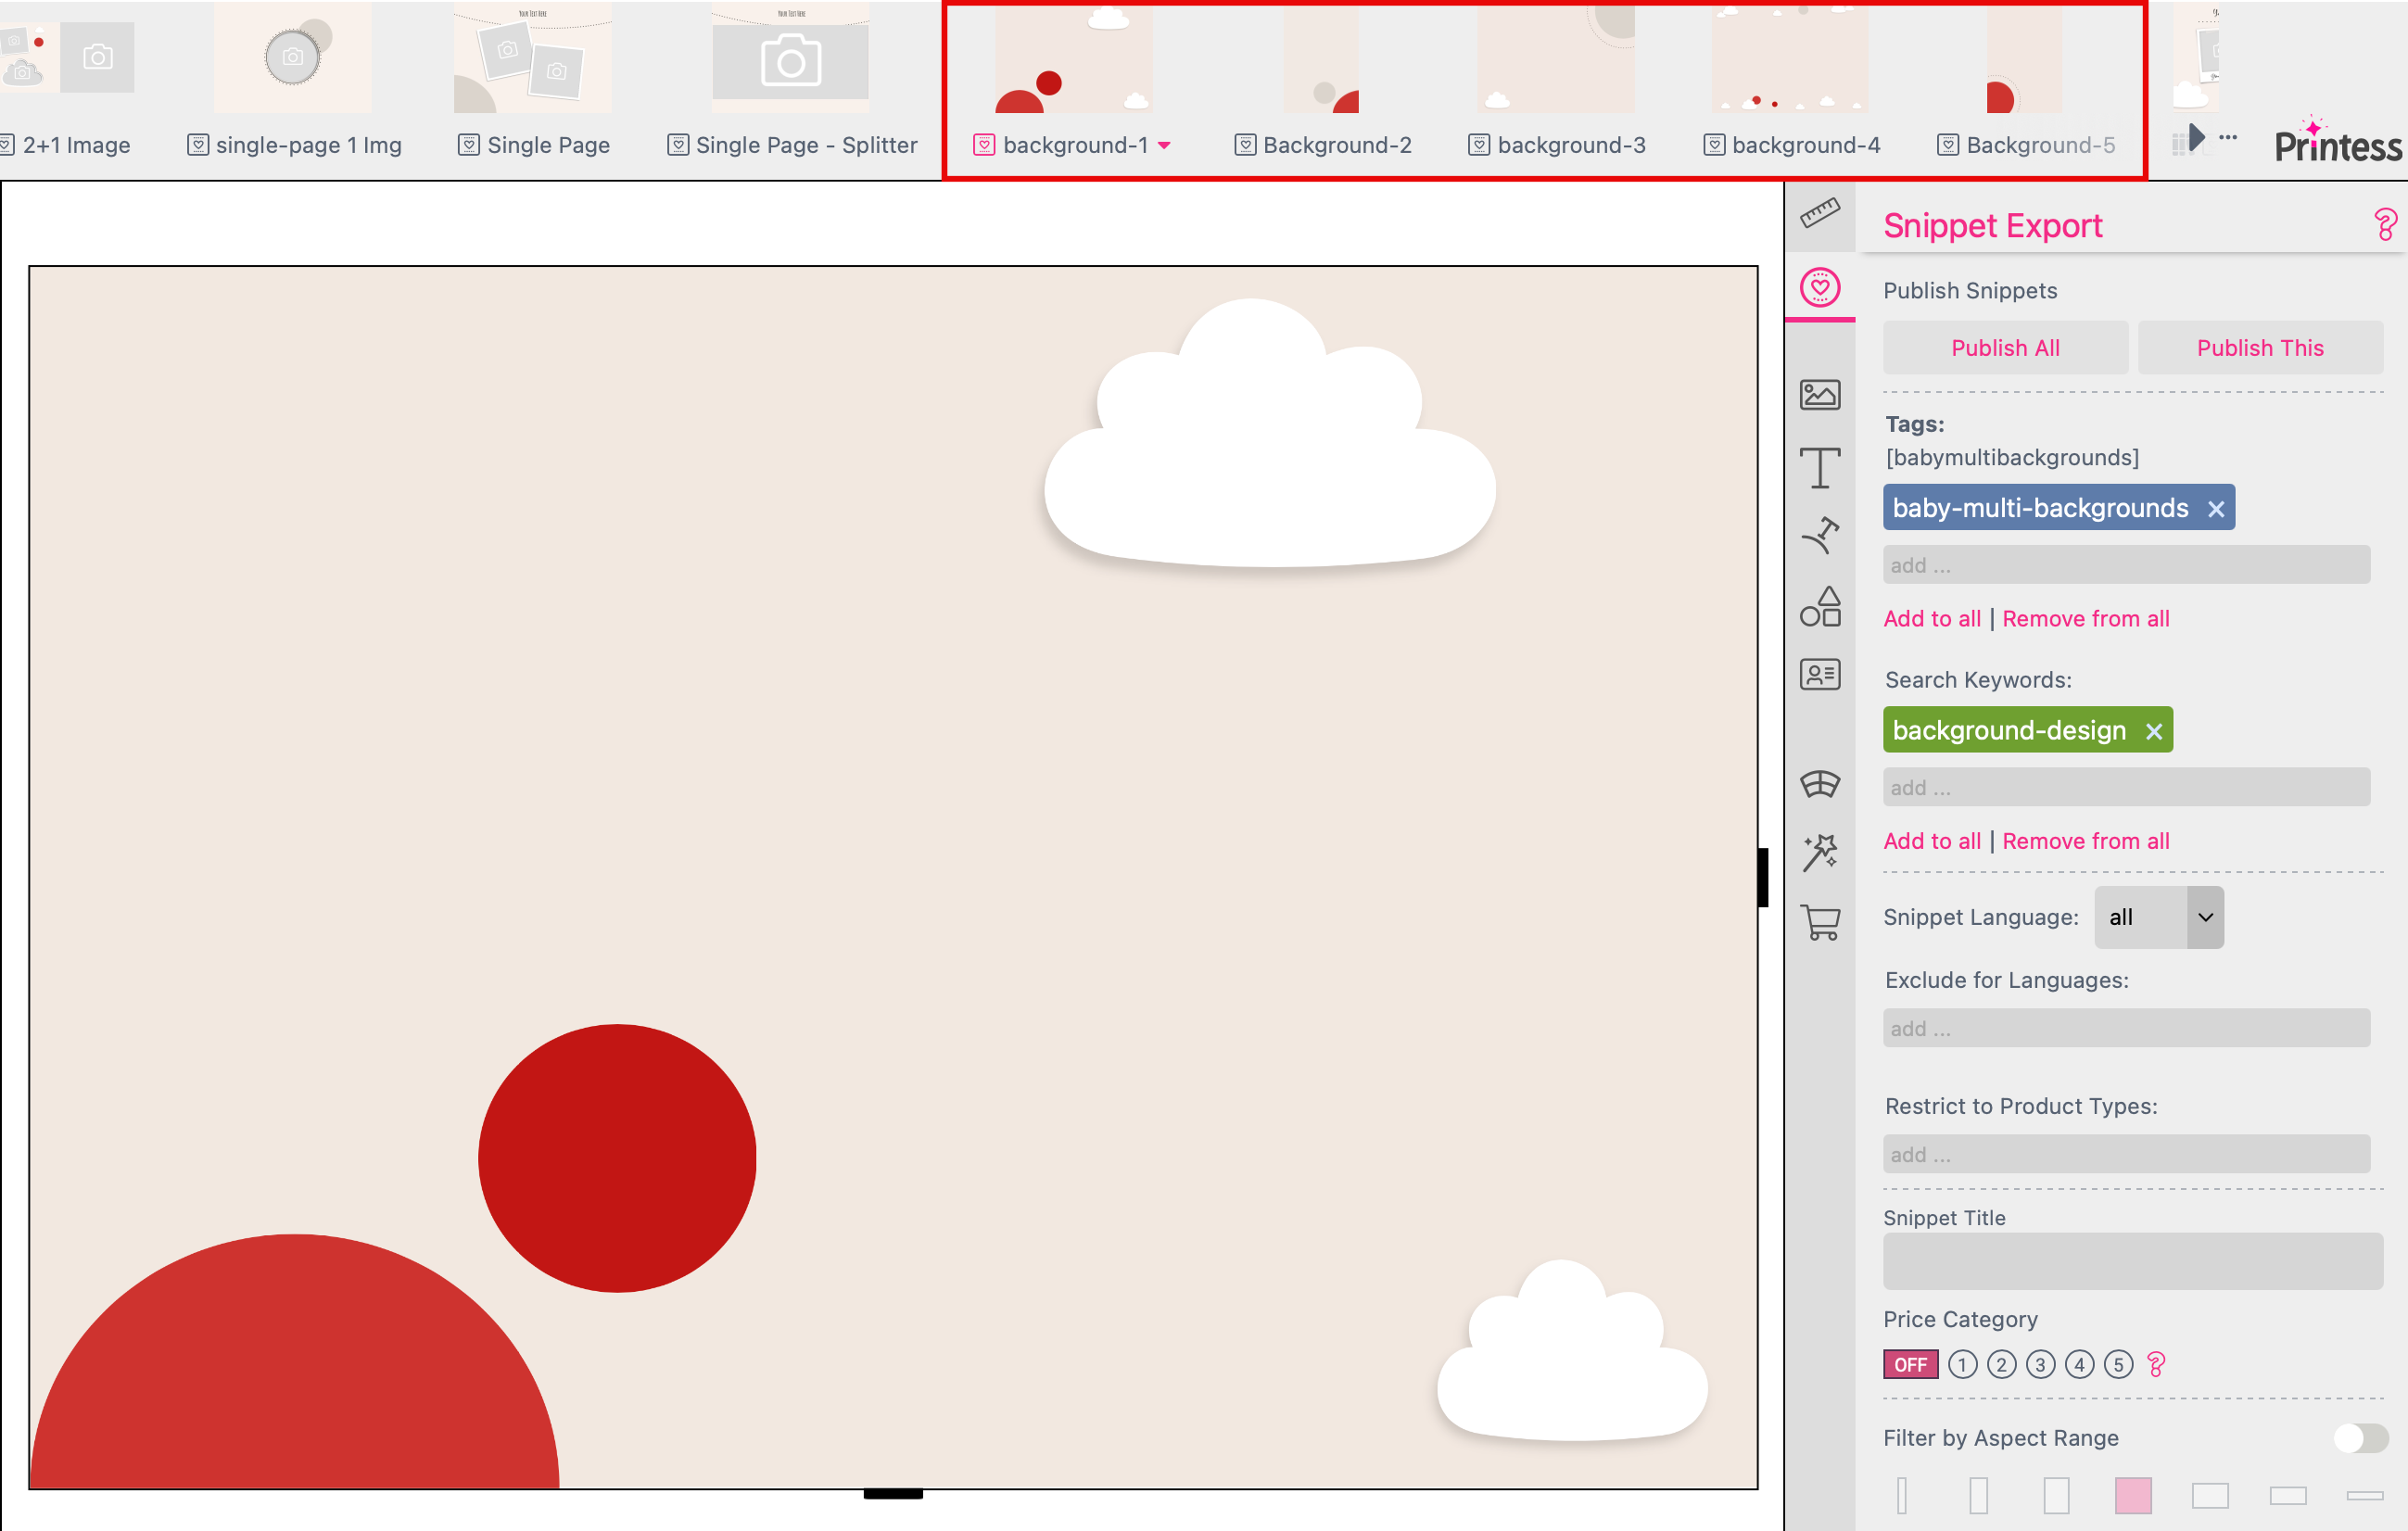
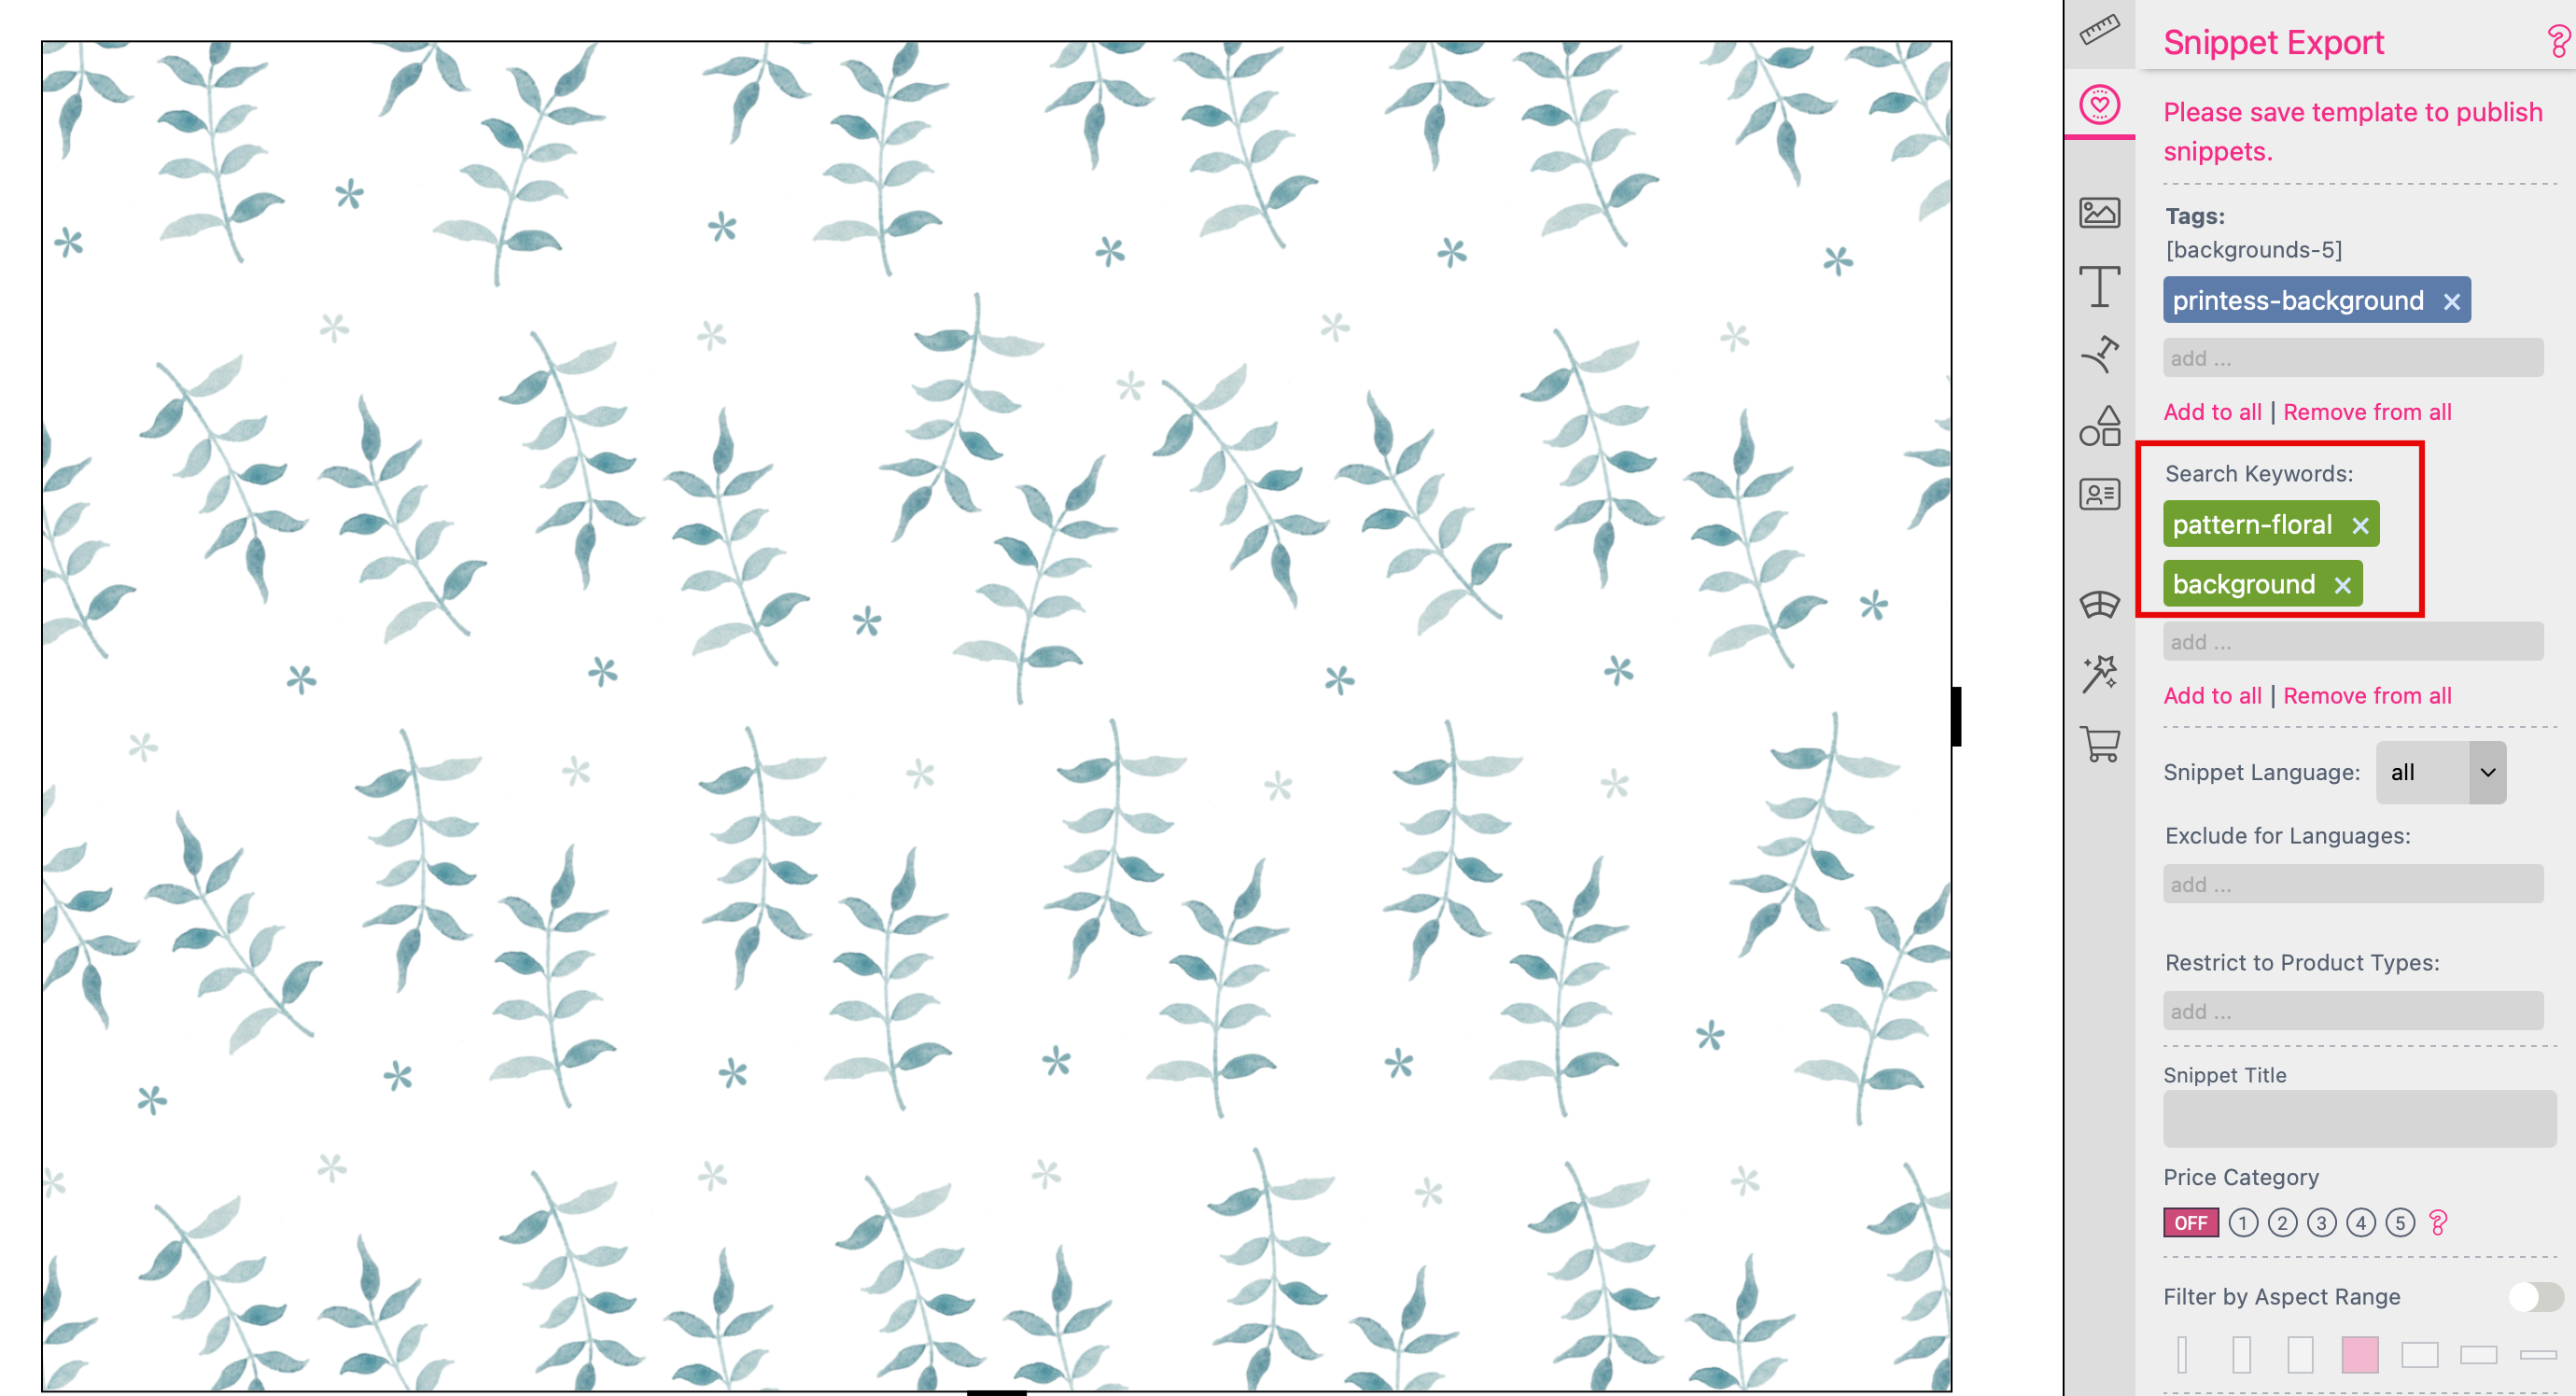
You have to use the Keyword “background-design” for any Layout Snippet which should be used for a Specific Theme. That’s important for the Keyword Menu used when they get automatically assigned to the Printess Template at the Background Tab. These background Layout Snippets must be part of the Layout Library used for a Specific Theme.
There are two ways to set these background Layout Snippets up within the Layout Library.
This creates a variety of versions that makes the resulting Magic Photobook appear significantly more diverse. The pages and spreads of this background Document are applied to the pages of the Photobook Master one after another in a circulating manner.
But at the Buyer Side only the last page of this background Document will be displayed at the Layout Snippet Selection of the Background Tab. And only the background shape of it will be placed.
But if you would like to offer all different backgrounds at the Buyer Side for changing you have to set up each in a separate Document within that Layout Library.
This enables the Buyer to select a specific Layout Snippet for each page and spread of the Photobook - including all frames which are part of the Layout Snippet. And if you activated the Color Selection for these additional frames the Buyer even change them.
Use the Keyword “background” for any background Layout Snippet which is not used for a Specific Theme. In addition you can define any other Keyword to get the Layout Snippet displayed filtered at the Buyer Side. Just make sure that the additional Keyword is part of the Keyword Menu you are using - like in our example above.
Layout Library which include such unspecific background Layout Snippets could be used for several different Magic Photobooks. You can add them to a Universal Theme at the Photobook Theme Creator and you can assign them through the Background Tab at the Buyer Side Settings of your Printess Template.
How to assign Backgrounds to the Background Tab
Watch the video tutorial:
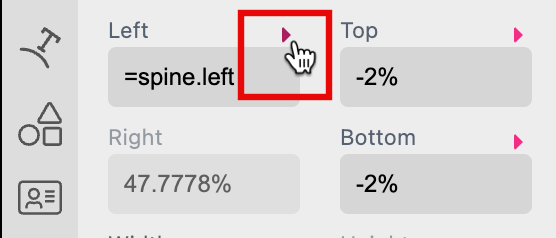
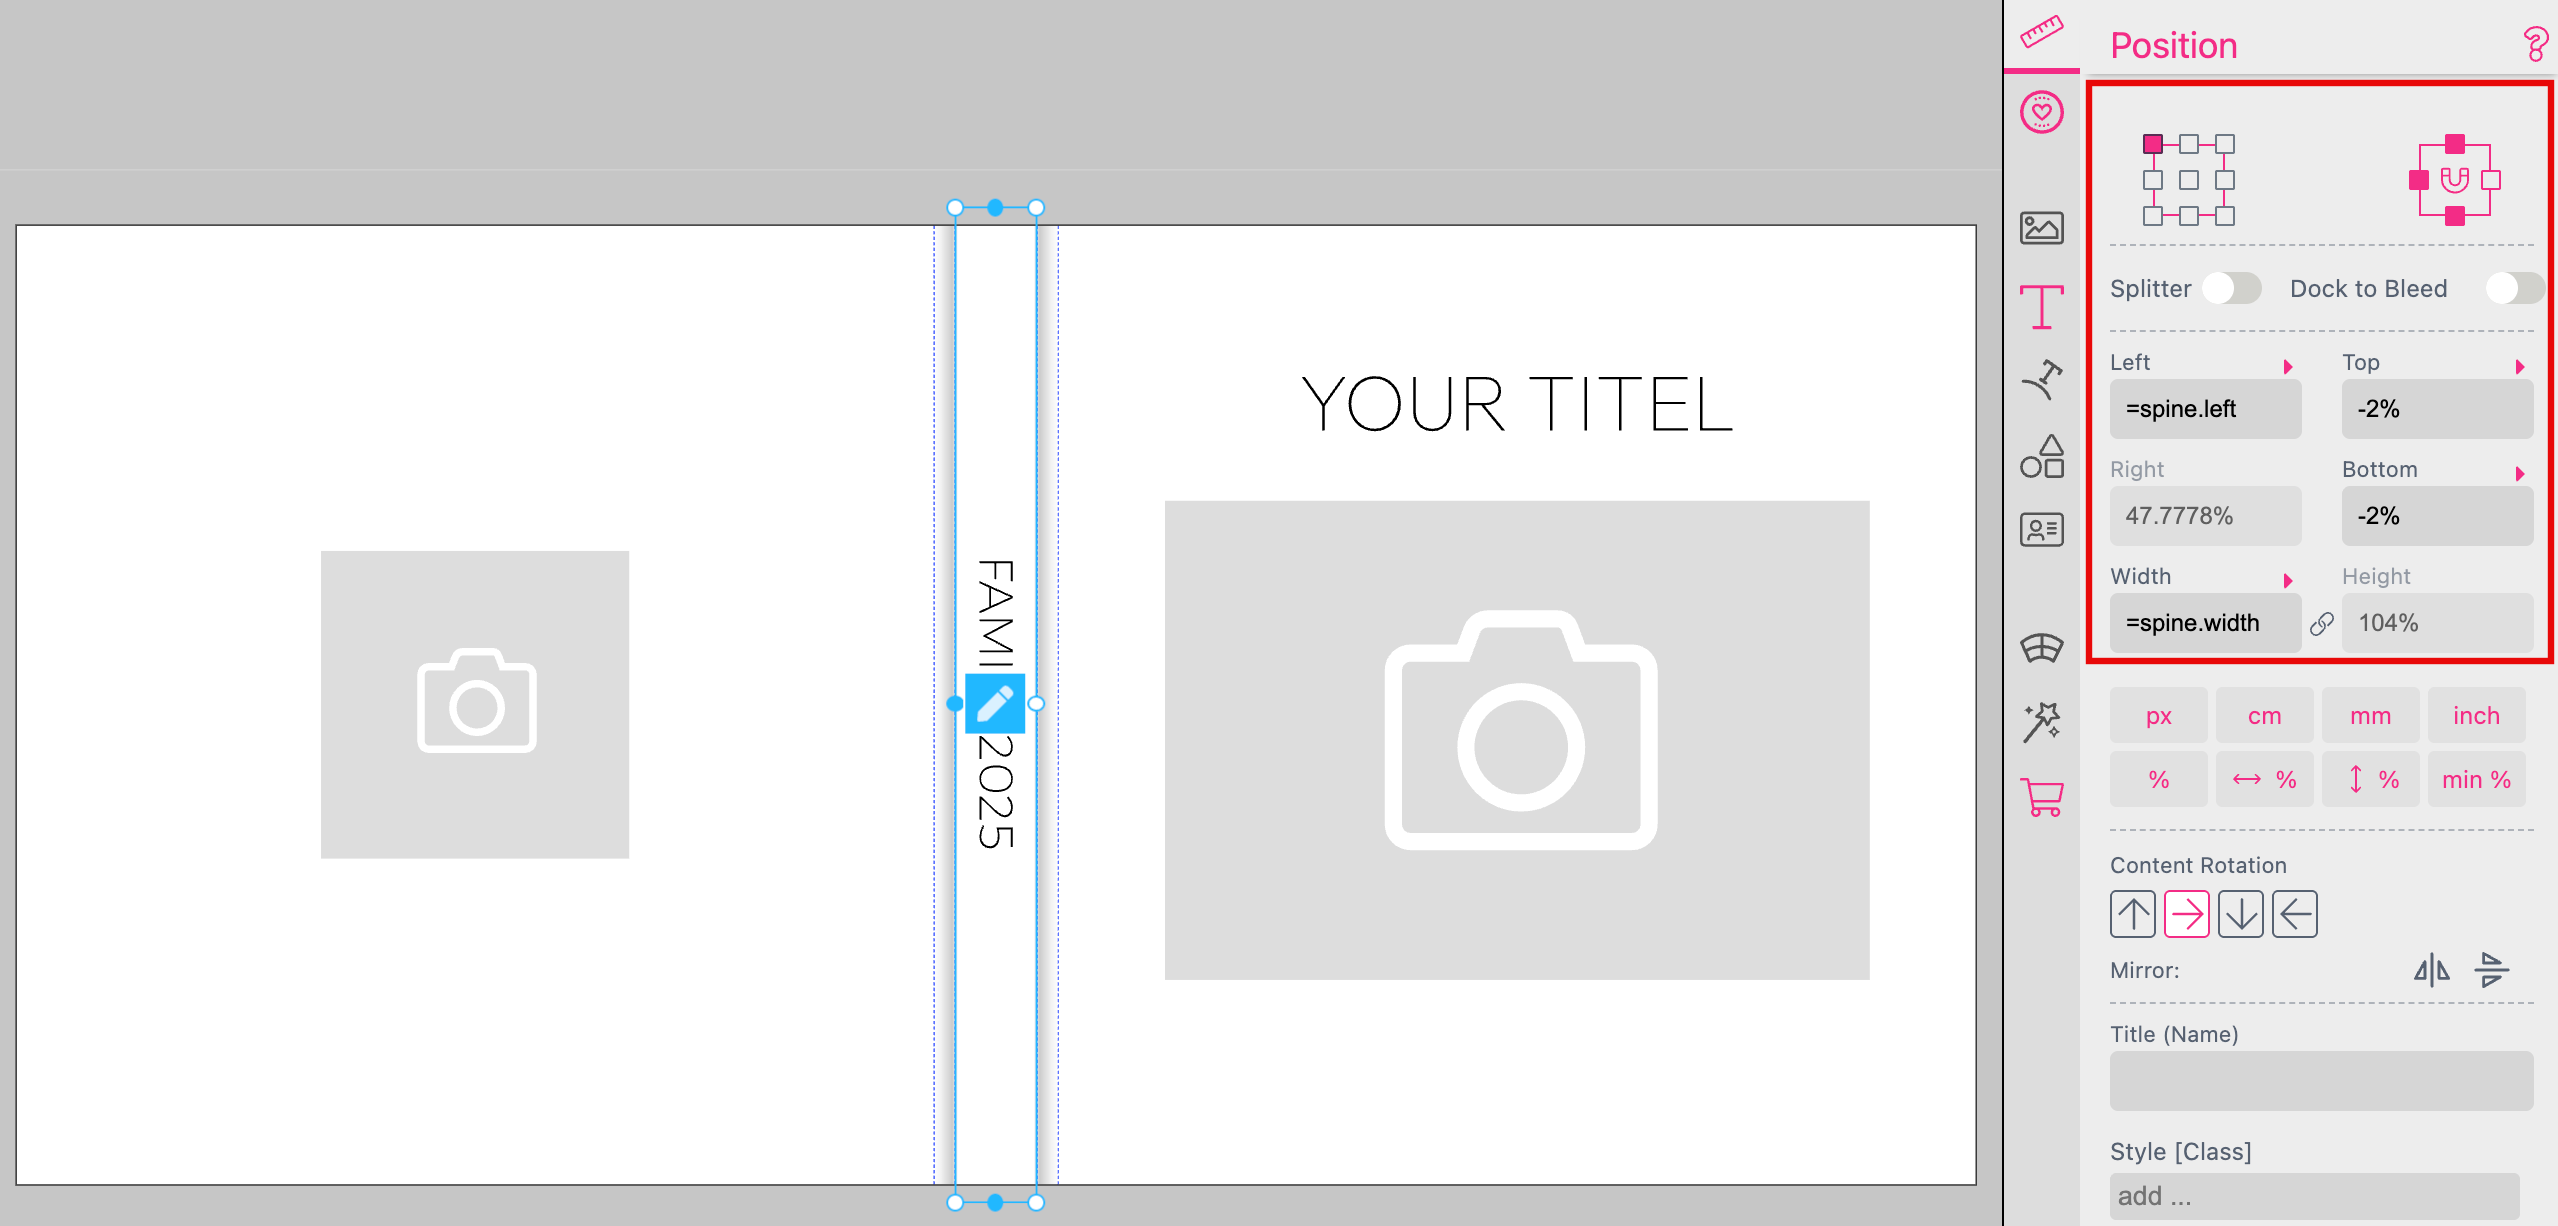
These helpers define the horizontal positioning of any frame. Click on the small triangle next to positioning option “left” or “right” - depending on your defined focal point of the frame.
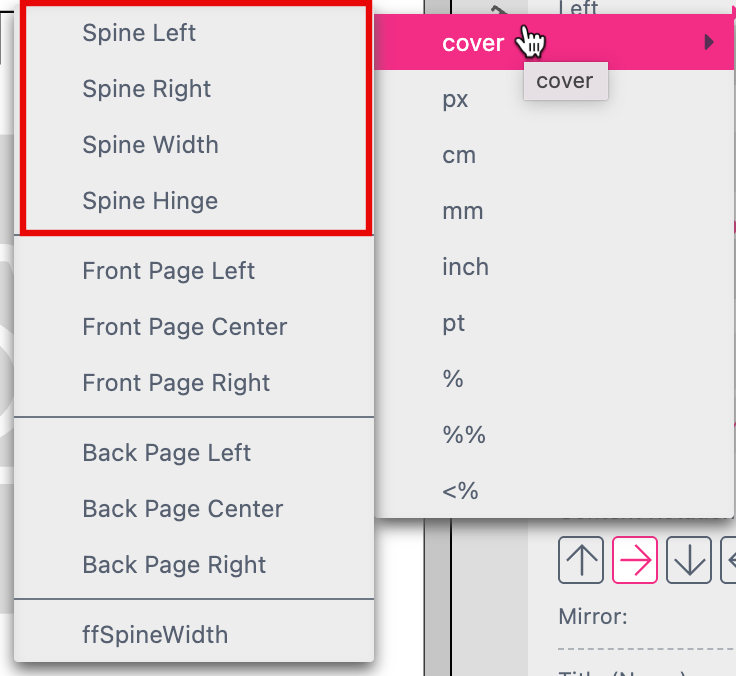
Now choose “cover” to select one of the options for the positioning of the Spine.
Define the Position top-left
Define the Docking left, top and bottom
Define Left with “=spine.left” to positioning the left edge of the group frame to the left edge of the Spine
Set Top and Bottom to “-2%” if you are working with a Bleed. It ensures that the group frame will always expand into the Bleed.
Define the Width with “=spine.width” to match the width of the frame group to the width of the Spine.
As a result the frame will be placed at the Spine and will change it’s width with the Spine.
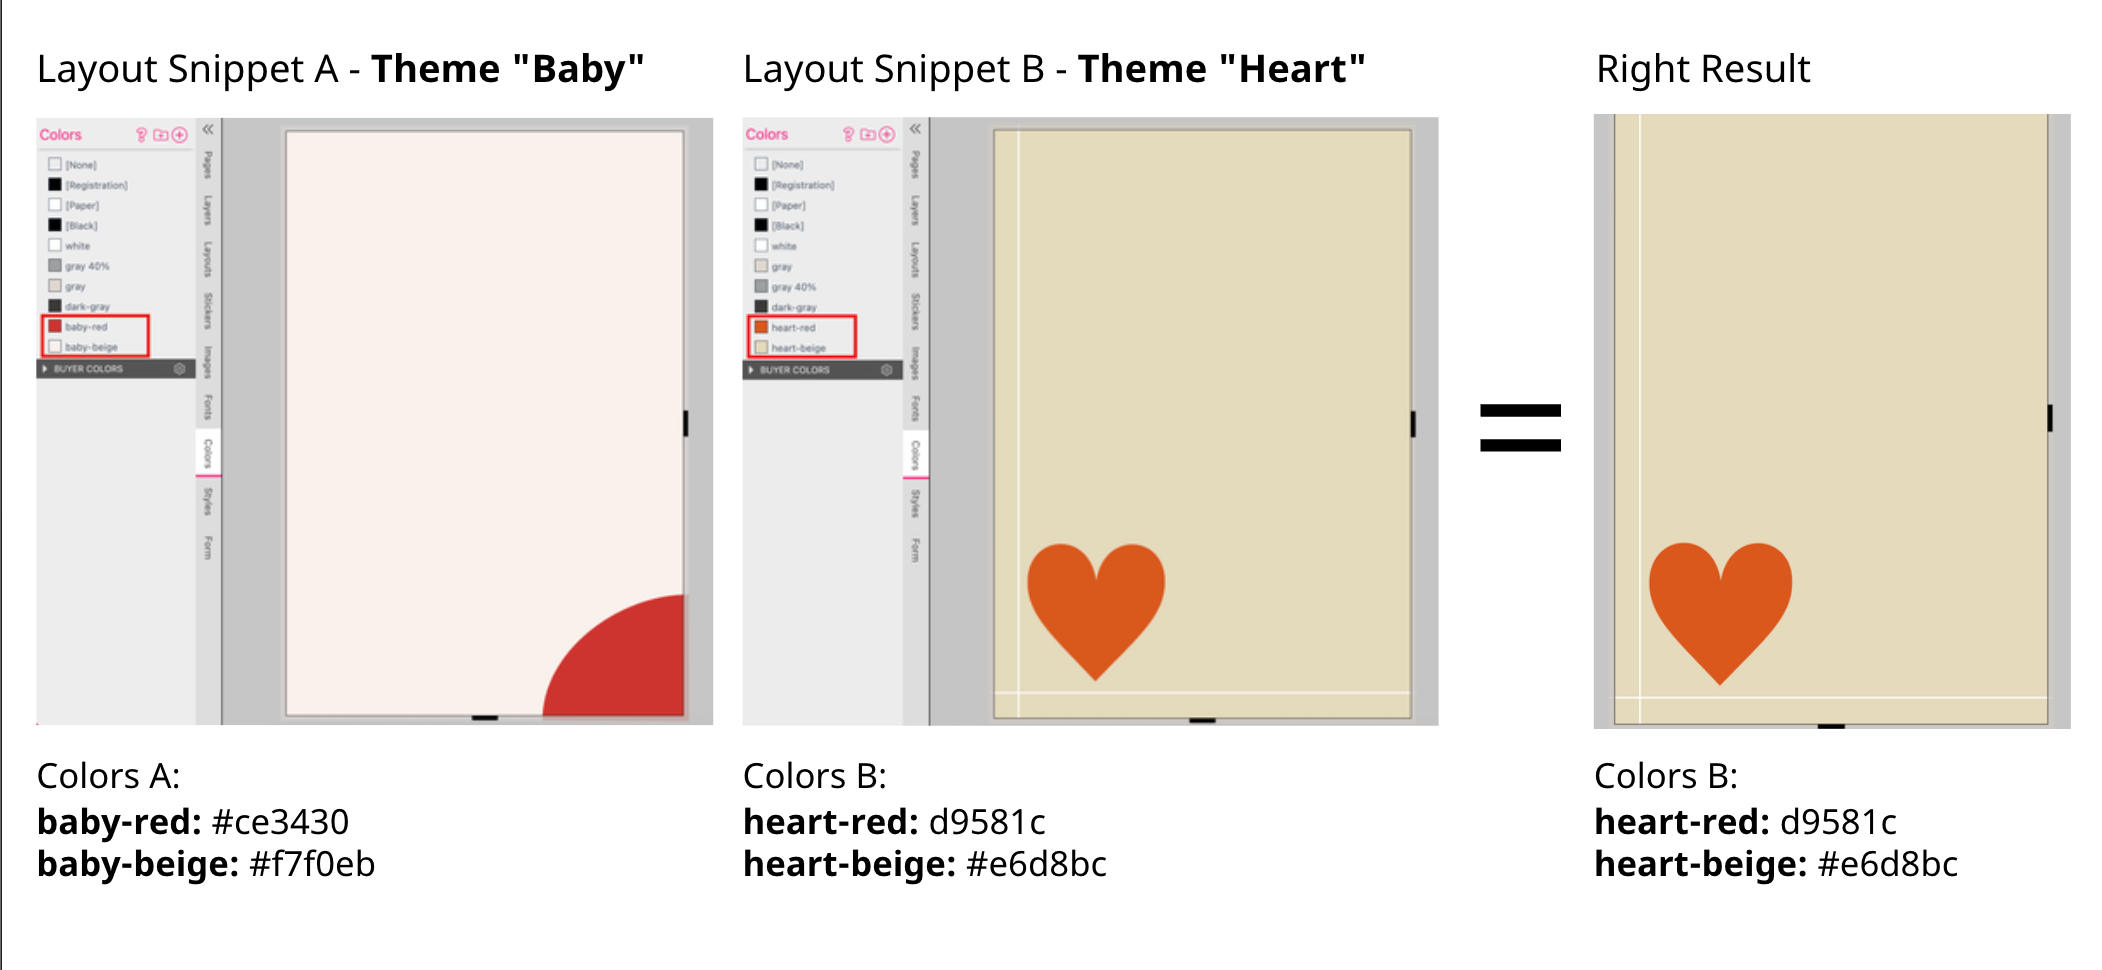
Do NOT use the same color name with different color values in the different Layout Snippets of your different Themes. If the Buyer places another Layout Snippet the color value will not be updated! So the new Layout Snippet will use the old color values - of the previous Layout Snippet - for colors with the same name.
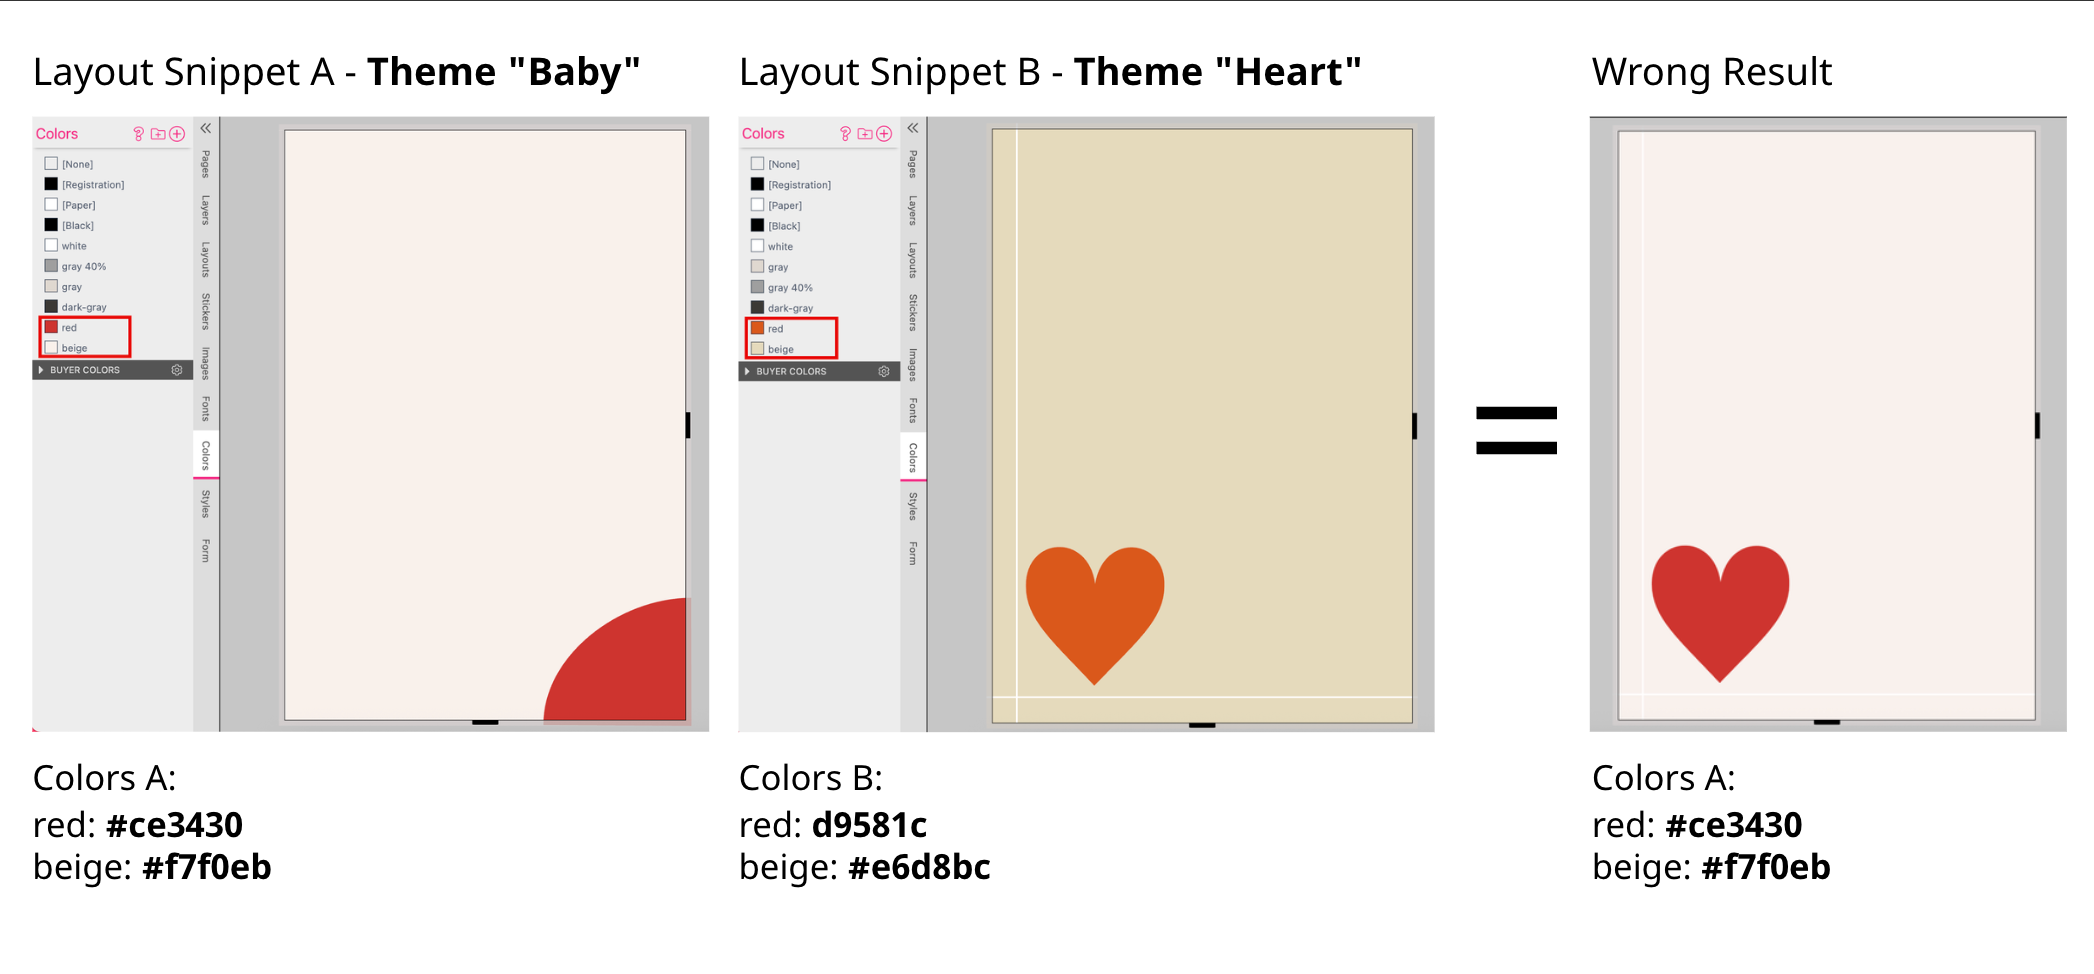
Especially when you are using generic color names like “background” you will mix up the color values. So you have to use unique color names in your Layout Libraries.
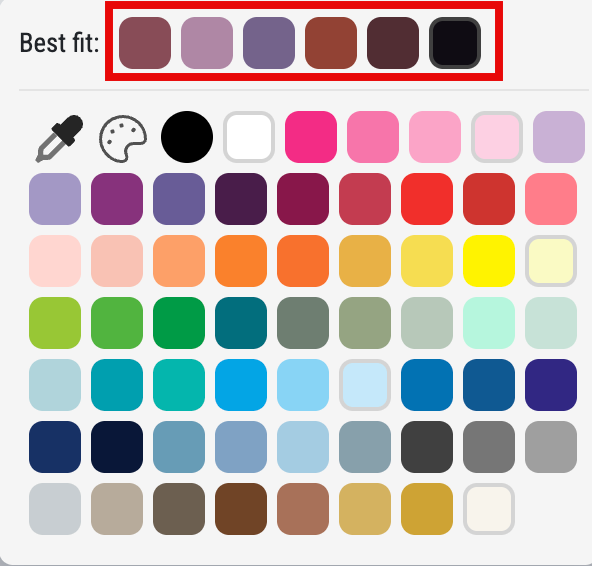
If you offer the Buyer a Color Selection in the Magic Photobook not only the color palette will be displayed but also a “Best Fit”. These are colors that the AI has extracted from the images on the currently displayed page.