Additionally to the required standard attach parameters token and templateName, there are other parameters that can change the the behavior and look of your template from within your online store. With a few exceptions (e.g. the theme parameter) these are working with the classic iFrame-Ui as well as with the Panel- Ui.
You can find an extensive and always up-to-date list in our Javascript/Typescript API, by searching for interface printessAttachParameters.
The described parameters are just additional properties that are added to your attach parameter object alongside the templateName and token parameters.
Panel-Ui:
const printessLoader = await import("https://editor.printess.com/printess-editor/loader.js");

const printessApi = await printessLoader.load({
    token: "[your-shop-token]",
    templateName: "Baby Photo Book",
    templateVersion: "published",
    formFields: [],
    formFieldProperties: [],
    translationKey: "en",
    basketId: "Some-Unique-Basket-Or-Session-Id"
    addToBasketCallback: (saveToken, thumbnailUrl) =>
    {
        prompt("Savetoken:", saveToken)
    }
});
Printess will automatically detect the browser language of your users and translate labels and hints by default. Your localisation can be controlled through attach parameters as well, should you choose to overwrite the options that Printess provides you or ignore your users’ browser language and take more direct control of i18n.
const printessApi = await printessLoader.load({
    token: "[your-shop-token]",
    templateName: "Baby Photo Book",
    templateVersion: "published",
    basketId: "Some-Unique-Basket-Or-Session-Id",
    addToBasketCallback: (saveToken, thumbnailUrl) =>
    {
        prompt("Savetoken:", saveToken)
    },
    translationKey: "en"
});
You can set a translation key. It sets a fixed language and removes the setting to use the browser language.
const printessApi = await printessLoader.load({
    token: "[your-shop-token]",
    templateName: "Baby Photo Book",
    templateVersion: "published",
    basketId: "Some-Unique-Basket-Or-Session-Id",
    addToBasketCallback: (saveToken, thumbnailUrl) =>
    {
        prompt("Savetoken:", saveToken)
    },
    translationKey: "en",
    translations: {
    "custom": {
        "name": "Your Name" // you can also access this translation in documents with ${gl("custom.name")}
    }
    }
});
You can specify your own translations object to overwrite Printess standard localisations, enriching your account wide translation table with template specific entries.
To load a specific theme you need to set the theme name like you defined it in the Theme Editor.
const printessApi = await printessLoader.load({
    token: "[your-shop-token]",
    templateName: "Baby Photo Book",
    templateVersion: "published",
    basketId: "Some-Unique-Basket-Or-Session-Id",
    addToBasketCallback: (saveToken, thumbnailUrl) =>
    {
        prompt("Savetoken:", saveToken)
    },
    theme: "theme-name"
});
Using the “formFields” property, it is possible to preselect one or more specific form field values. This is the way to go if you want to prefill form fields with data you collected before loading the editor. The names must match names you have set in your Printess template.
formFields: [
    {
        name: "color",
        value: "Marine Blue"
    },
    {
        name: "DOCUMENT_SIZE",
        value: "21.0x29.7"
    }
]
This example will prefill a form field called color with the value Marine Blue and a form field called DOCUMENT_SIZE with the value “21.0x29.7”.
Live example of setting form field values through attach parametersA common use of this is setting the document size on load, for templates that support a size-changing form field: just set the corresponding form field (here called DOCUMENT_SIZE) to a size in whatever unit your template uses.
<script type="module">
 const printessLoader = await import("https://editor.printess.com/printess-editor/loader.js");
 const printessApi = await printessLoader.load({
   token: "[your-shop-token]",
   translationKey: "en",
   templateName: "Custom Size",
   templateVersion: "published",
   basketId: "Some-Unique-Basket-Or-Session-Id",
   addToBasketCallback: (saveToken, thumbnailUrl) =>
     {
       prompt("Savetoken:", saveToken)
     },

   formFields: [
     /* To set the document size on load,
        just make sure your template supports
        size-change and set the corresponding
        form field to any size in the unit of the
        template. In our example "cm".
        The "Custom Size" template used her,
        can found in the "Design Tutorials"
        when you select "New" in the open dialog.
     */
     {
       name: "DOCUMENT_SIZE",
       value: "13x13"
     }
   ]
 })
</script>
If you create a template with a varying number of pages and give the user the ability to add or subtract pages, Printess will automatically create a hidden form field called “PAGE_COUNT”.
You can set “PAGE_COUNT” to an initial value with the attach parameter bookInsidePages: number.
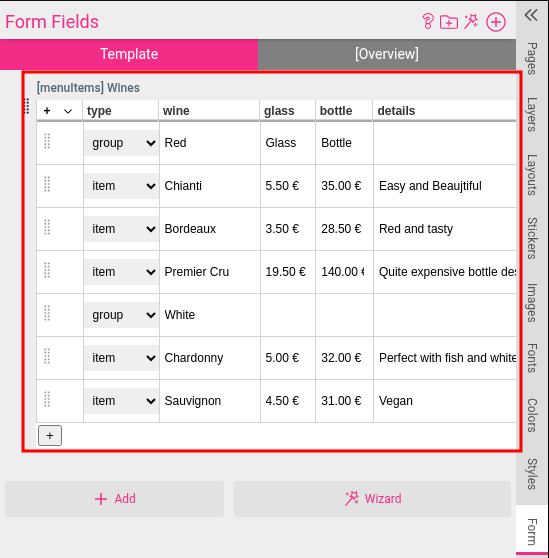
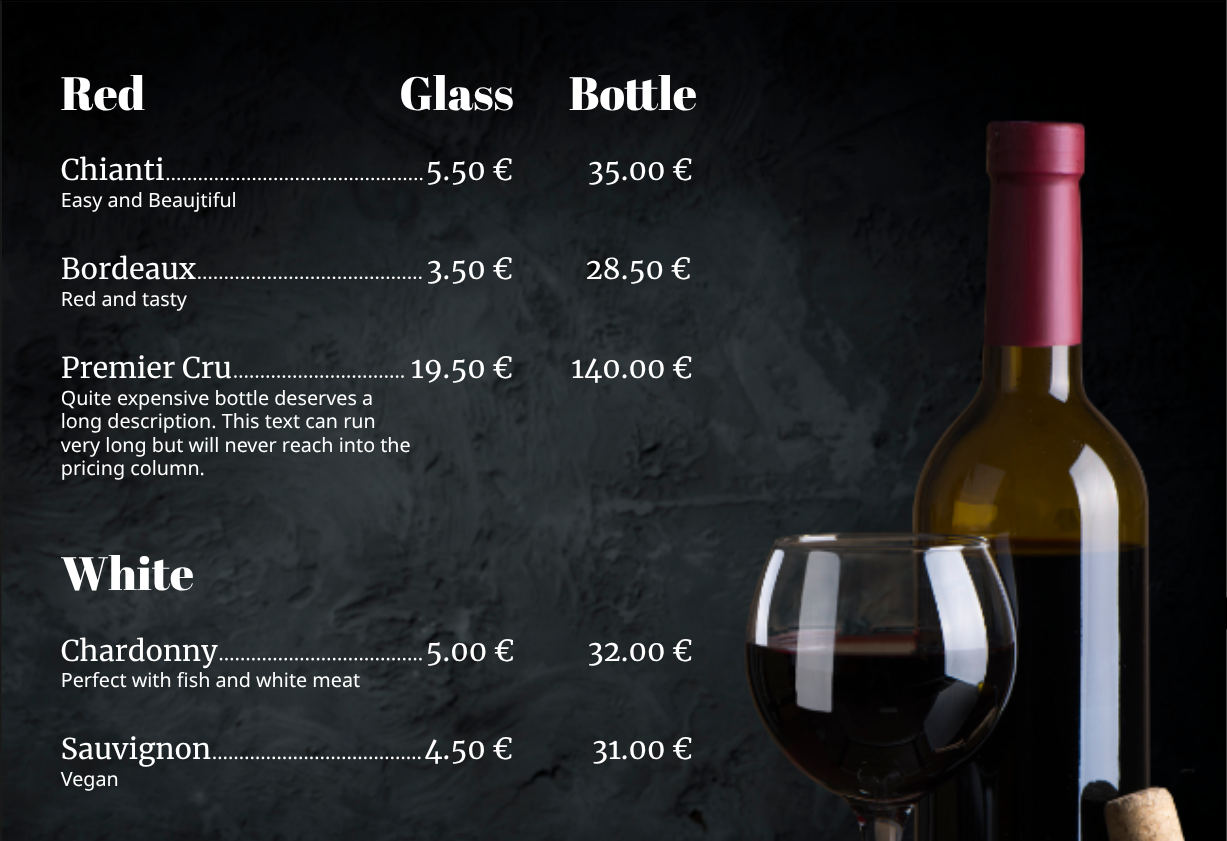
A more complex example for setting form field values is the prefilling of table values. For that, a string containing a serialized json representation of row values is provided. As an example, the wine menu from the editor example templates is used. Each row in the table represents one line in the vine menu. The type column decides if it is a headline (group) or a wine entry (item). Then there is a price display for 2 different sizes (glass / bottle) and a short wine description (details).
Screenshot of the original table configuration:
The following script will replace the original table entries Chianty, Bordeux, Premier Cru, Chardonny, Sauvignon with Cabernet Sauvignon, Merlot, Pinot Noir, Chardonnay, Sauvignon Blanc and Gewürztraminer. For better readability, the table contents are split up in one item per row instead of one big array containing everything and put together to one array at the end.
    //Red wine headline
    const groupRedWine = {
        "type": "group",
        "wine": "Red",
        "glass": "Glass",
        "bottle": "Bottle",
        "details": ""
    };

    //White wine headline
    const groupWhiteWine = {
        "type": "group",
        "wine": "White",
        "glass": "",
        "bottle": "",
        "details": ""
    };

    //Red wine entry
    const redWine1 = {
        "type": "item",
        "wine": "Cabernet Sauvignon",
        "glass": "5.50€",
        "bottle": "35.00",
        "details": "Very meaty with fruit flavors"
    };

    //Red wine entry
    const redWine2 = {
        "type": "item",
        "wine": "Merlot",
        "glass": "3.50",
        "bottle": "28.50",
        "details": "Well rounded, medium bodied"
    };

    //Red wine entry
    const redWine3 = {
        "type": "item",
        "wine": "Pinot Noir",
        "glass": "4.00",
        "bottle": "29.00",
        "details": "Juicy fruit flavours"
    };

    //White wine entry
    const whiteWine1 = {
        "type": "item",
        "wine": "Chardonnay",
        "glass": "5.00",
        "bottle": "35.00",
        "details": "Fruity palate and versatility"
    };

    //White wine entry
    const whiteWine2 = {
        "type": "item",
        "wine": "Sauvignon Blanc",
        "glass": "4.50",
        "bottle": "33.00",
        "details": "Aromatic pale yellow and dry"
    };

    //White wine entry
    const whiteWine3 = {
        "type": "item",
        "wine": "Gewürztraminer",
        "glass": "3.50",
        "bottle": "30.0",
        "details": "Full of character"
    };

    //Putting all table rows together in one array
    const tableRows = [
        groupRedWine,
        redWine1,
        redWine2,
        redWine3,
        groupWhiteWine,
        whiteWine1,
        whiteWine2,
        whiteWine3
    ];

    //Example for Panel- Ui, but will work the same way in iFrame- Ui
    const printessLoader = await import("https://editor.printess.com/v/nightly/printess-editor/loader.js");

    const printessApi = await printessLoader.load({
        token: "[your-shop-token]",
        templateName: "KB-Table-Formfield-Values",
        templateVersion: "published",
        formFields: [
            {
                name: "menuItems",
                value: JSON.stringify(tableRows)   //tables must be serialized json arrays
            }
        ]
    });
Demo: Printess - Table form field values
It is possible to change the complete configuration of one or more form fields. This can be done with the formFieldProperties attach parameter. This is an array containing all the form field definitions / properties that should be changed. The definition for one form field is:
{
    name: string,                       //The form field name
    regExp?: string,                    //A js regex for form field validation
    regExpMessage?: string,             //The validation message in case the validation fails
    info?: string,                      //The form field info text
    maxChars?: number,                  //The maximum number of characters this form field should take
    priceDisplay?: number,              //The price per letter
    pricePrefix?: string,               //A prefix that is displayed in front of the per letter pricing display
    pricePostfix?: string,              //A postfix that is displayed after the per letter pricing display
    hasPerLetterPricing?: boolean,      //The number of used letters is used for pricing.
    isMandatory?: boolean,              //This form field is mandatory and the user has to change its value
    clearOnFocus?: boolean,             //The form field value is cleared after receiving the input focus
    caption?: string,                   //Change the displayed form field label
    priceRelevant?: boolean,            //Mark the form field as price relevant (requires special permissions)
    visibility?: "admin" | "buyer" | "condition",
    condition?: string,                 //The visibility condition
    classNames?: string,
    addNew?: "text" | "label",          //Create the form field as a new text or label form field if it does not exist yet
    list?: formFieldListEntry[]         //In case of list form fields, the list entries
};
In case of list form fields, the definition for one list entry looks like this:
type formFieldListEntry = {
  key: string,          //The list entry key (value)
  label?: string,       //The display label
  description?: string, //A short description about this entry
  imageId?: string,     //The image id in case of image list
  tag?: string,         //The tag used for price categories
  meta1?: string,       //Additional free to use property
  meta2?: string,       //Additional free to use property
  meta3?: string,       //Additional free to use property
  meta4?: string,       //Additional free to use property
  disabled?: boolean    //If set to true, this entry is shown greyed out and cannot be selected
}
Inside the list form field configuration these properties are displayed as columns inside the list entry table:

To change the label of a form field named “Fruits” from Fruits to Vegetables the formFieldProperties parameters needs to be configured like this:
formFieldProperties: [
    {
        name: "Fruits",
        caption: "Vegetables"
    }
]
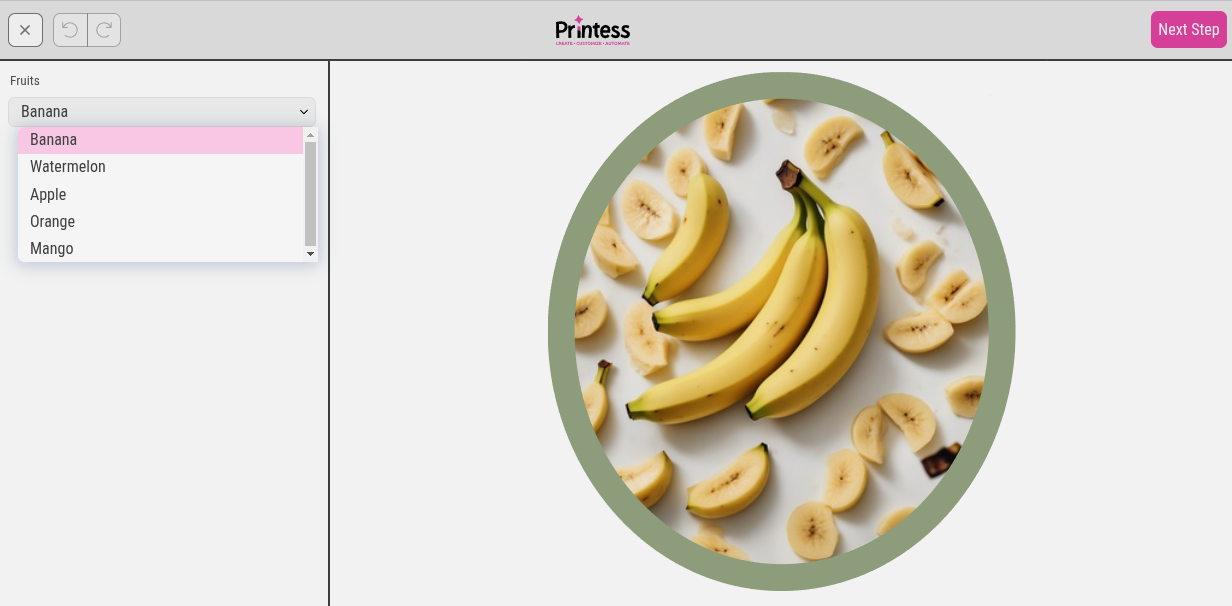
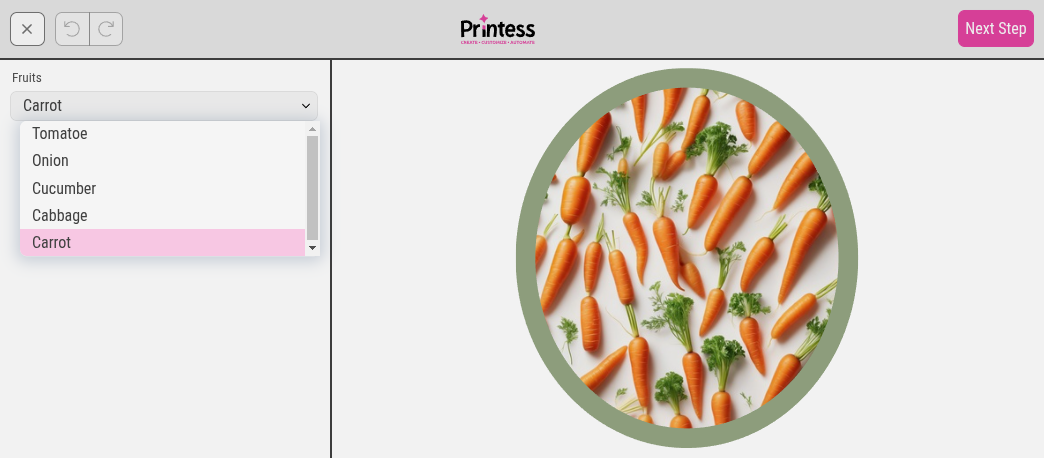
The following example demonstrates how to set a form field value called “Text” from Fruits to Vegetables and changes the list entries from fruit types to vegetable types.
The original template:
The list entries after the changed values:
<script type="module">
    //Example for Panel- Ui, but will work the same way in iFrame- Ui
    const printessLoader = await import("https://editor.printess.com/v/nightly/printess-editor/loader.js");

    const printessApi = await printessLoader.load({
        token: "[your-shop-token]",
        templateName: "KB-List-Formfield-Entries",
        templateVersion: "published",
        formFields: [
            {
                name: "Text",
                value: "Vegetable"
            },
            {
                name: "fruits",
                value: "Carrot"
            }
        ],
        formFieldProperties: [
        {
            name: "fruits",
            list: [
                {
                    key: "Tomatoe",
                    label: "Tomatoe"
                },
                {
                    key: "Onion",
                    label: "Onion"
                },
                {
                    key: "Cucumber",
                    label: "Cucumber"
                },
                {
                    key: "Cabbage",
                    label: "Cabbage"
                },
                {
                    key: "Carrot",
                    label: "Carrot"
                }
            ]
        }
        ]
    });
</script>
Demo: Printess - Change form field list entries
Please note, the images used in this example must be already available inside the template. The Images based on the selected list value are selected by hardcoded styles.
formFieldProperties isn’t limited to changing form fields that already exist in the template - setting addNew: "text" | "label" for an entry whose name doesn’t yet exist creates it as a new text or label form field instead. This is useful for injecting a one-off field you need for a specific integration (for example a hidden note or a computed label) without having to add it to every template in the Editor first.
formFieldProperties: [
    {
        name: "newLabel",
        addNew: "label",
        caption: "New label added via API"
    }
]
<script type="module">
  const printessLoader = await import("https://editor.printess.com/printess-editor/loader.js");
  const printessApi = await printessLoader.load({
    token: "[your-shop-token]",
    translationKey: "en",
    templateName: "add-label-via-api",
    templateVersion: "published",
    basketId: "Some-Unique-Basket-Or-Session-Id",
    addToBasketCallback: (saveToken, thumbnailUrl) => {
      prompt("Savetoken:", saveToken)
    },
    formFields: [],
    formFieldProperties: [
      {
        name: "newLabel",
        addNew: "label",
        caption: "New label added via API"
      }
    ]
  })
</script>
You can merge specific designs into your base template through Attach Parameters, in order to display a pre-configured product based on prior inputs of the user, similar to pre-filling form fields.
In order to achieve this, you need the attach parameter mergeTemplates, which accepts an array of objects, where each object is the configuration of a source template and how to apply it to the template that’s currently displayed.
As you can see in our example Codepen and the code block below, you can either merge resources by specifying their templateName and documentName or, in the case of Snippets, their Snippet ID. Layout Snippets can be found in the Account Portal, find out more about that here.
You can specify multiple objects in the array and the merges will be performed sequentially. Having too many merge operations in one template will come at a computational cost and may slow down the loading process, so you should not go overboard with them.
const printessApi = await printessLoader.load({
    token: "[your-shop-token]",
    templateName: "card_Master",
    templateVersion: "published",
    // Template merging
    mergeTemplates: [
        {
            "templateName": "card_Cake",
            "documentName": "Cake", // optional, source-document used for merging. If not supplied Primary or first Document is used.
            "templateVersion": "published", // Can be draft or published (default) depending on which version of the document should be used
            // spreadIndex: 0; // optional, specify where in the **target** document the resource should be applied
            // mergeMode: "merge" // other options: "layout-snippet-no-repeat" | "layout-snippet-repeat-all" | "layout-snippet-repeat-inside"
        },
        {
            "templateName": "sid~34997b3a82c9cfbb8e300a12c7790427ee9a02d5~gid",
            // ^ In this case we merge a Snippet by its ID, which you can find in the Account Portal
            "spreadIndex": 1,
            "mergeMode": "layout-snippet-no-repeat",
      },
    ],
});
Specifying the spreadIndex is vital if you want to merge multiple templates sequentially, which you can see in the example above. Setting spreadIndex to 0 or unsetting it will lead to the layout snippet being merged at the same spread as the card, rendering it invisible underneath.
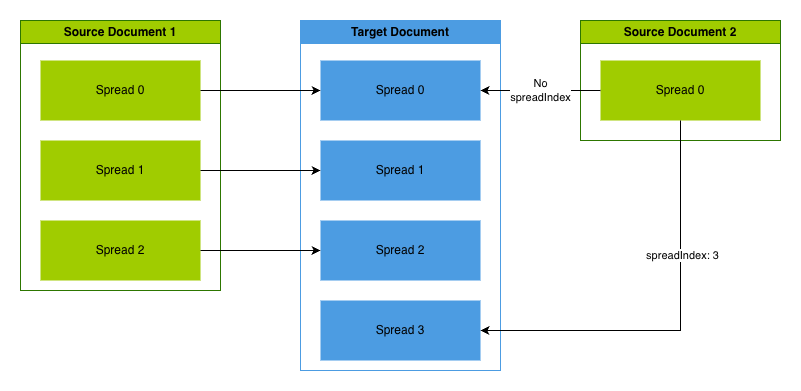
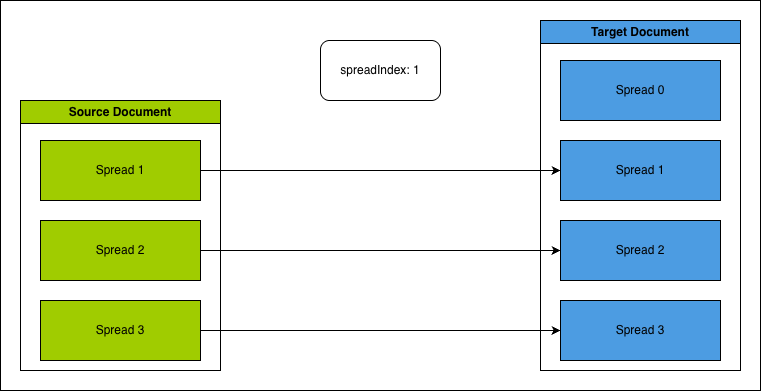
The spreadIndex functions as a starting point of your merge: starting from the specified spread, the following spreads will be filled until there are none left in either the source or the target.
Here you can see how spreadIndex works:
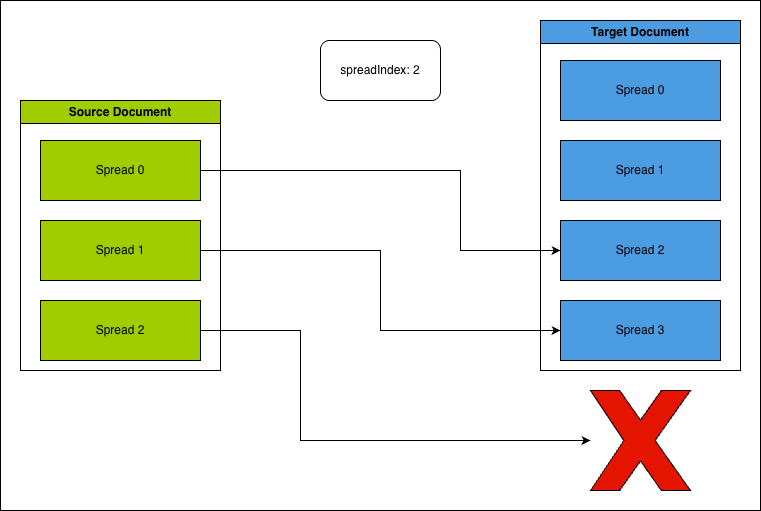
Note that if your merge target does not have enough spreads to accommodate all your source spreads, the overflowing spreads will be discarded.
Printess provides you with the possibility of listening to certain events through callbacks, which you can specify as attach parameters as well.
You can find all callbacks in the Javascript/Typescript API, by searching for interface printessCallbacks.
Live example of listening to the Form Field Changed callback
Here are the most important callbacks, which you will need in most of your integrations:
<body>
  <!-- While the fullscreen editor is open, Printess automatically hides all direct body children WITHOUT the class "printess-owned" and shows them again when it closes. -->
  <!-- Give the class "printess-owned" to elements that should stay visible alongside the editor. -->
  <!-- This way the Editor and surrounding HTML elements won't have to fight through z-indeces or other ugly methods. -->
  <div>
    <h1> If you can read this, the Editor is hidden </h1>
    <button> Show Editor </button>
  </div>
</body>
<script type="module">
    const printessLoader = await import("https://editor.printess.com/printess-editor/loader.js");

    let savedState = "";

    const onBack = (saveToken, thumbnailUrl) => {
        alert(`Backing up! \nSave Token: \n${saveToken} \nThumbnail \n${thumbnailUrl}`);
        savedState = saveToken;
        if(printessApi) {
            printessApi.ui.hide();
        }
    }

    const onBasket = (saveToken, thumbnailUrl) => {
        alert(`Cast it in the Basket! \nSave Token: \n${saveToken} \nThumbnail \n${thumbnailUrl}`);

        try {
            // Call your backend to send the saveToken to production and close the editor
            ui?.hide()
        } catch (err) {
            alert(err.message)
        }
    }

    const printessApi = await printessLoader.load({
        token: "[your-shop-token]",
        templateName: "Printess-Basic-Callbacks",
        templateVersion: "published",
        backButtonCallback: onBack,
        addToBasketCallback: onBasket,
        saveTemplateCallback: (saveToken, type, thumbnailUrl) => {
          alert(`Better Save than sorry! \nSave Token: \n${saveToken} \nThumbnail \n${thumbnailUrl}\nType \n${type}`);
          savedState = saveToken;
        },
        loadTemplateButtonCallback: () => {
          alert("Fear and Loading in Las Vegas");
          loadSavedState();
        },
    });

    const showButton = document.querySelector("button");
    showButton.addEventListener("click", () => {
        printessApi.api.load(savedState);
        printessApi.ui.show();
    })

    const loadSavedState = () => {
        if (!savedState) {
            alert("Nothing to load...");
            return;
        }
        printessApi.api.load(savedState);
    }
</script>
loadYou can play with these foundational Callbacks in our Basic Callbacks Codepen
All basic Callbacks utilise SaveTokens - Printess SaveTokens are only stored for 30 days by default.
This callback is fired when the user clicks on the Back button. It carries a save-token in case you want to allow your user to continue their work later. To enable this, just pass the save-token instead of the Template name.
backButtonCallback?: (saveToken: string, thumbnailUrl: string) => void
This is fired when the user selects the Add to Basket button. It carries a save-token which you can pass to the backend API for production or pass to templateName for making changes on the saved work. The basket callback also carries a thumbnail URL for showing off the configured product in your shopping cart.
addToBasketCallback?: (saveToken: string, thumbnailUrl: string) => void
This is fired when the user clicks the Save button. It carries a save-token which you can pass to the backend API for storing. Later you can pass it as templateName for continue working on or ordering. The Save Button is only visible if you activate it under Buyer View Appearance -> Other Settings -> Show Save Button
saveTemplateCallback?: (saveToken: string, type: "save" | "close", thumbnailUrl: string) => void
Depending on your shop system, you might need to store more information than just the saveToken in order to load your saved state at a later time.
The needed information might contain things like:
This is fired when the user clicks the Load button. The Load Button is only visible if you activate it under Buyer View Appearance -> Other Settings -> Show Load Button
loadTemplateButtonCallback?: () => void
Inside this callback you could offer a user to see all of their saved states that you stored in your backend through one of the previous callbacks. They could then choose one to load from the list, which you can do by calling printessApi.api.load(chosen_save_token).
Following are some more niche Callbacks you might need in your integration. This list is not exhaustive, if you don’t find what you need, visit our Javascript/Typescript API and search for interface printessCallbacks to see all Callbacks that Printess offers.
If you’re still missing something for your integration, get in touch!
The formFieldChangedCallback will be called when a price relevant form field changes.
formFieldChangedCallback = (name: string, value: string, tag: string, label: string, ffLabel: string, disabled?: boolean, imageId?: string, meta1?: string, meta2?: string, meta3?: string, meta4?: string) => void;
The meta1 to meta4 values carry the free to use columns of the selected list entry.
The priceChangeCallback will be called when any price relevant detail of the design changes. This includes form fields, but also extends to other details.
priceChangeCallback = (infos: iExternalProductPriceInfo) => void
In case an error occurs, the errorCallback will be called, this way you can catch any issues, log them and/or give users a good looking message. If you encounter a reoccurring error and think it might be an issue with Printess itself, any logging on your side can also help us in routing it out.
errorCallback?: ((errorName: ErrorName, data?: Record<string, string>) => void) | undefined
In the example below we force an error to happen by trying to load a non-existent template:
Adding custom error handlingYou can replace icons in the Panel UI by using the Theme Manager. It is a much cleaner approach and we recommend using it over the attach parameters.
Using the icons attach parameter, it is possible to “overwrite” the standard icons used on UI elements like the “Close” button that will bring you back to the shop. The new icons must be available in SVG format. SVG is a XML based vectorgraphic format. It is possible to view the contents of SVG files using any text editor. The icons parameter expects a JSON object that contains the icon name as property name and the textual content of the svg file as string value. An example for the close button that is shown to cancel the editing and brings you back to the shop:
<svg xmlns="http://www.w3.org/2000/svg" viewBox="0 0 320 512"><path fill="#FF0000" d="M193.94 256L296.5 153.44l21.15-21.15c3.12-3.12 3.12-8.19 0-11.31l-22.63-22.63c-3.12-3.12-8.19-3.12-11.31 0L160 222.06 36.29 98.34c-3.12-3.12-8.19-3.12-11.31 0L2.34 120.97c-3.12 3.12-3.12 8.19 0 11.31L126.06 256 2.34 379.71c-3.12 3.12-3.12 8.19 0 11.31l22.63 22.63c3.12 3.12 8.19 3.12 11.31 0L160 289.94 262.56 392.5l21.15 21.15c3.12 3.12 8.19 3.12 11.31 0l22.63-22.63c3.12-3.12 3.12-8.19 0-11.31L193.94 256z"></path></svg>
The close icon can now be set via the icons parameter. The property name equals the icon name inside the Printess Editor. See Icon List.
"icons": {
    "close": "<svg  xmlns=\"http://www.w3.org/2000/svg\" viewBox=\"0 0 320 512\"><path fill=\"#FF0000\"  d=\"M193.94 256L296.5 153.44l21.15-21.15c3.12-3.12 3.12-8.19 0-11.31l-22.63-22.63c-3.12-3.12-8.19-3.12-11.31 0L160 222.06 36.29 98.34c-3.12-3.12-8.19-3.12-11.31 0L2.34 120.97c-3.12 3.12-3.12 8.19 0 11.31L126.06 256 2.34 379.71c-3.12 3.12-3.12 8.19 0 11.31l22.63 22.63c3.12 3.12 8.19 3.12 11.31 0L160 289.94 262.56 392.5l21.15 21.15c3.12 3.12 8.19 3.12 11.31 0l22.63-22.63c3.12-3.12 3.12-8.19 0-11.31L193.94 256z\"></path></svg>"
}
As seen above, the icon needs to be provide as string value. Make sure that the apostrophes " inside the svg are escaped " to ensure json string compatibility and prevent proken javascript code.
To automatically use the editors color scheme instead of providing a different colored svg for each theme, the color values inside the svg can be replaced with currentColor in your json. The editor will automatically replace currentColor with the themes configured color. In the example above, the red color is provided inside the paths fill property. By replacing the html color hash #FF0000 with currentColor everything is set to automatically change the icons color automatically.
If you have created an AI Auth token for granular and authorized control over AI usage, you can use that token as an attach parameter to actually enforce your control.
To do this, you need to use the attach parameter aiAuthToken:
"aiAuthToken": "YOUR_GENERATED_TOKEN"
You can add custom buttons into the Printess editor using the attach parameter buttons, an array of iExternalButton.
The structure of one such button looks like this:
iExternalButton: {
    clickCallback: (() => any);
    color: "primary" | "secondary";
    hint?: string;                  // Tooltip shown on the button
    icon?: iconName;
    iconSize?: "small" | "large";   // Only takes effect if no label is set, default is "large"
    label: string;
    location: "button-bar" | "image-upload" | "only-image-upload";
    outline: "solid" | "outline";
    where?: "desktop" | "mobile";   // Restrict where the button is shown, default is everywhere
}
As you can see, you can specify a callback, styles according to your theme and also the location of the button.
The location only-image-upload hides all other upload buttons.
If you have a Printess Make product and want your customers to skip the setup questions - maybe they already gave you the answers earlier in your process - you can do this easily by using the makeData?: iMakeData parameter.
The iMakeData interface contains information that would normally be requested through the setup questions:
export interface iMakeData {
  businessName: string,
  businessType: string,
  valueProposition: string,
  language: string,
  logoUrl: string,
  email: string,
  website: string,
  tel: string,
  addressLine1: string,
  addressLine2: string,
  addressLine3: string,
}
If you need a higher resolution thumbnail for an item in the shopping cart, you can change the maximum size with the attach parameters basketThumbnailMaxHeight: number and basketThumbnailMaxWidth: number.
They both default to 400 and take a number up to 1000.
You can adjust the settings of your Photobook on initial load through the bookSettings attach parameter.
It works the same way as the adjustBook() API method documented in the Use Cases chapter.
Don’t confuse this with the theme attach parameter described under Themes above - that one controls the look of the Panel-UI itself. A Photobook Theme is a pre-designed set of page layouts for a Magic Photobook, configured in the Account Portal.
Magic Photobooks automatically create a hidden form field called PHOTOBOOK_THEME to hold the currently selected Photobook Theme. You can preselect one on load the same way you would any other form field, using the formFields attach parameter - just set its value to the theme’s name as defined in the Account Portal.
formFields: [
    {
        name: "PHOTOBOOK_THEME",
        value: "berlin"
    }
]
<script type="module">
  const printessLoader = await import("https://editor.printess.com/printess-editor/loader.js");
  const printess = await printessLoader.load({
    token: "[your-shop-token]",
    templateName: "Magic Photobook",
    templateVersion: "published",
    basketId: "Some-Unique-Basket-Or-Session-Id",
    addToBasketCallback: (saveToken, thumbnailUrl) => {
      prompt("Savetoken:", saveToken)
    },
    formFields: [
      {
        name: "PHOTOBOOK_THEME",
        value: "berlin"
      }
    ]
  })
</script>
You can generate a template programmatically using the importJSON attach parameter.
It accepts a JSON in our intermediary design format, in which you can specify template settings, document settings and define the spreads and frames that make your design.
Example template from JSON for a mother's day cardYou can even use AI to build a template JSON for you, using our Layout skill:
Printess Layout Skill{
"unit": "mm",
"colors": [
{
"groupName": "Brand",
"name": "primary",
"color": "#e8a0b4"
},
{
"groupName": "Brand",
"name": "secondary",
"color": "#fff0f5"
},
{
"groupName": "Brand",
"name": "accent",
"color": "#c0397a"
},
{
"groupName": "Brand",
"name": "ink",
"color": "#5a2a3f"
},
{
"groupName": "Brand",
"name": "white",
"color": "#ffffff"
}
],
"fonts": [
{
"id": "font-parisienne",
"url": "https://cdn.jsdelivr.net/fontsource/fonts/parisienne@latest/latin-400-normal.ttf",
"groupName": "Script"
},
{
"id": "font-cormorant",
"url": "https://cdn.jsdelivr.net/fontsource/fonts/cormorant-garamond@latest/latin-400-normal.ttf",
"groupName": "Serif"
},
{
"id": "font-cormorant-italic",
"url": "https://cdn.jsdelivr.net/fontsource/fonts/cormorant-garamond@latest/latin-400-italic.ttf",
"groupName": "Serif"
}
],
"images": [
{
"id": "ai-floral-corner-tl",
"name": "Floral Corner Top Left",
"url": "https://printess-prod.s3.eu-central-1.amazonaws.com/uploads/fc8b773be98ee6d58ffebd9d955a55252ddc9a0a/images/ff7b4abce2ec7d8fecb7cf70a14fd2a46f22ae08.png"
},
{
"id": "ai-floral-corner-br",
"name": "Floral Corner Bottom Right",
"url": "https://printess-prod.s3.eu-central-1.amazonaws.com/uploads/fc8b773be98ee6d58ffebd9d955a55252ddc9a0a/images/db4aa0caedacb4ee223ad13b51f99cc3c4282bac.png"
},
{
"id": "ai-floral-sprig",
"name": "Small Floral Sprig",
"url": "https://printess-prod.s3.eu-central-1.amazonaws.com/uploads/fc8b773be98ee6d58ffebd9d955a55252ddc9a0a/images/51e58c2efac8cead545c7ab84ada7c208a02cf67.png"
}
],
"simpleStories": [
{
"id": "story-caption",
"paragraphTextAndstyles": [
{
"text": "For the one whose love bloomed our every season — thank you for being our sunlight, our shelter, and our home.",
"paragraphStyle": {
"horizontalTextAlign": "center",
"lineHeight": "140%"
},
"textStyle": {
"fontId": "font-cormorant-italic",
"fontSize": "11pt",
"fontColor": "ink"
}
}
]
},
{
"id": "story-date",
"paragraphTextAndstyles": [
{
"text": "Mother's Day · with all our hearts",
"paragraphStyle": {
"horizontalTextAlign": "center",
"lineHeight": "120%"
},
"textStyle": {
"fontId": "font-cormorant",
"fontSize": "9pt",
"fontColor": "accent",
"tracking": 200
}
}
]
}
],
"documents": [
{
"name": "Mother's Day Facing Page",
"pageWidth": 420,
"pageHeight": 210,
"hasFacingPages": false,
"isEditable": true,
"bleed": {
"inside": 3,
"outside": 3,
"top": 3,
"bottom": 3,
"showBleed": true
},
"margin": {
"inside": 12,
"outside": 12,
"top": 12,
"bottom": 12
},
"backgroundColor": {
"groupName": "Brand",
"color": "secondary",
"name": "secondary"
},
"spreads": [
{
"label": "Spread",
"frames": [
{
"id": "PFF9FD7eST4dBSdEcTz1p",
"left": -3,
"top": -3,
"width": 426,
"height": 216,
"shape": {
"shape": "Rectangle",
"closed": true,
"fillColor": "secondary"
}
},
{
"id": "PFQeDeO9xP3Jsmp5Sj08P",
"left": -7,
"top": 0,
"width": 90,
"height": 80,
"image": {
"id": "ai-floral-corner-br",
"placement": "fit",
"alignment": "top-left",
"allowEdit": false
},
"rotation": {
"anchor": "cm",
"degree": 180
},
"effects": {
"opacity": 0.95
}
},
{
"id": "PmVeTkH41gVopVXSSTfoB",
"left": 331,
"top": 10,
"width": 92,
"height": 80,
"image": {
"id": "ai-floral-corner-br",
"placement": "fit",
"alignment": "top-right",
"allowEdit": false
},
"rotation": {
"anchor": "cm",
"degree": 270
},
"effects": {
"opacity": 0.9
}
},
{
"id": "P4Bcqp36SbrnRYD1w0QP9",
"left": -5,
"top": 134,
"width": 92,
"height": 80,
"image": {
"id": "ai-floral-corner-br",
"placement": "fit",
"alignment": "bottom-left",
"allowEdit": false
},
"rotation": {
"anchor": "cm",
"degree": 90
},
"effects": {
"opacity": 0.9
}
},
{
"id": "Prcu14C0tuOLIgEmMzogE",
"left": 327,
"top": 128,
"width": 92,
"height": 80,
"image": {
"id": "ai-floral-corner-br",
"placement": "fit",
"alignment": "bottom-right",
"allowEdit": false
},
"effects": {
"opacity": 0.95
}
},
{
"id": "PoLrNGcHM7iYA2uk3F94t",
"left": 200,
"top": 96,
"width": 20,
"height": 18,
"image": {
"id": "ai-floral-sprig",
"placement": "fit",
"alignment": "middle-center",
"allowEdit": false
},
"effects": {
"opacity": 0.85
}
},
{
"id": "PbiXAc1GISdsZnFWNatXl",
"left": 60,
"top": 14,
"width": 300,
"height": 38,
"text": {
"fontId": "font-parisienne",
"text": "With Love",
"maxFontSize": "60pt",
"fillColor": "accent",
"minLetterSpacing": 100,
"maxLetterSpacing": 110,
"verticalSimpleTextAlign": "center",
"horizontalSimpleTextAlign": "center",
"allowEdit": true
}
},
{
"id": "PkCVZSg9JdqKGt9UBfrhV",
"left": 14,
"top": 58,
"width": 188,
"height": 132,
"image": {
"id": "placeholder",
"placement": "fill",
"alignment": "middle-center",
"allowEdit": true
},
"shape": {
"shape": "Rectangle",
"closed": true,
"fillColor": "primary",
"strokeColor": "primary",
"strokeWidth": "0.5mm",
"strokeAlign": "outside"
}
},
{
"id": "PSa9Uca18mcfhWc2q6qZG",
"left": 218,
"top": 58,
"width": 88,
"height": 88,
"image": {
"id": "placeholder",
"placement": "fill",
"alignment": "middle-center",
"allowEdit": true
},
"shape": {
"shape": "Circle",
"closed": true,
"fillColor": "primary",
"strokeColor": "primary",
"strokeWidth": "0.5mm",
"strokeAlign": "outside"
}
},
{
"id": "PobUfWKtvdZ7bVkPRUs3e",
"left": 314,
"top": 58,
"width": 92,
"height": 60,
"image": {
"id": "placeholder",
"placement": "fill",
"alignment": "middle-center",
"allowEdit": true
},
"shape": {
"shape": "Rectangle",
"closed": true,
"fillColor": "primary",
"strokeColor": "primary",
"strokeWidth": "0.5mm",
"strokeAlign": "outside"
}
},
{
"id": "PoK7bx7OiT1ApjiftLbi2",
"left": 314,
"top": 124,
"width": 92,
"height": 50,
"image": {
"id": "placeholder",
"placement": "fill",
"alignment": "middle-center",
"allowEdit": true
},
"shape": {
"shape": "Rectangle",
"closed": true,
"fillColor": "primary",
"strokeColor": "primary",
"strokeWidth": "0.5mm",
"strokeAlign": "outside"
}
},
{
"id": "PjO89CD1odcXeNvlzlVPv",
"left": 218,
"top": 152,
"width": 88,
"height": 38,
"storyReference": {
"storyId": "story-caption",
"verticalTextAlign": "top",
"firstBaseline": "ascender",
"paddingLeft": 2,
"paddingRight": 2,
"paddingTop": 1,
"paddingBottom": 1,
"allowEdit": true
}
},
{
"id": "PpT820nCpIwaFYdD8rJTm",
"left": 60,
"top": 192,
"width": 300,
"height": 12,
"storyReference": {
"storyId": "story-date",
"verticalTextAlign": "center",
"firstBaseline": "ascender",
"allowEdit": true
}
}
]
}
]
}
]
}